INFOVPC deployments are an Enterprise feature. Please email sales@datafold.com to enable your account.
Create a Domain Name (optional)
You can either choose to use your domain (for example,datafold.domain.tld) or to use a Datafold managed domain (for example, yourcompany.dedicated.datafold.com).
Customer Managed Domain Name
Create a DNS A-record for the domain where Datafold will be hosted. For the DNS record, there are two options:- Public-facing: When the domain is publicly available, we will provide an SSL certificate for the endpoint.
- Internal: It is also possible to have Datafold disconnected from the internet. This would require an internal DNS (for example, AWS Route 53) record that points to the Datafold instance. It is possible to provide your own certificate for setting up the SSL connection.
Give Datafold Access to AWS
For setting up Datafold, it is required to set up a separate account within your organization where we can deploy Datafold. We’re following the best practices of AWS to allow third-party access.Create a separate AWS account for Datafold
First, create a new account for Datafold. Go to My Organization to add an account: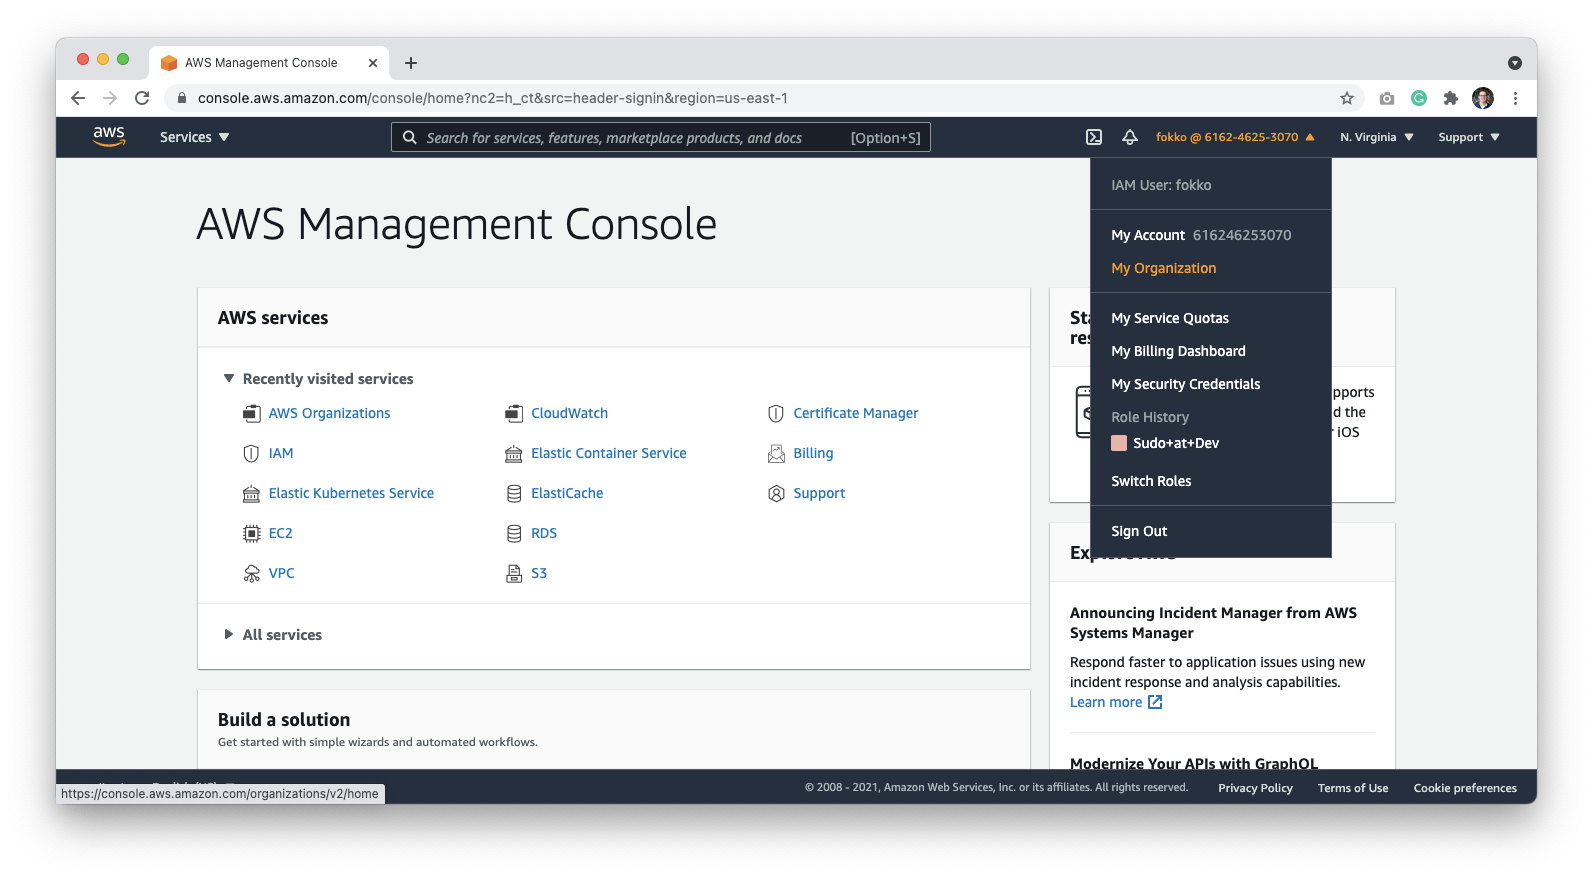
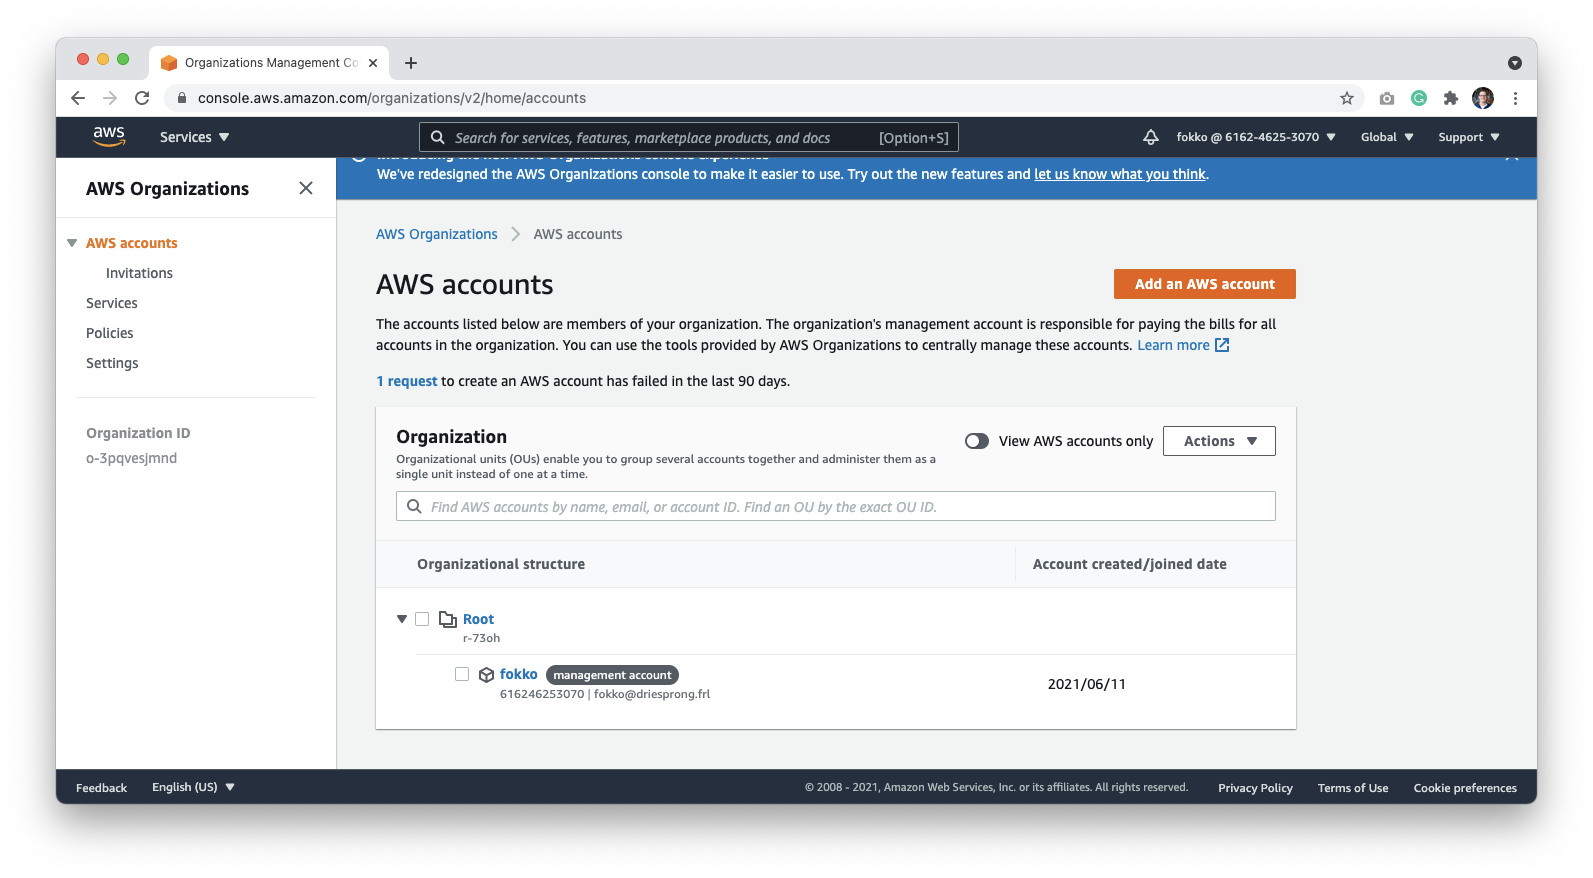
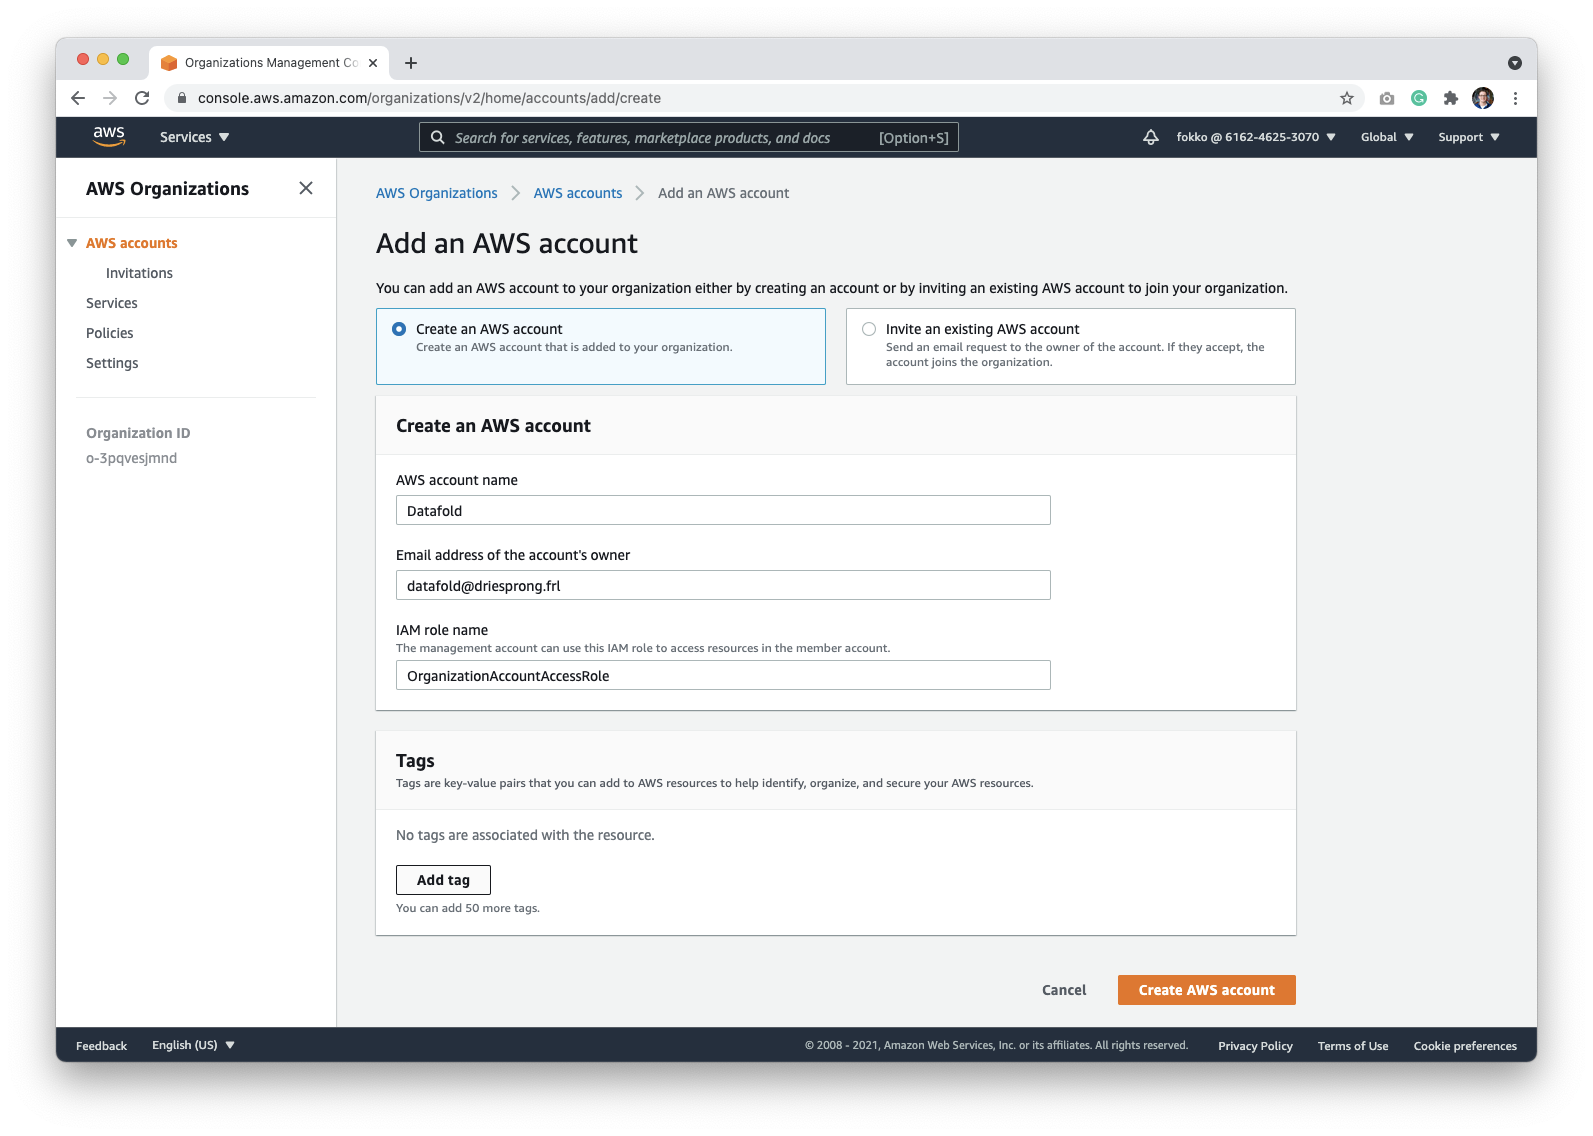
Grant Third-Party access to Datafold
To make sure that deployment runs as expected, your Datafold Support Engineer may need access to the Datafold-specific AWS account that you created. The access can be revoked after the deployment if needed. To grant access, log into the account created in the previous step. You can switch to the newly created account using the Switch Role page: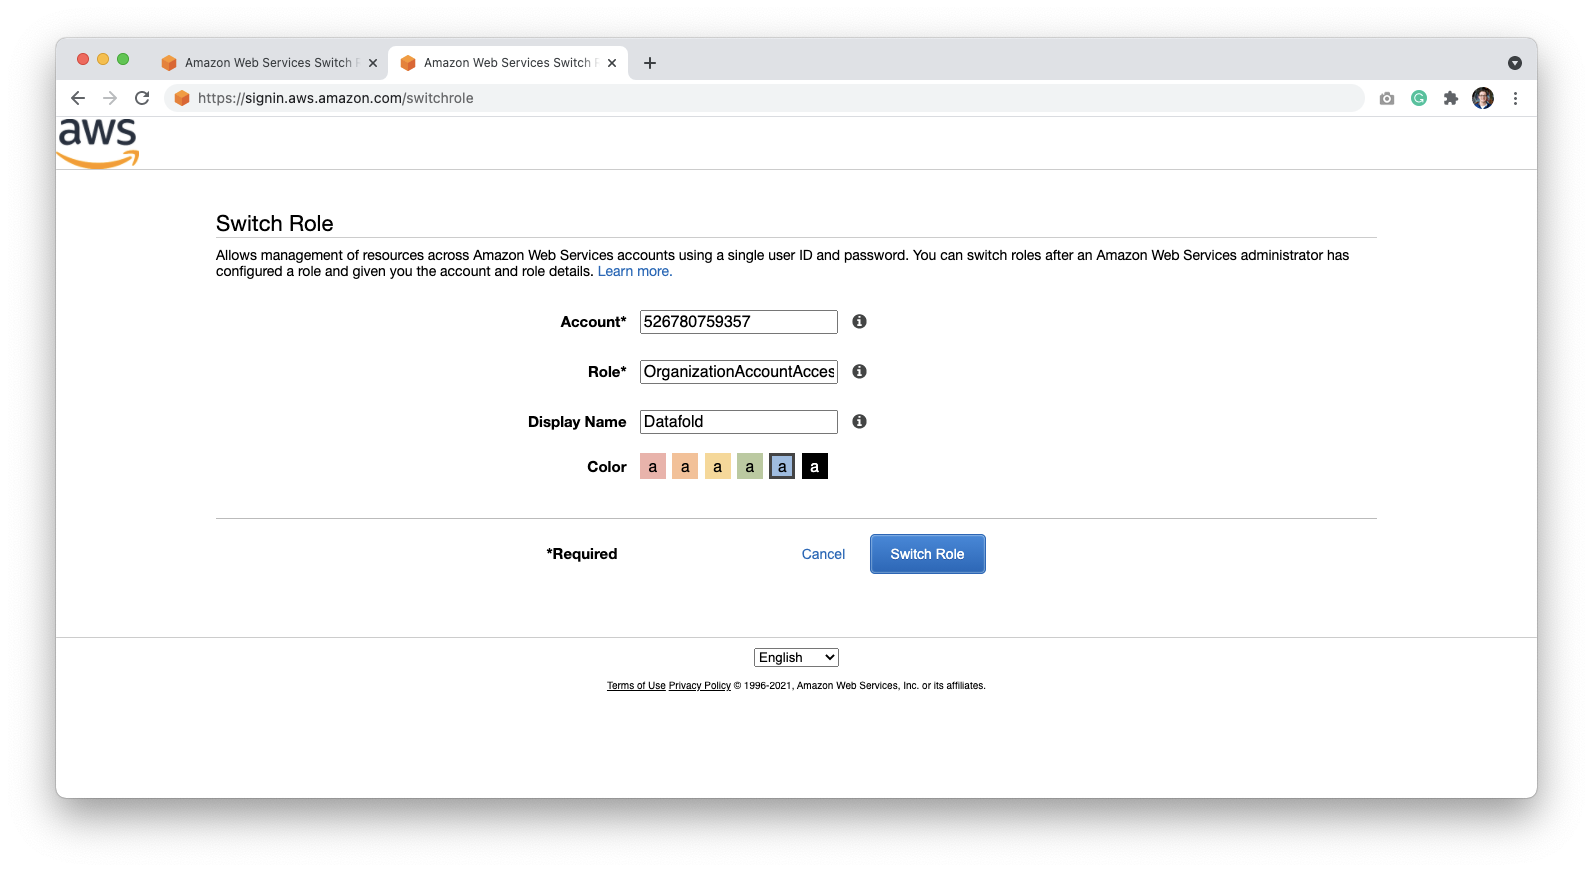
Grant Access to Datafold
Next, we need to allow Datafold to access the account. We do this by allowing the Datafold AWS account to access your AWS workspace. Go to the IAM page or type IAM in the search bar: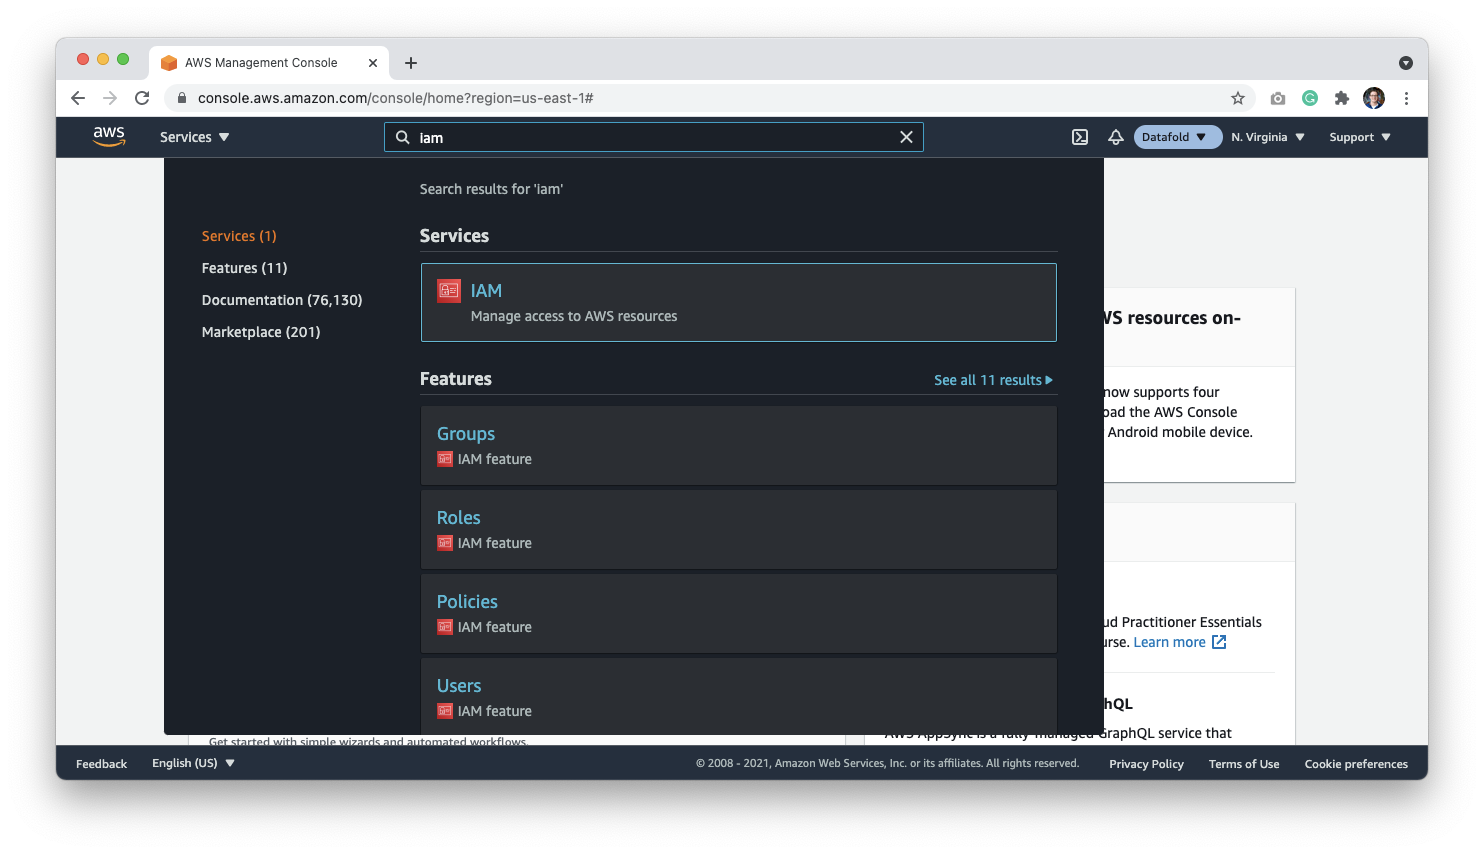
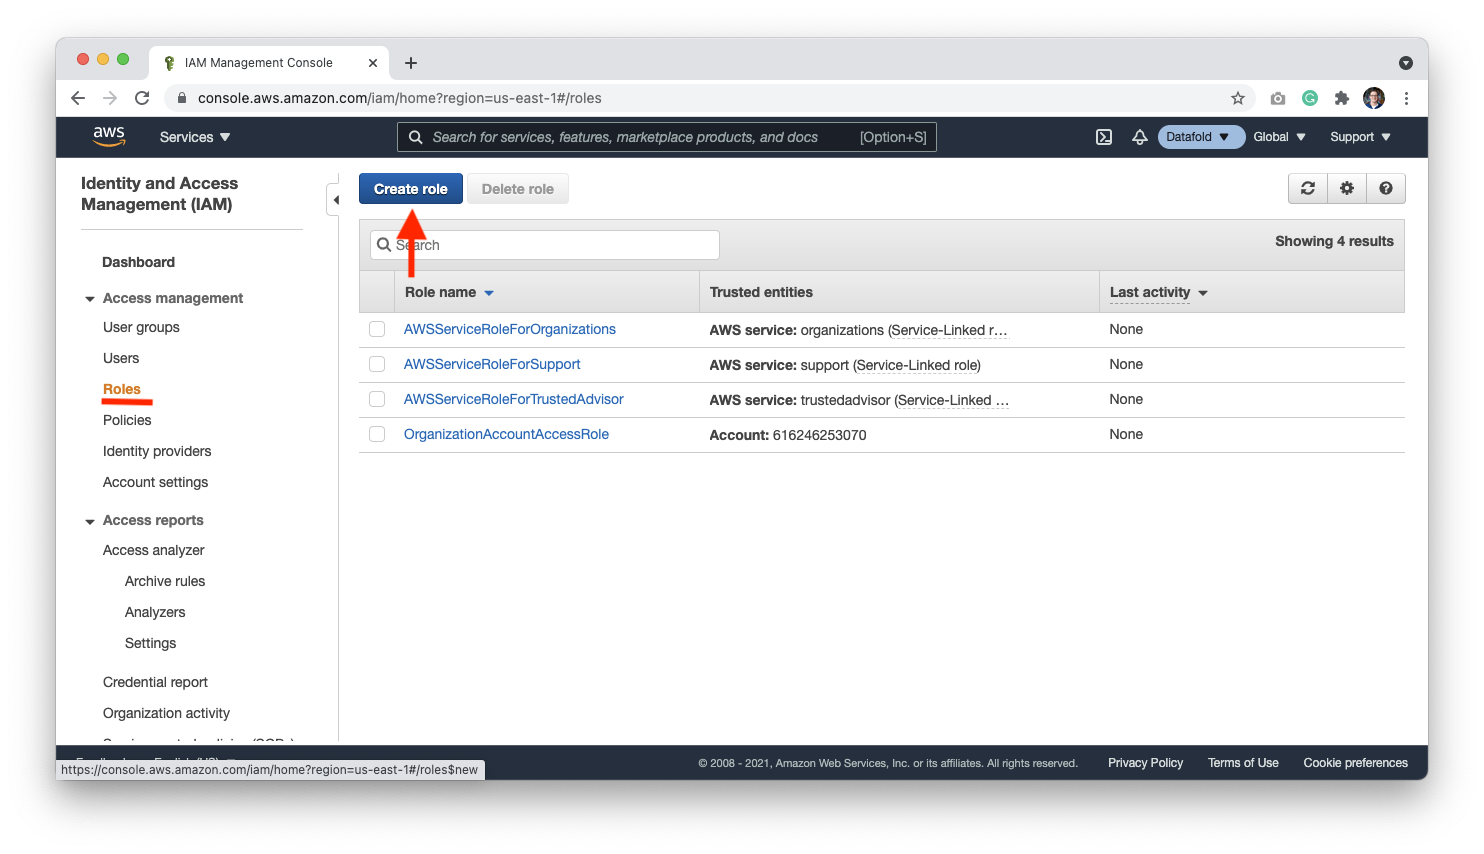
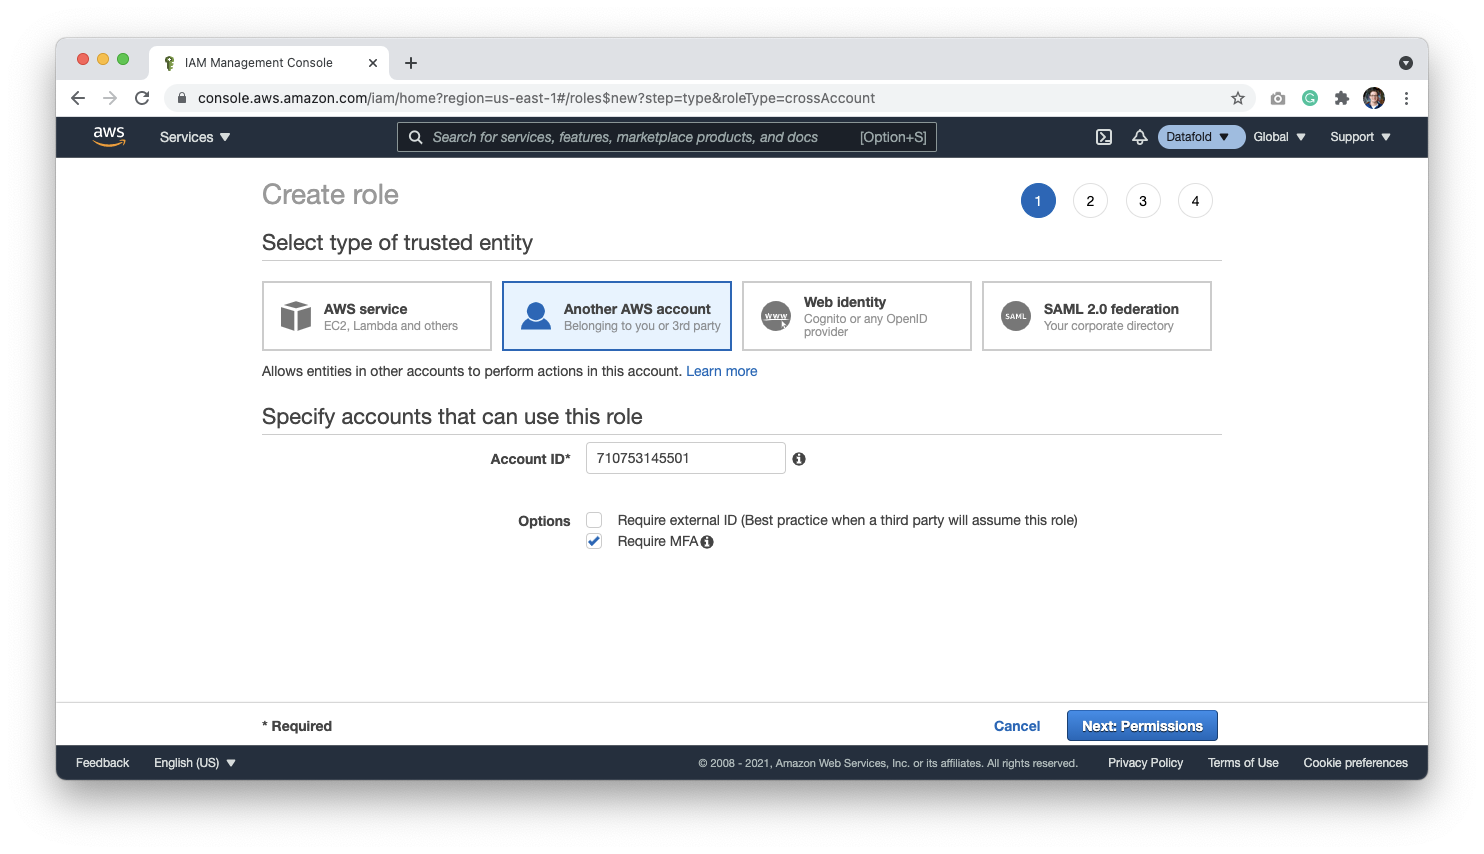
710753145501, which is Datafold’s account ID. Select Require MFA and click Next: Permissions.
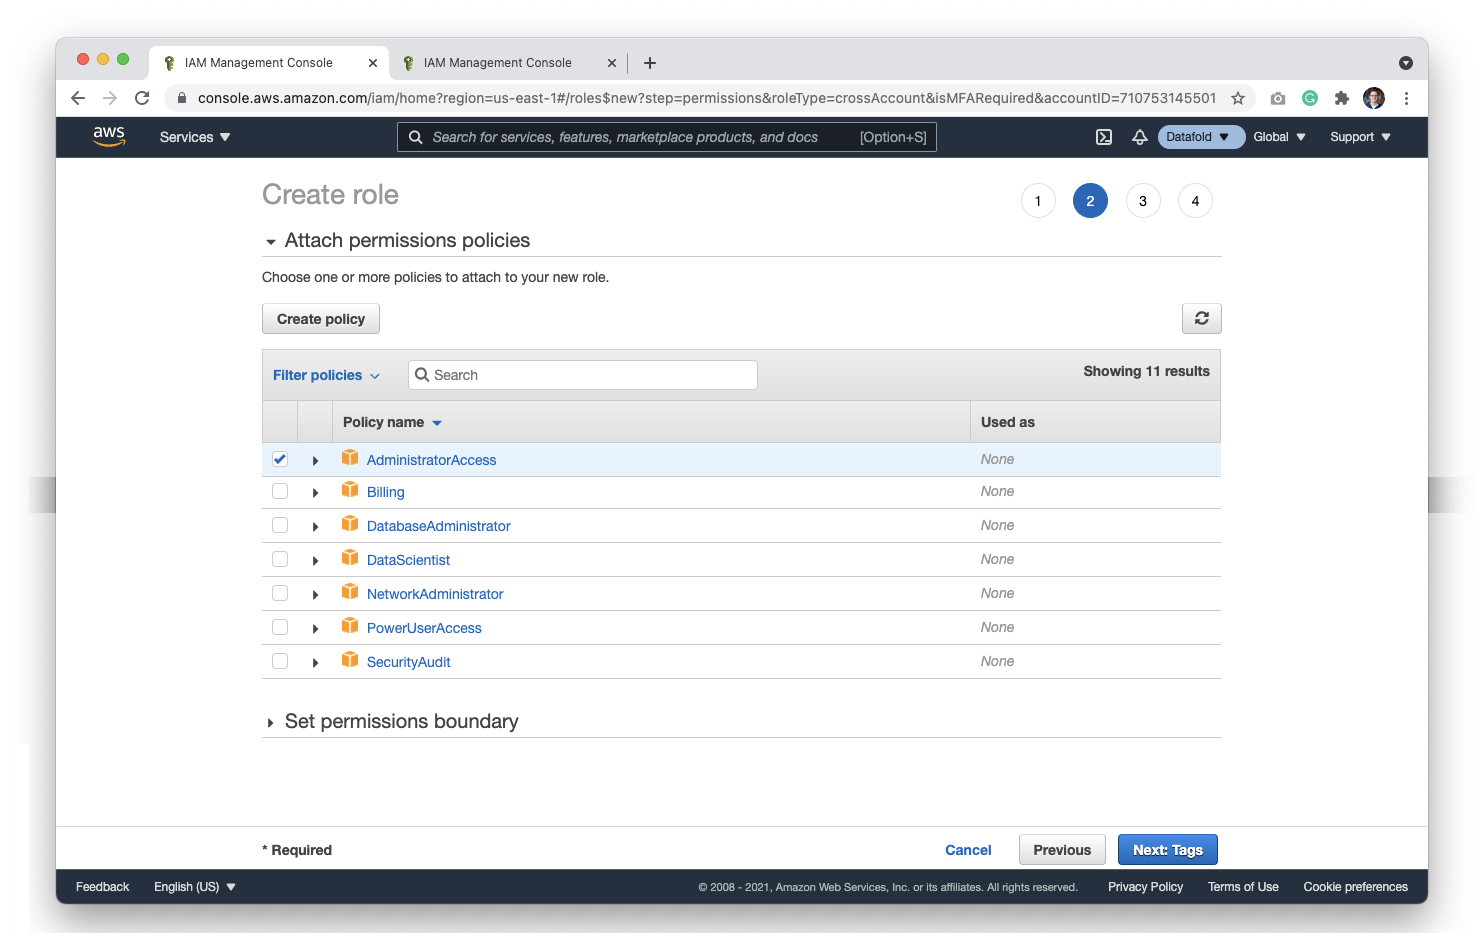
Datafold, you may want to name the role Datafold-role.
Click Create Role to complete this step.
Now that the role is created, you should be routed back to a list of roles in your organization.
Click on your newly created role to get a sharable link for the account and store this in your password manager. When setting up your deployment with a support engineer, Datafold will use this link to gain access to the account.
After validating the deployment with your support engineer, and making sure that everything works as it should, we will let you know when it’s clear to revoke the credentials.
Minimal IAM Permissions
Because we work in a Account dedicated to Datafold, there is no direct access to your resources unless explicitly configured (e.g., VPC Peering). The following IAM policy are required to update and maintain the infrastructure.PowerUserAccess and then selectively add iam permissions given above.
PowerUserAccess has explicit denies for account:*, organization:* and iam:*.
Datafold AWS infrastructure details
This document provides detailed information about the AWS infrastructure components deployed by the Datafold Terraform module, explaining the architectural decisions and operational considerations for each component.EBS volumes
The Datafold application requires 3 volumes for persistent storage, each deployed as encrypted Elastic Block Store (EBS) volumes in the primary availability zone. This also means that pods cannot be deployed outside the availability zone of these volumes, because the nodes wouldn’t be able to attach them. ClickHouse data volume serves as the analytical database storage for Datafold. ClickHouse is a columnar database that excels at analytical queries. The default 40GB allocation usually provides sufficient space for typical deployments, but it can be scaled up based on data volume requirements. The GP3 volume type with 3000 IOPS ensures consistent performance for analytical workloads. ClickHouse Logs Volume stores ClickHouse’s internal logs and temporary data. The separate logs volume prevents log data from consuming IOPS and I/O performance from actual data storage. Redis Data Volume provides persistent storage for Redis, which handles task distribution and distributed locks in the Datafold application. Redis is memory-first but benefits from persistence for data durability across restarts. The 50GB default size accommodates typical caching needs while remaining cost-effective. All EBS volumes are encrypted using AWS KMS, managed by AWS, ensuring data security at rest. The volumes are deployed in the first availability zone to minimize latency and simplify backup strategies.Load balancer
The load balancer serves as the primary entry point for all external traffic to the Datafold application. The module offers 2 deployment strategies, each with different operational characteristics and trade-offs. External Load Balancer Deployment (the default approach) creates an AWS Application Load Balancer through Terraform. This approach provides centralized control over load balancer configuration and integrates well with existing AWS infrastructure. The load balancer automatically handles SSL termination, health checks, and traffic distribution across Kubernetes pods. This method is ideal for organizations that prefer infrastructure-as-code management and want consistent load balancer configurations across environments. Kubernetes-Managed Load Balancer deployment setsdeploy_lb = false and relies on the AWS Load Balancer Controller running within the EKS cluster. This approach leverages Kubernetes-native load balancer management, allowing for dynamic scaling and easier integration with Kubernetes ingress resources. The controller automatically provisions and manages load balancers based on Kubernetes service definitions, which can be more flexible for applications that need to scale load balancer resources dynamically.
Both load balancers apply the currently recommended and strictest ELB security policies: ELBSecurityPolicy-TLS13-1-2-Res-2021-06 and security settings.
The choice between these approaches often depends on operational preferences and existing infrastructure patterns. External deployment provides more predictable resource management, while Kubernetes-managed deployment offers greater flexibility for dynamic workloads.
Security A security group shared between the load balancer and the EKS nodes allows traffic to reach only the EKS nodes and nothing else. The load balancer allows traffic to land directly into the EKS private subnet.
Certificate The certificate can be pre-created by the customer and then attached, or a cloud-managed certificate can be created on the fly.
The application will not function without HTTPS, so a certificate is mandatory. After the certificate is created either manually or through this repository, it must be validated by the DNS administrator by adding a CNAME record. This puts the certificate in “Issued” state. The certificate cannot be found when it’s still provisioning.
