> ## Documentation Index
> Fetch the complete documentation index at: https://docs.datafold.com/llms.txt
> Use this file to discover all available pages before exploring further.
# Okta (OIDC)
> Configure Okta OIDC single sign-on (SSO) for Datafold. Step-by-step setup instructions for authenticating your team with Okta.
**NOTE**
Okta SSO is available for both SaaS and dedicated cloud installations of Datafold.
## Create Okta App Integration[](#create-okta-app-integration "Direct link to Create Okta App Integration")
**INFO**
Creating an App Integration in Okta may require admin privileges.
Start the integration by creating a web app integration in Okta.
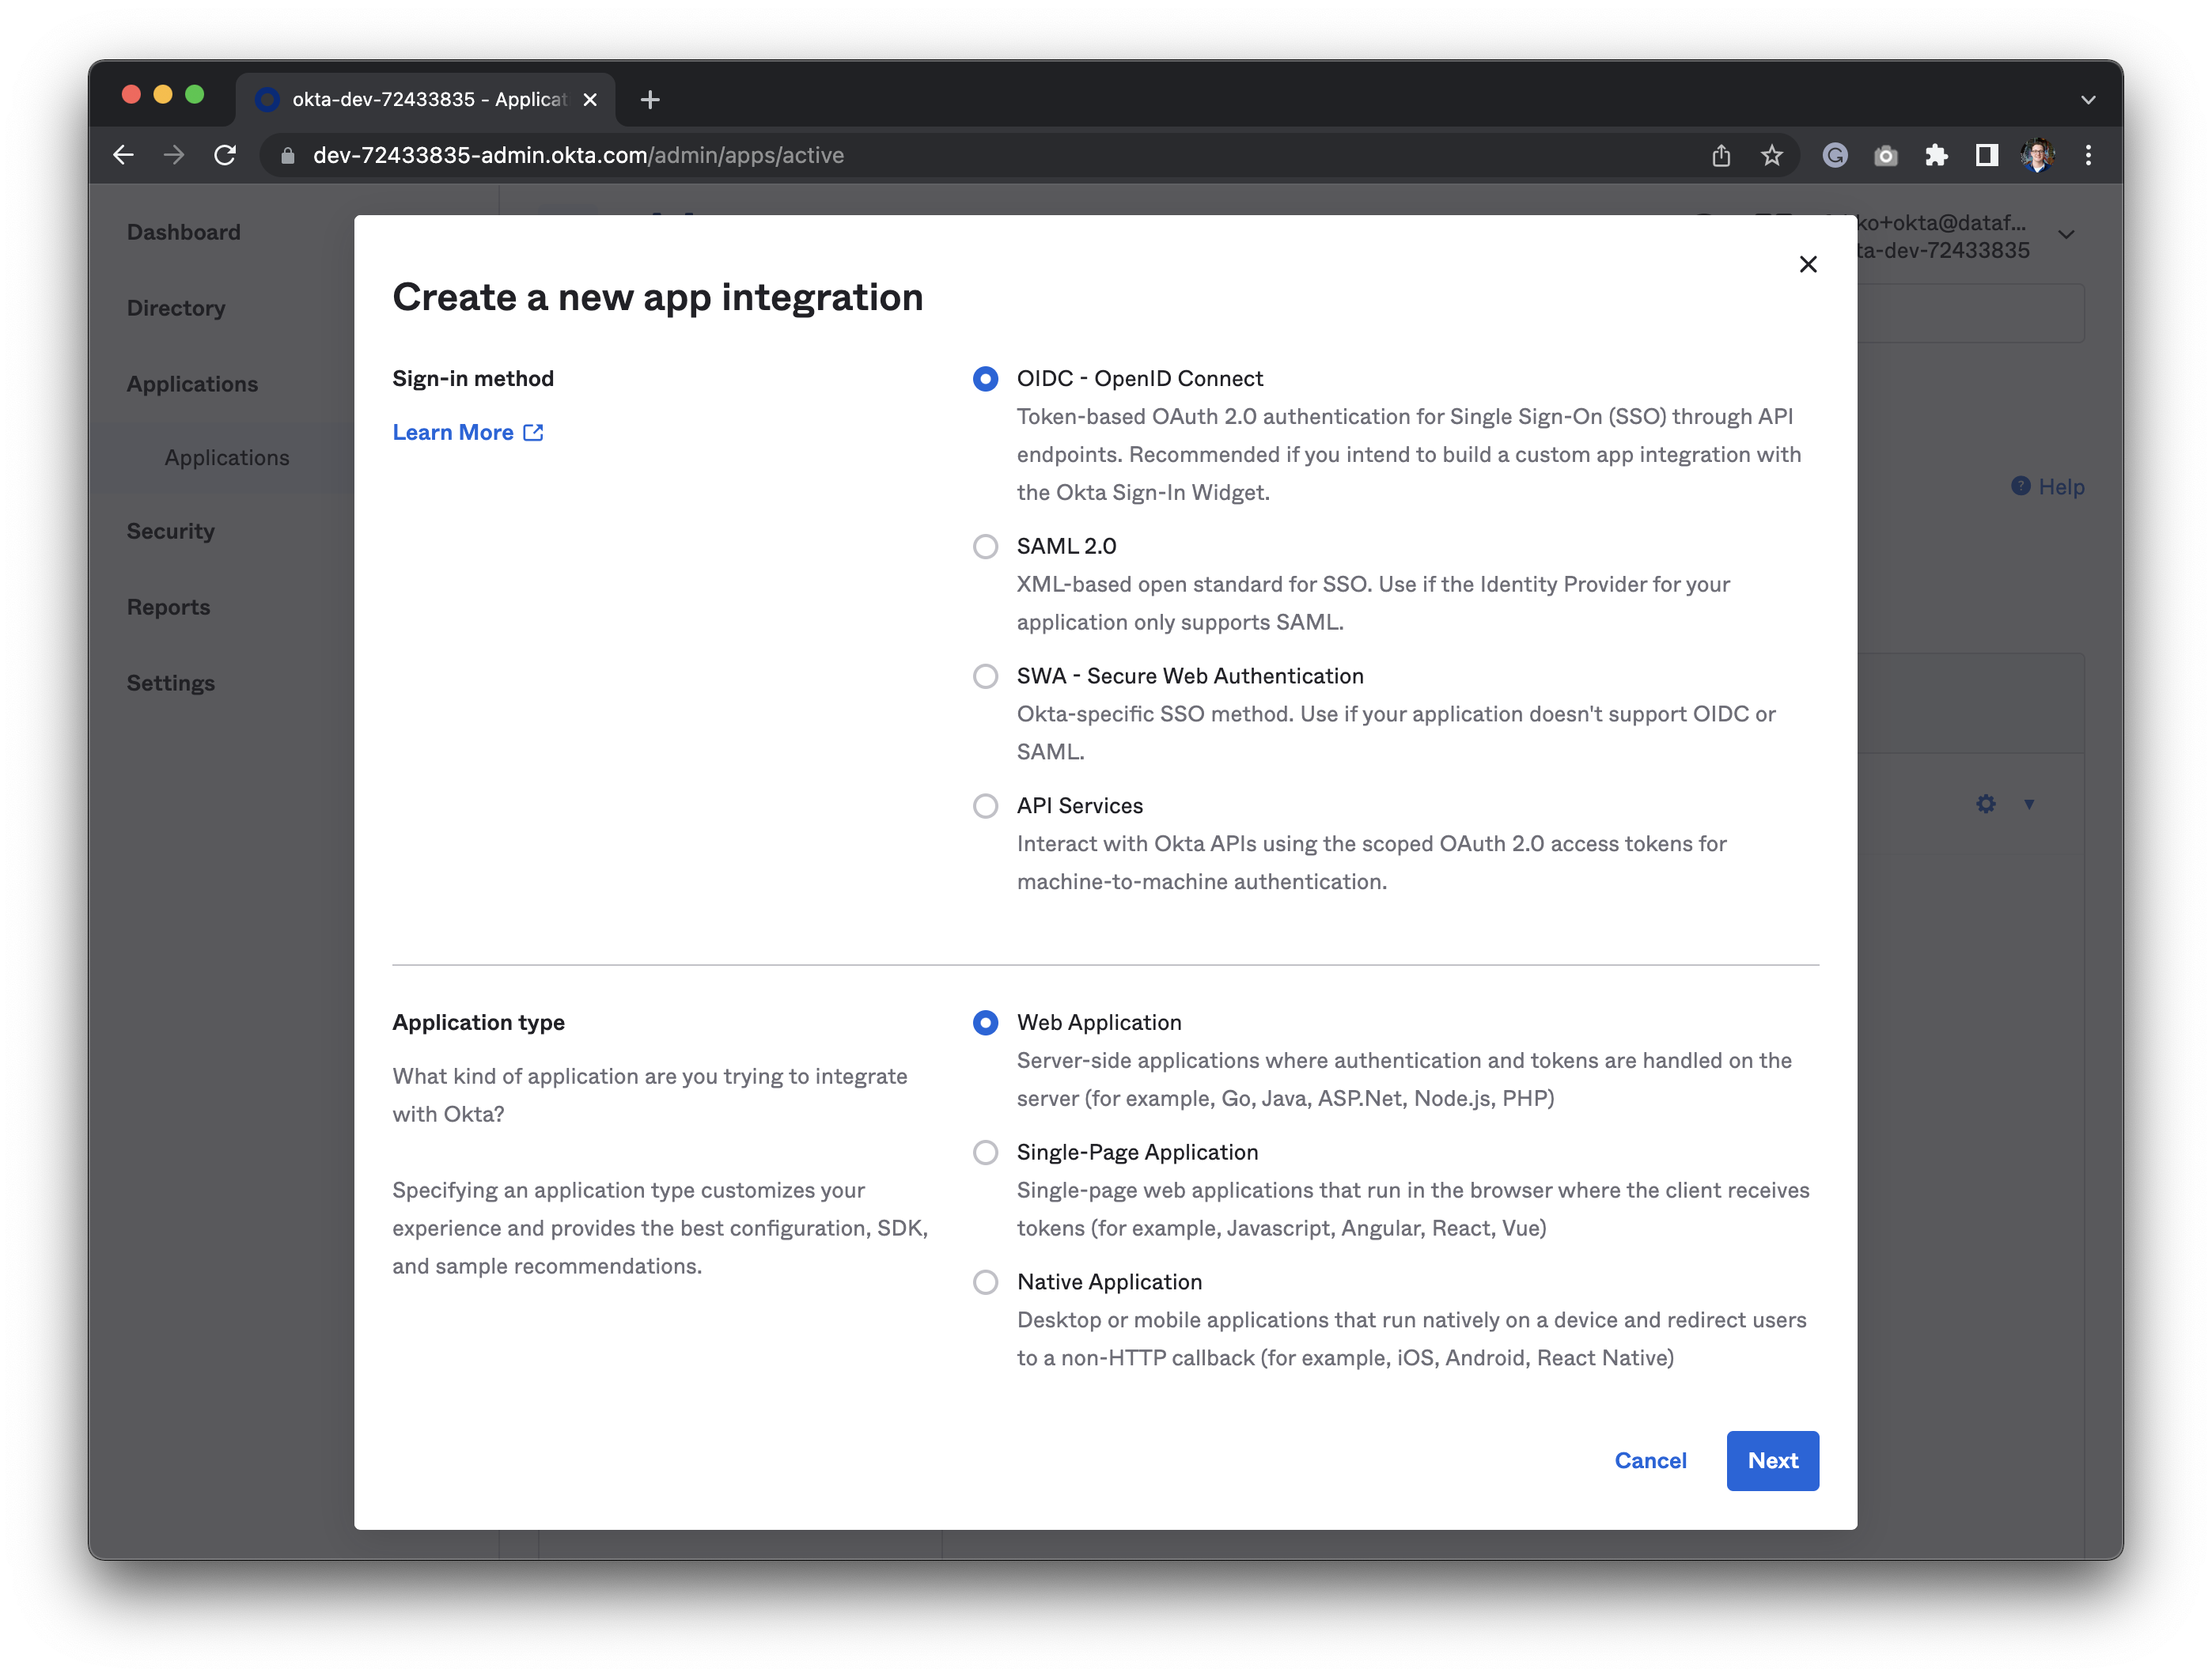
Next, log in to Okta interface and navigate to **Applications** and click **Create App Integration**.
Then, in the configuration form, select **OpenId Connect (OIDC)** and **Web Application** as the Application Type.
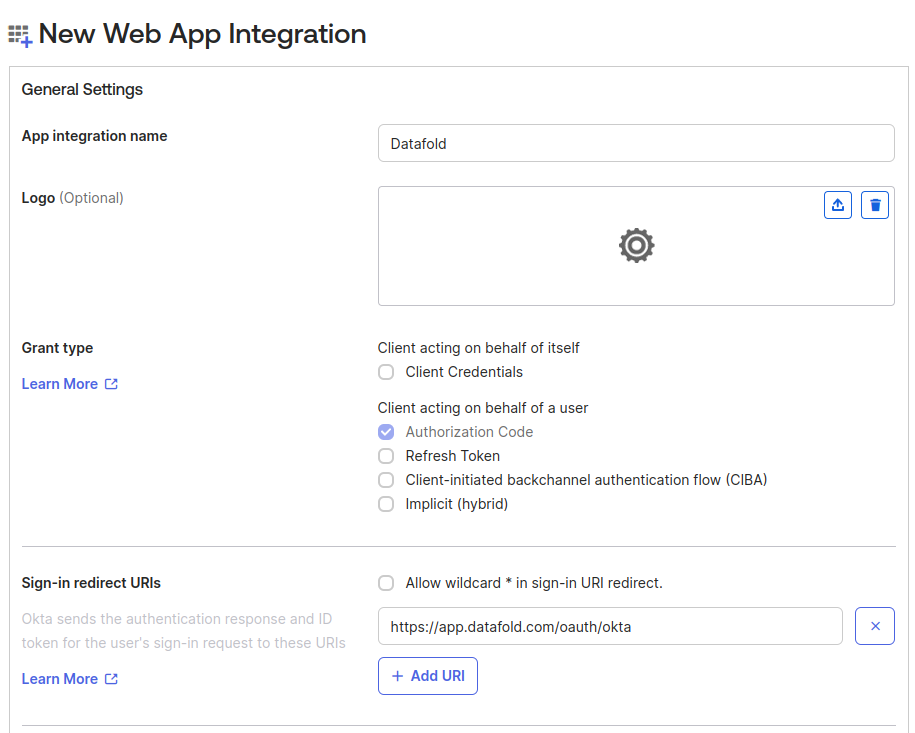
 In the following section, you will set:
* **App integration name**: A name to identify the integration. We suggest you use `Datafold`.
* **Grant type**: Should be set to `Authorization code` automatically.
* **Sign-in redirect URI**:
The redirect URL should be `https://app.datafold.com/oauth/okta/client_id`, where `client_id` is the Client ID of the configuration.
**CAUTION**
You will be given the Client ID after saving the integration and need to come back to update the client ID afterwards.
The redirect URL should be `https://your-dns-name/oauth/okta`, replacing `your-dns-name` with the DNS name for your installation.
* **Sign-out redirect URIs**: Leave this empty.
* **Trusted Origins**: Leave this empty too.
* **Assignments**: Select `Skip group assignment for now`. Later you should assign the correct groups and users.
* Click "Save" to create the app integration in Okta.
In the following section, you will set:
* **App integration name**: A name to identify the integration. We suggest you use `Datafold`.
* **Grant type**: Should be set to `Authorization code` automatically.
* **Sign-in redirect URI**:
The redirect URL should be `https://app.datafold.com/oauth/okta/client_id`, where `client_id` is the Client ID of the configuration.
**CAUTION**
You will be given the Client ID after saving the integration and need to come back to update the client ID afterwards.
The redirect URL should be `https://your-dns-name/oauth/okta`, replacing `your-dns-name` with the DNS name for your installation.
* **Sign-out redirect URIs**: Leave this empty.
* **Trusted Origins**: Leave this empty too.
* **Assignments**: Select `Skip group assignment for now`. Later you should assign the correct groups and users.
* Click "Save" to create the app integration in Okta.
 Once the save is successful, on the next screen, you'll be presented with Client ID and Client Secret. We need these IDs to update the redirect URLs that Datafold needs. We'll also apply the Client ID and Client Secret in the Datafold integration later.
* Edit "General settings"
* Scroll down to the **Login** section
* Update the **Sign-in redirect URI**. See above for details.
* Click "Save" to persist the changes.
## Set Up Okta-initiated login
**TIP**
Organization admins will always be able to log in with either password or Okta. Non-admin users will be required to log in through Okta once configured.
This step is optional and should be done at the discretion of the Okta administrator.
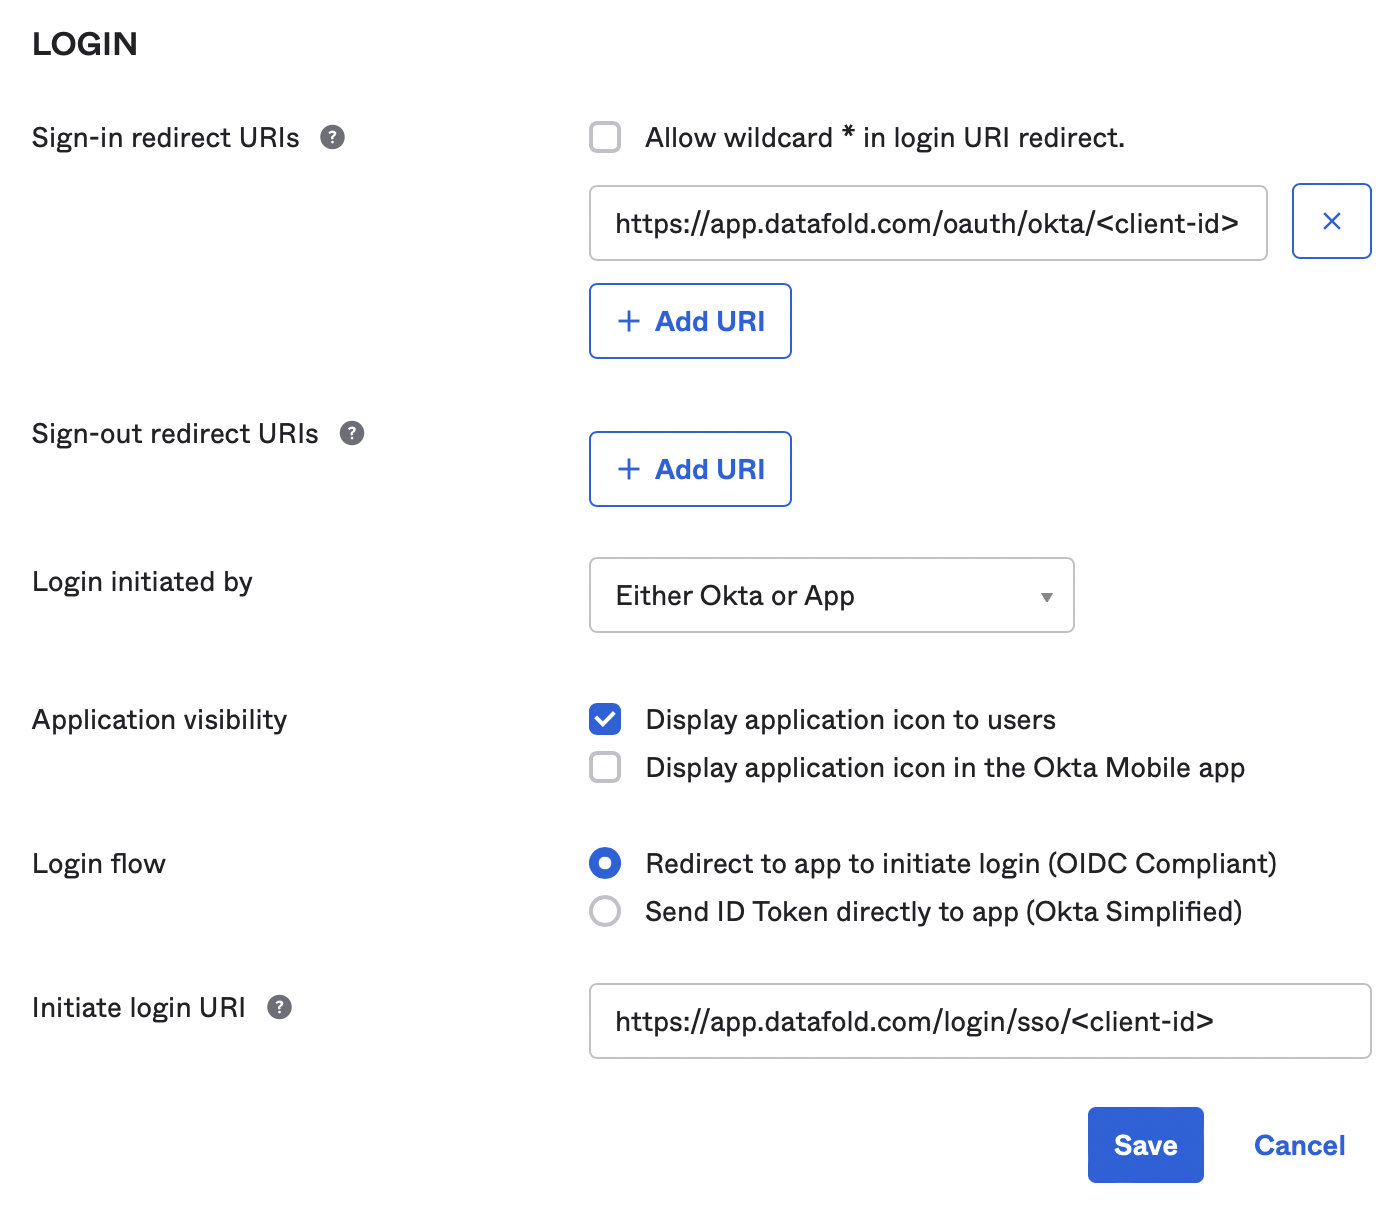
Users in your organization can log in to the application directly from the Okta end-user dashboard. To enable this feature, configure the integration as follows:
1. Edit "General settings"
2. Set **Login initiated by** to `Either Okta or App`.
3. Set **Application visibility** to `Display application icon to users`.
4. Set **Login flow** to `Redirect to app to initiate login (OIDC Compliant)`.
5. Set **Initiate login URI**:
* `https://app.datafold.com/login/sso/client-id?action=desired_action`
* Replace `client-id` with the Client ID of the configuration, and
* Replace `desired_action` with `signup` if you enabled users auto-creation, or `login` otherwise.
* `https://your-dns-name/login/sso/client-id?action=desired_action`
* Replace `client-id` with the Client ID of the configuration, and
* Replace `desired_action`with `signup` if you enabled users auto-creation, or `login` otherwise.
* Replace `your-dns-name` with the DNS name for your installation.
Once the save is successful, on the next screen, you'll be presented with Client ID and Client Secret. We need these IDs to update the redirect URLs that Datafold needs. We'll also apply the Client ID and Client Secret in the Datafold integration later.
* Edit "General settings"
* Scroll down to the **Login** section
* Update the **Sign-in redirect URI**. See above for details.
* Click "Save" to persist the changes.
## Set Up Okta-initiated login
**TIP**
Organization admins will always be able to log in with either password or Okta. Non-admin users will be required to log in through Okta once configured.
This step is optional and should be done at the discretion of the Okta administrator.
Users in your organization can log in to the application directly from the Okta end-user dashboard. To enable this feature, configure the integration as follows:
1. Edit "General settings"
2. Set **Login initiated by** to `Either Okta or App`.
3. Set **Application visibility** to `Display application icon to users`.
4. Set **Login flow** to `Redirect to app to initiate login (OIDC Compliant)`.
5. Set **Initiate login URI**:
* `https://app.datafold.com/login/sso/client-id?action=desired_action`
* Replace `client-id` with the Client ID of the configuration, and
* Replace `desired_action` with `signup` if you enabled users auto-creation, or `login` otherwise.
* `https://your-dns-name/login/sso/client-id?action=desired_action`
* Replace `client-id` with the Client ID of the configuration, and
* Replace `desired_action`with `signup` if you enabled users auto-creation, or `login` otherwise.
* Replace `your-dns-name` with the DNS name for your installation.
 1. Click "Save" to persist the changes.
The Okta configuration is now complete.
## Configure Okta in Datafold
To finish the configuration, create an Okta integration in Datafold.
To complete the integration in Datafold, create a new integration by navigating to **Settings** → **Integrations** → **SSO** → **Add new integration** → **Okta**.
1. Click "Save" to persist the changes.
The Okta configuration is now complete.
## Configure Okta in Datafold
To finish the configuration, create an Okta integration in Datafold.
To complete the integration in Datafold, create a new integration by navigating to **Settings** → **Integrations** → **SSO** → **Add new integration** → **Okta**.
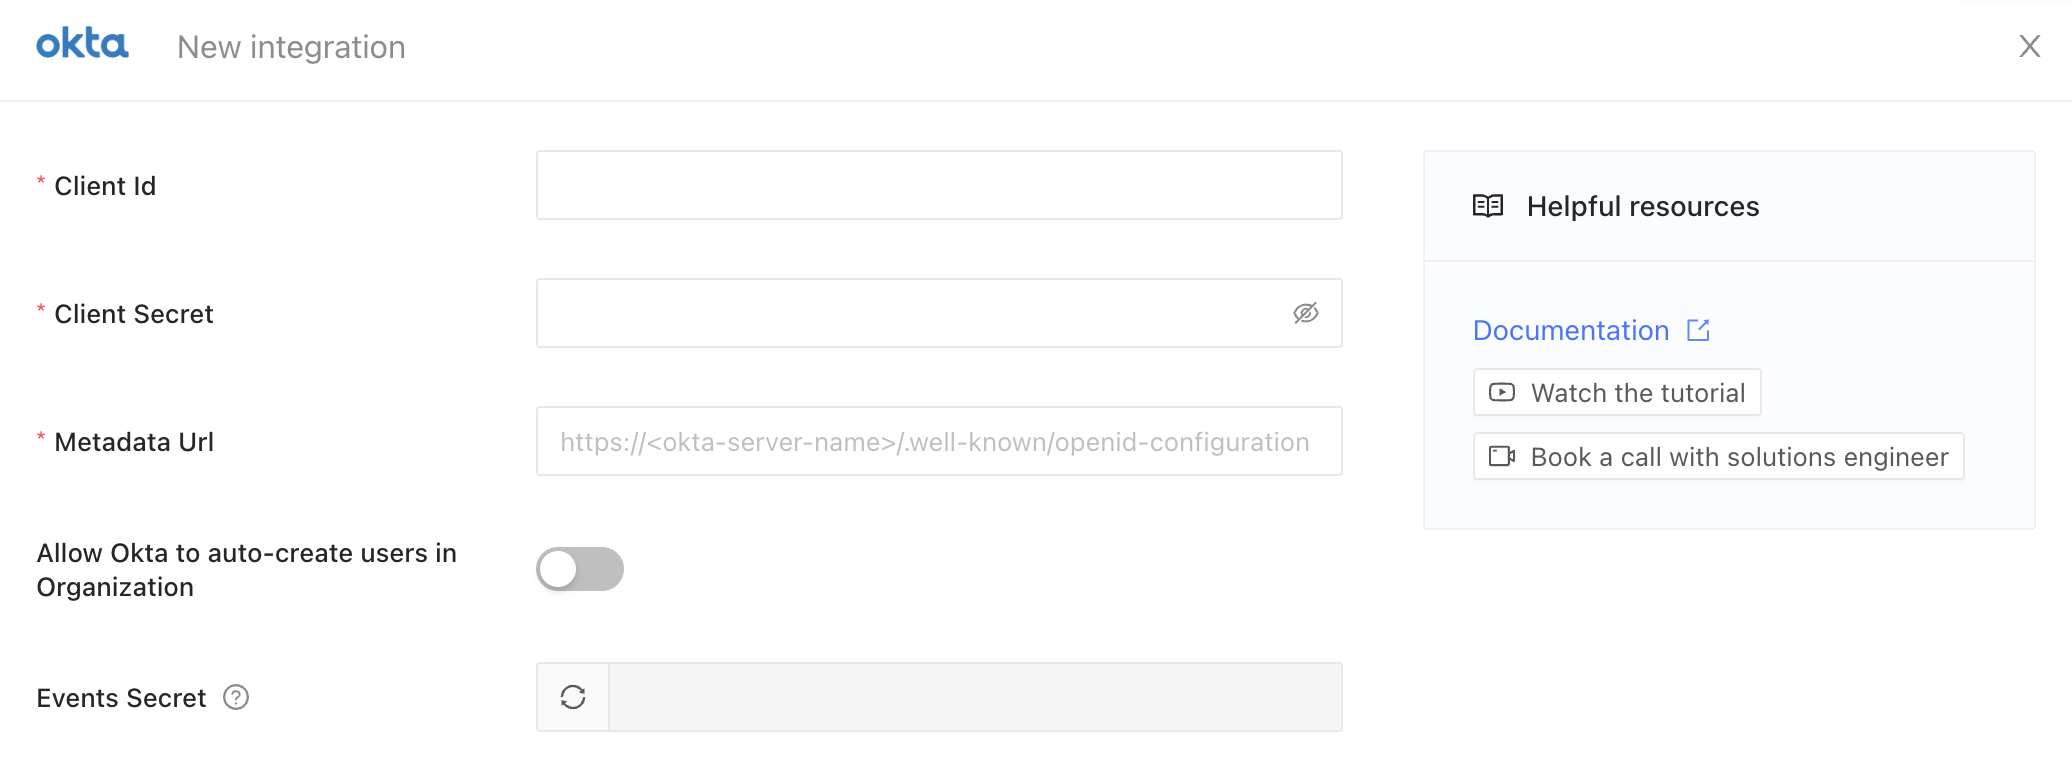 * Paste in your Okta **Client Id** and **Client Secret**.
* The **Metadata Url** of Okta OAuth server is `https:///.well-known/openid-configuration`, replace `okta-server-name` with the name of your Okta domain.
* If you'd like to auto-create users in Datafold that are authorized in Okta, enable the **Allow Okta to auto-create users in Organization** switch.
* Finally, click **Save**.
**TIP**
Users can either be explicitly invited in Datafold by an admin user, using the same email as used in Okta, or they can be auto-created. When the `signup` action is set in the login URI, authenticated users on Okta who have been assigned as a user in Okta of the Datafold application will then be able to login. If that user has not yet been invited, Datafold will then automatically create a user for them, since they're already authenticated by the Okta server of your domain. The user will then receive an email to confirm their email address.
## Synchronize state with Datafold \[Optional]
This step is essential if you want to ensure that users from your organization are automatically logged out when they are unassigned or deactivated in Okta.
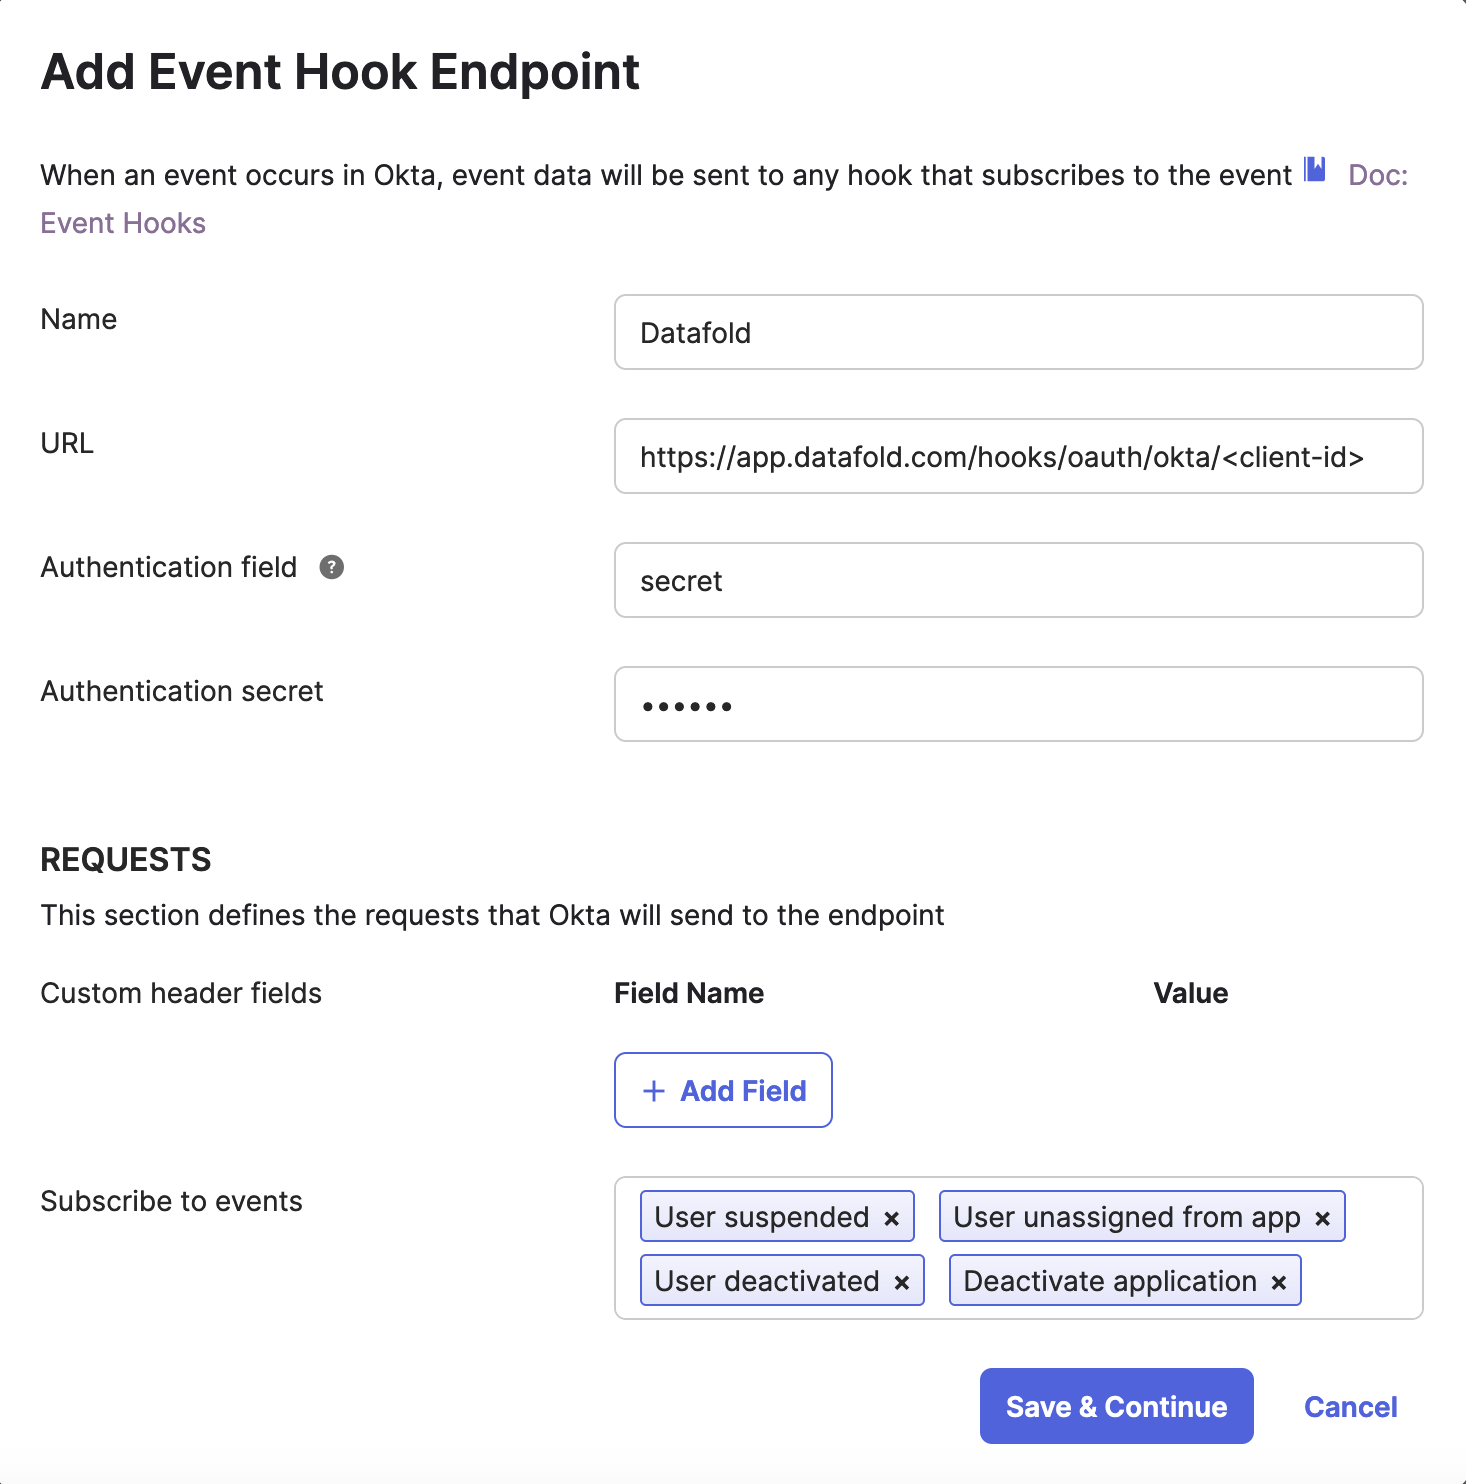
1. Navigate to **Okta Admin panel** → **Workflow** → **Event Hooks**
2. Click **Create Event Hook**
3. Set **Name** to `Datafold`
4. Set **URL** to `https://app.datafold.com/hooks/oauth/okta/`
5. Set **Authentication field** to `secret`
6. Go to Datafold and generate a secret token in **Settings** → **Integrations** → **SSO** → **Okta**. Click the **Generate** button, copy it by using the **Copy** button and click **Save**. Use the pasted code in the **Authentication secret** field in Okta.
* Paste in your Okta **Client Id** and **Client Secret**.
* The **Metadata Url** of Okta OAuth server is `https:///.well-known/openid-configuration`, replace `okta-server-name` with the name of your Okta domain.
* If you'd like to auto-create users in Datafold that are authorized in Okta, enable the **Allow Okta to auto-create users in Organization** switch.
* Finally, click **Save**.
**TIP**
Users can either be explicitly invited in Datafold by an admin user, using the same email as used in Okta, or they can be auto-created. When the `signup` action is set in the login URI, authenticated users on Okta who have been assigned as a user in Okta of the Datafold application will then be able to login. If that user has not yet been invited, Datafold will then automatically create a user for them, since they're already authenticated by the Okta server of your domain. The user will then receive an email to confirm their email address.
## Synchronize state with Datafold \[Optional]
This step is essential if you want to ensure that users from your organization are automatically logged out when they are unassigned or deactivated in Okta.
1. Navigate to **Okta Admin panel** → **Workflow** → **Event Hooks**
2. Click **Create Event Hook**
3. Set **Name** to `Datafold`
4. Set **URL** to `https://app.datafold.com/hooks/oauth/okta/`
5. Set **Authentication field** to `secret`
6. Go to Datafold and generate a secret token in **Settings** → **Integrations** → **SSO** → **Okta**. Click the **Generate** button, copy it by using the **Copy** button and click **Save**. Use the pasted code in the **Authentication secret** field in Okta.
 **CAUTION**
Keep this secret token safe as you won't be able to see after saving your Integration.
7. In **Subscribe to events** add events: `User suspended`, `User deactivated`, `Deactivate application`, `User unassigned from app`
8. Click **Save & Continue**
**CAUTION**
Keep this secret token safe as you won't be able to see after saving your Integration.
7. In **Subscribe to events** add events: `User suspended`, `User deactivated`, `Deactivate application`, `User unassigned from app`
8. Click **Save & Continue**
 . On **Verify Endpoint Ownership** click **Verify**
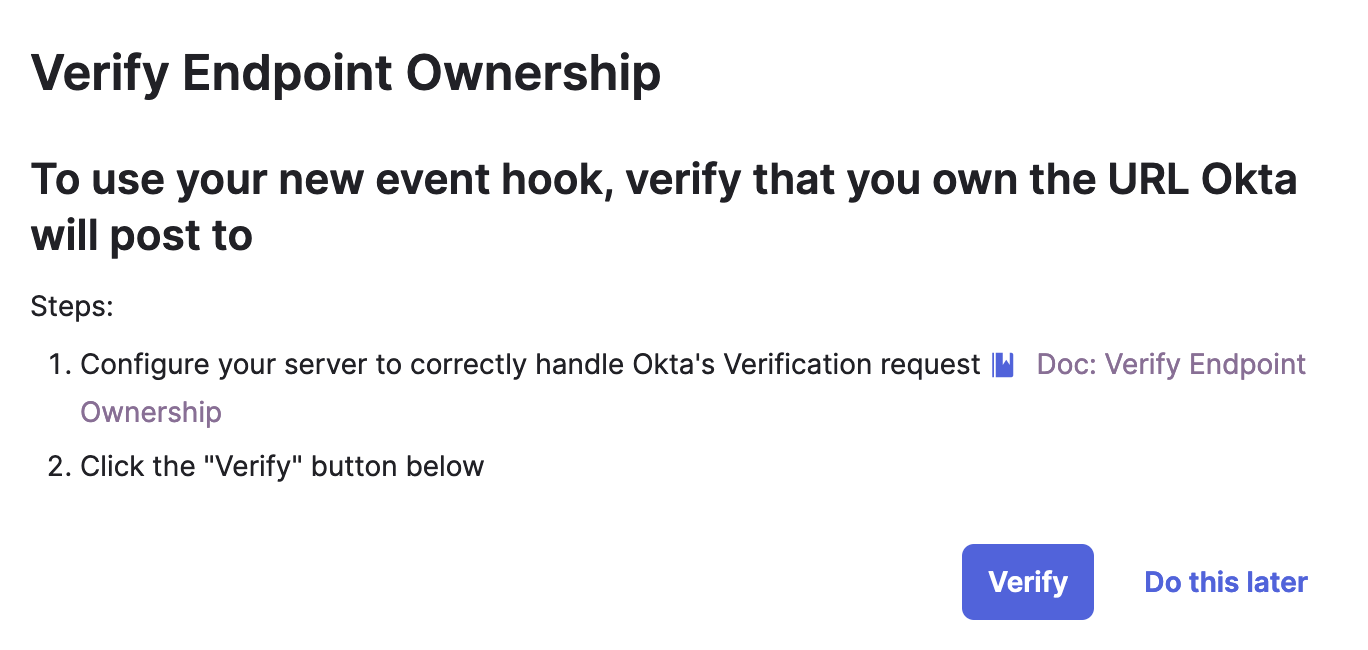 * If the verification is successful, you have completed the setup.
## Testing the Okta integration
* Visit [https://app.datafold.com](https://app.datafold.com)
* Type in your email and wait up to five seconds.
* The Okta button should switch from disabled to enabled.
* Click the Okta login button.
* The browser should be redirected to your Okta domain, authenticate the user there and be redirected back to the Datafold application.
* Visit `https://your-dns-name`, replacing your-dns-name with the domain name of your installation.
* Type in your email and wait up to five seconds.
* The Okta button should switch from disabled to enabled.
* Click the Okta login button.
* The browser should be redirected to your Okta domain, authenticate the user there and be redirected back to the Datafold application.
If this didn't work, pay close attention to any error messages, or contact `support@datafold.com`.
* If the verification is successful, you have completed the setup.
## Testing the Okta integration
* Visit [https://app.datafold.com](https://app.datafold.com)
* Type in your email and wait up to five seconds.
* The Okta button should switch from disabled to enabled.
* Click the Okta login button.
* The browser should be redirected to your Okta domain, authenticate the user there and be redirected back to the Datafold application.
* Visit `https://your-dns-name`, replacing your-dns-name with the domain name of your installation.
* Type in your email and wait up to five seconds.
* The Okta button should switch from disabled to enabled.
* Click the Okta login button.
* The browser should be redirected to your Okta domain, authenticate the user there and be redirected back to the Datafold application.
If this didn't work, pay close attention to any error messages, or contact `support@datafold.com`.