> ## Documentation Index
> Fetch the complete documentation index at: https://docs.datafold.com/llms.txt
> Use this file to discover all available pages before exploring further.
# dbt Cloud
> Integrate Datafold with dbt Cloud to automate Data Diffs in your CI pipeline, leveraging dbt jobs to detect changes and ensure data quality before merging.
**NOTE**
You will need a dbt **Team** account or higher to access the dbt Cloud API that Datafold uses to connect the accounts.
## Prerequisites
### Set up dbt Cloud CI
In dbt Cloud, [set up dbt Cloud CI](https://docs.getdbt.com/docs/deploy/cloud-ci-job) so that your Pull Request job runs when you open or update a Pull Request. This job will provide Datafold information about the changes included in the PR.
### Create an Artifacts Job in dbt Cloud
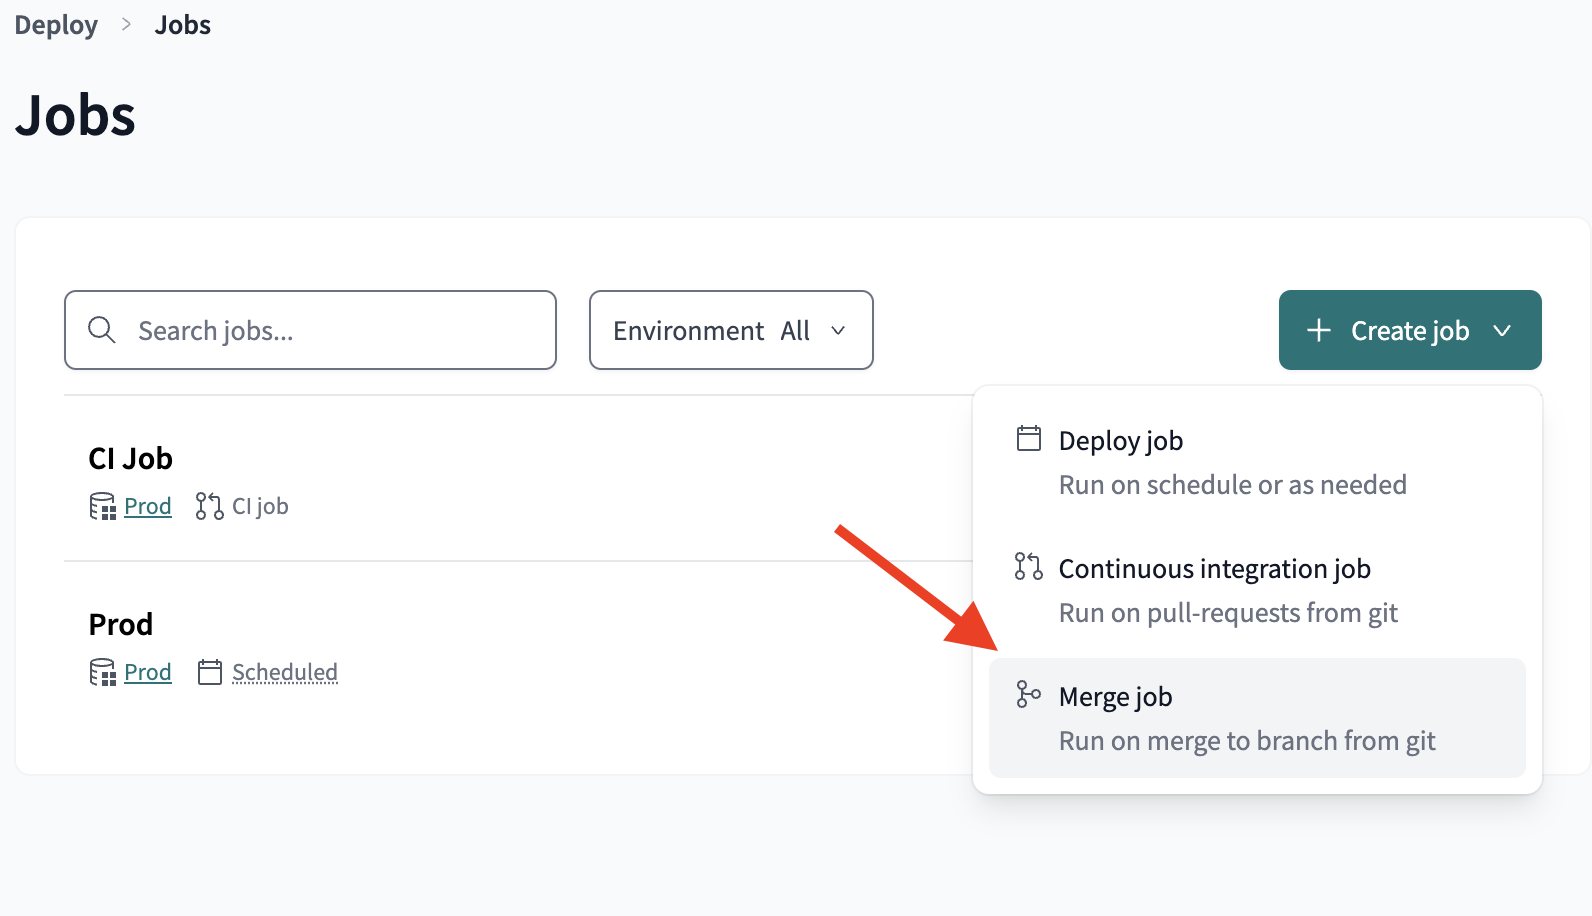
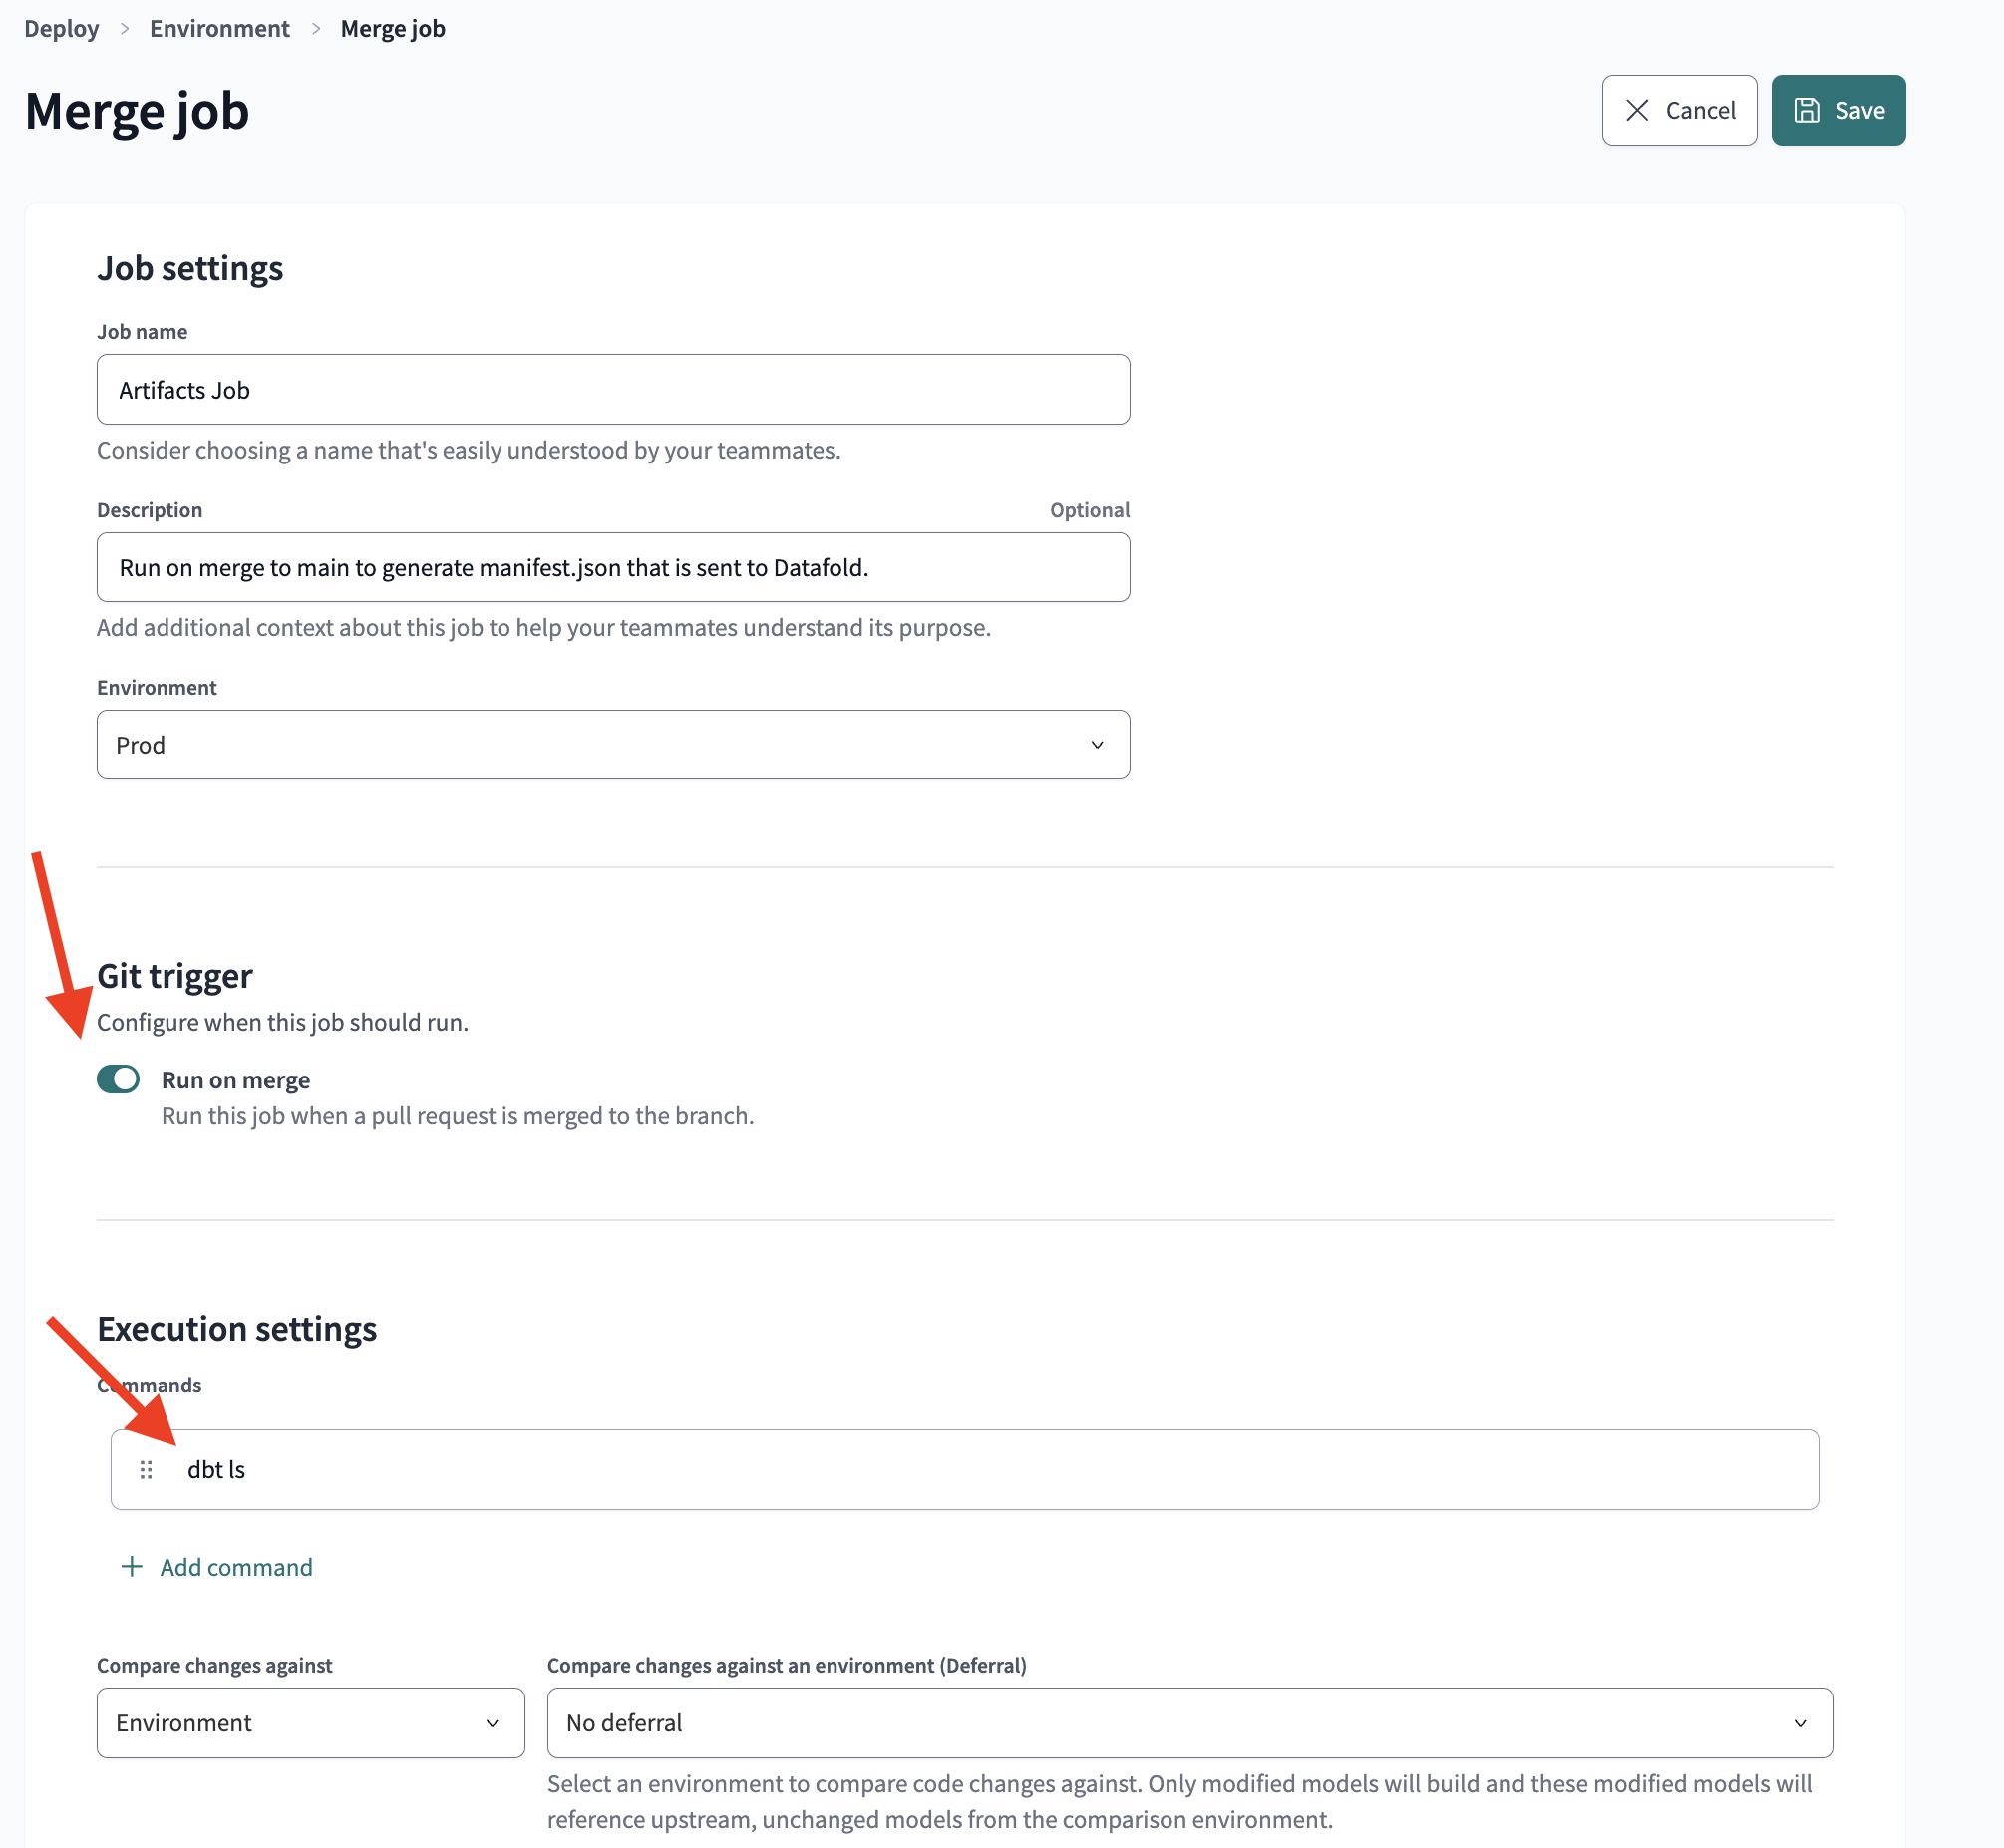
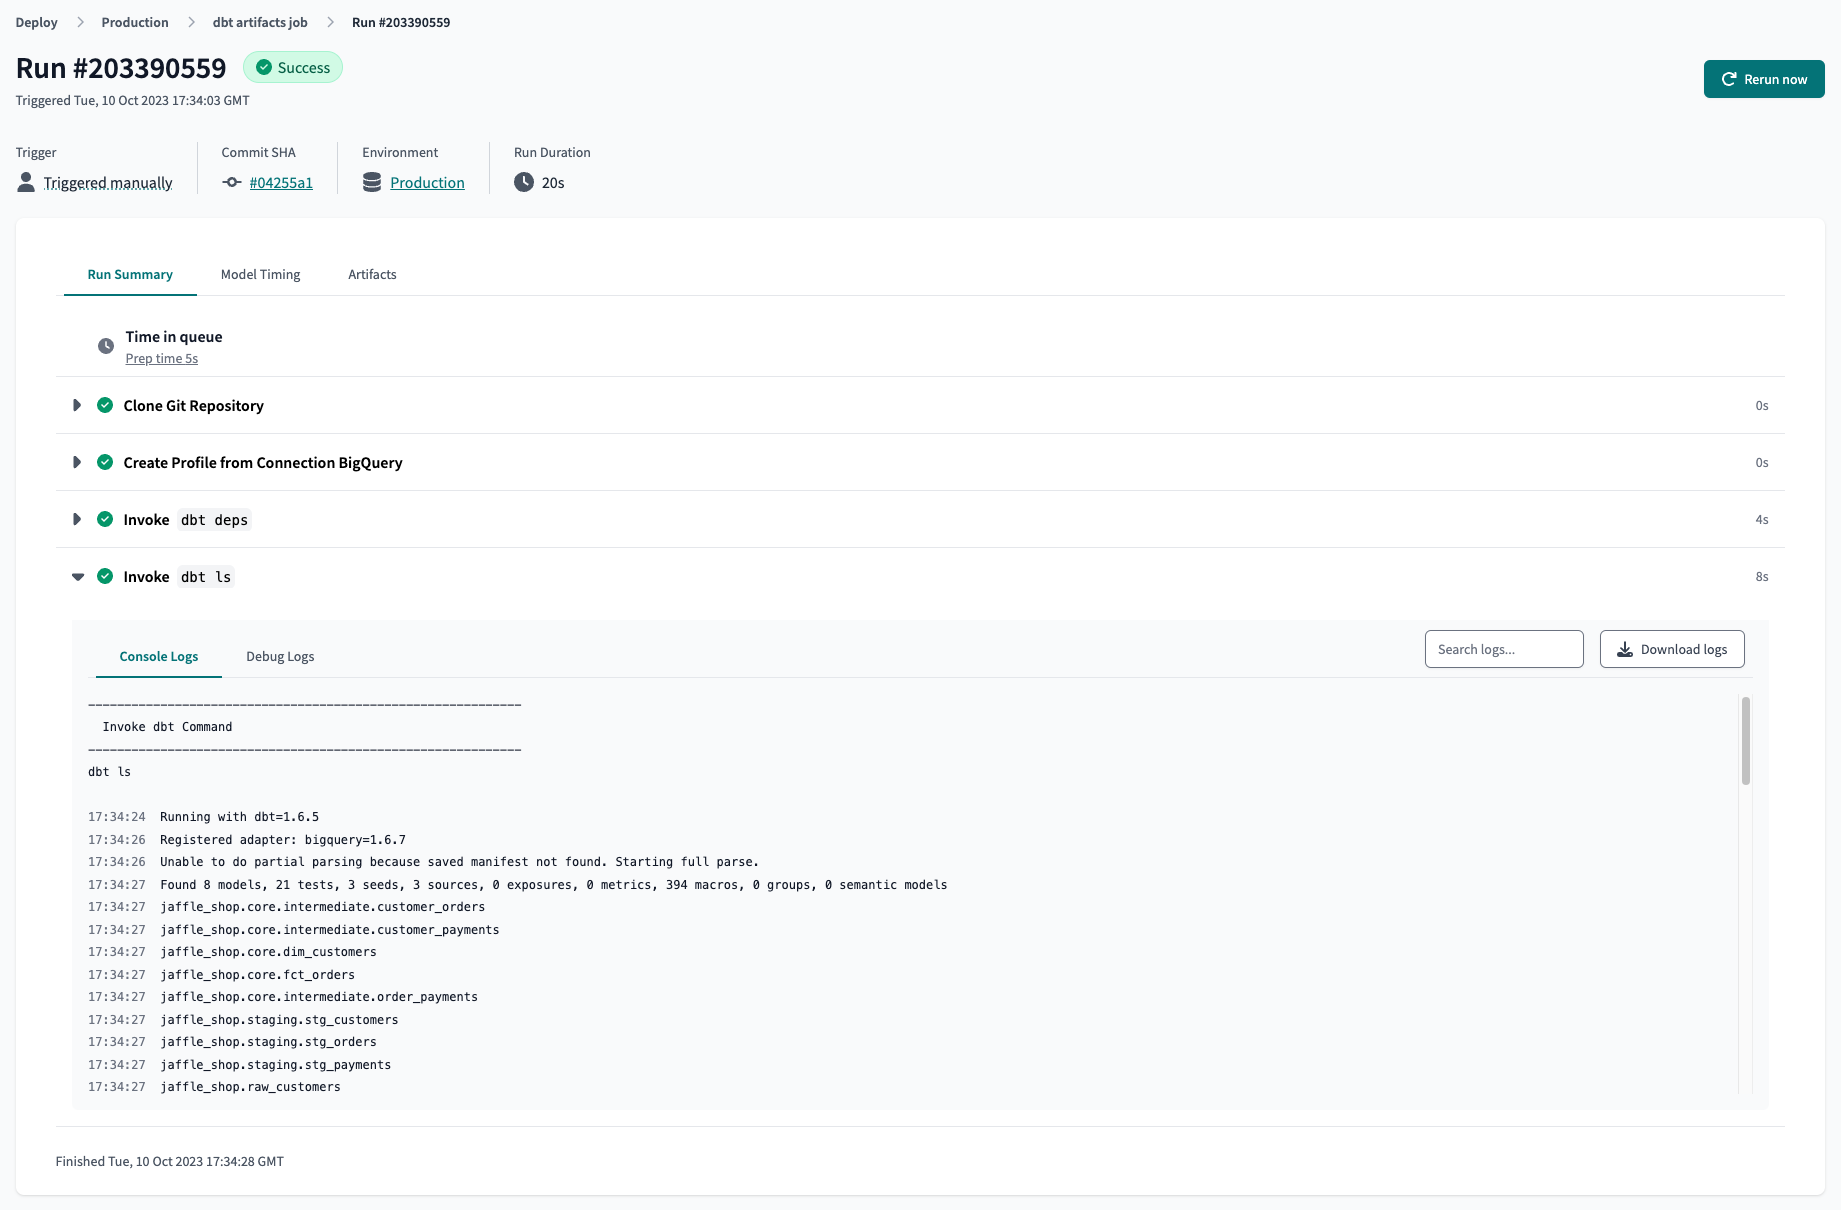
The Artifacts job generates production `manifest.json` on merge to main/master, giving Datafold information about the state of production. The simplest method is to set up a dbt Cloud job that executes the `dbt ls` command on merge to main/master.
> Note: `dbt ls` is preferred over `dbt compile` as it runs faster and data diffing does not require fully compiled models to work.
Example dbt Cloud artifact job settings and successful run:
 If you are interested in continuous deployment, you can use a Merge Trigger Production Job instead of the Artifacts Job listed above.
### dbt Cloud Access URL
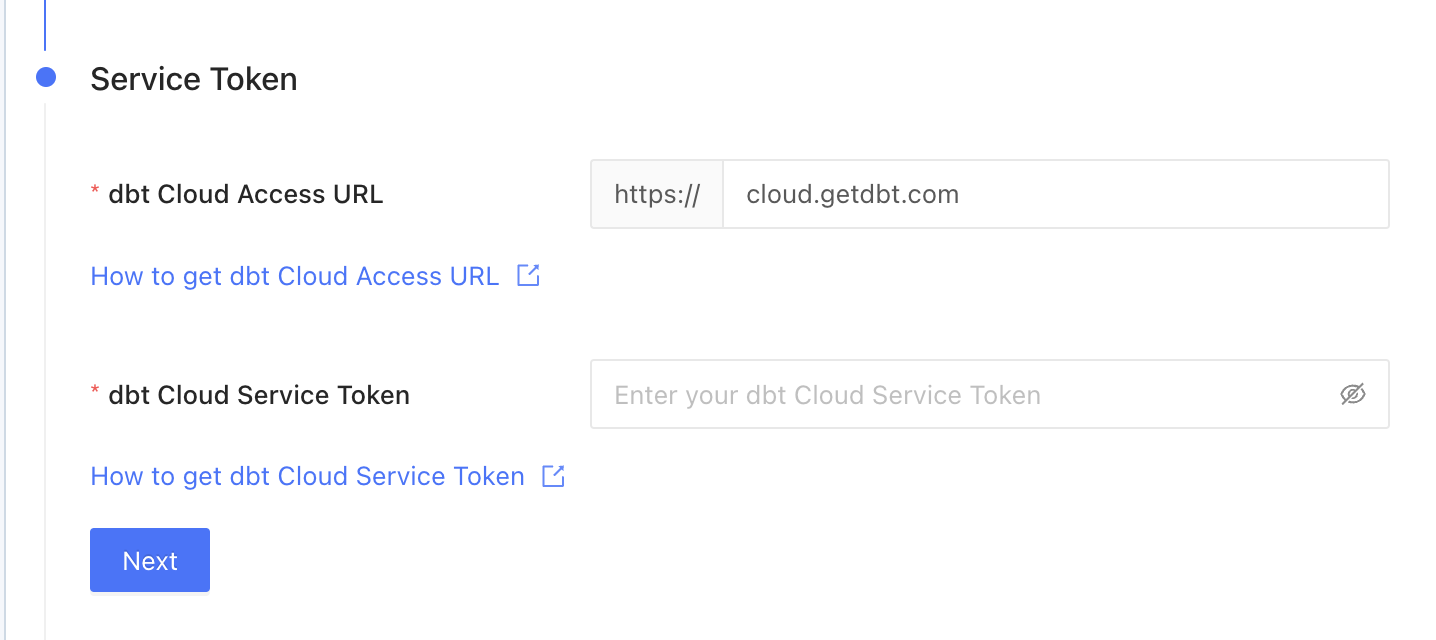
You will need your [access url](https://docs.getdbt.com/docs/cloud/about-cloud/regions-ip-addresses) to connect Datafold to your dbt Cloud account.
### Add dbt Cloud Service Account Token
To connect Datafold to your dbt Cloud account, you will need to use a [Service Token](https://docs.getdbt.com/docs/dbt-cloud-apis/service-tokens).
info
Please note that the use of User API Keys for this purpose is no longer recommended due to a [recent security update](https://docs.getdbt.com/docs/dbt-cloud-apis/service-tokens) in dbt Cloud. [Learn more below](/integrations/orchestrators/dbt-cloud#deprecating-user-tokens)
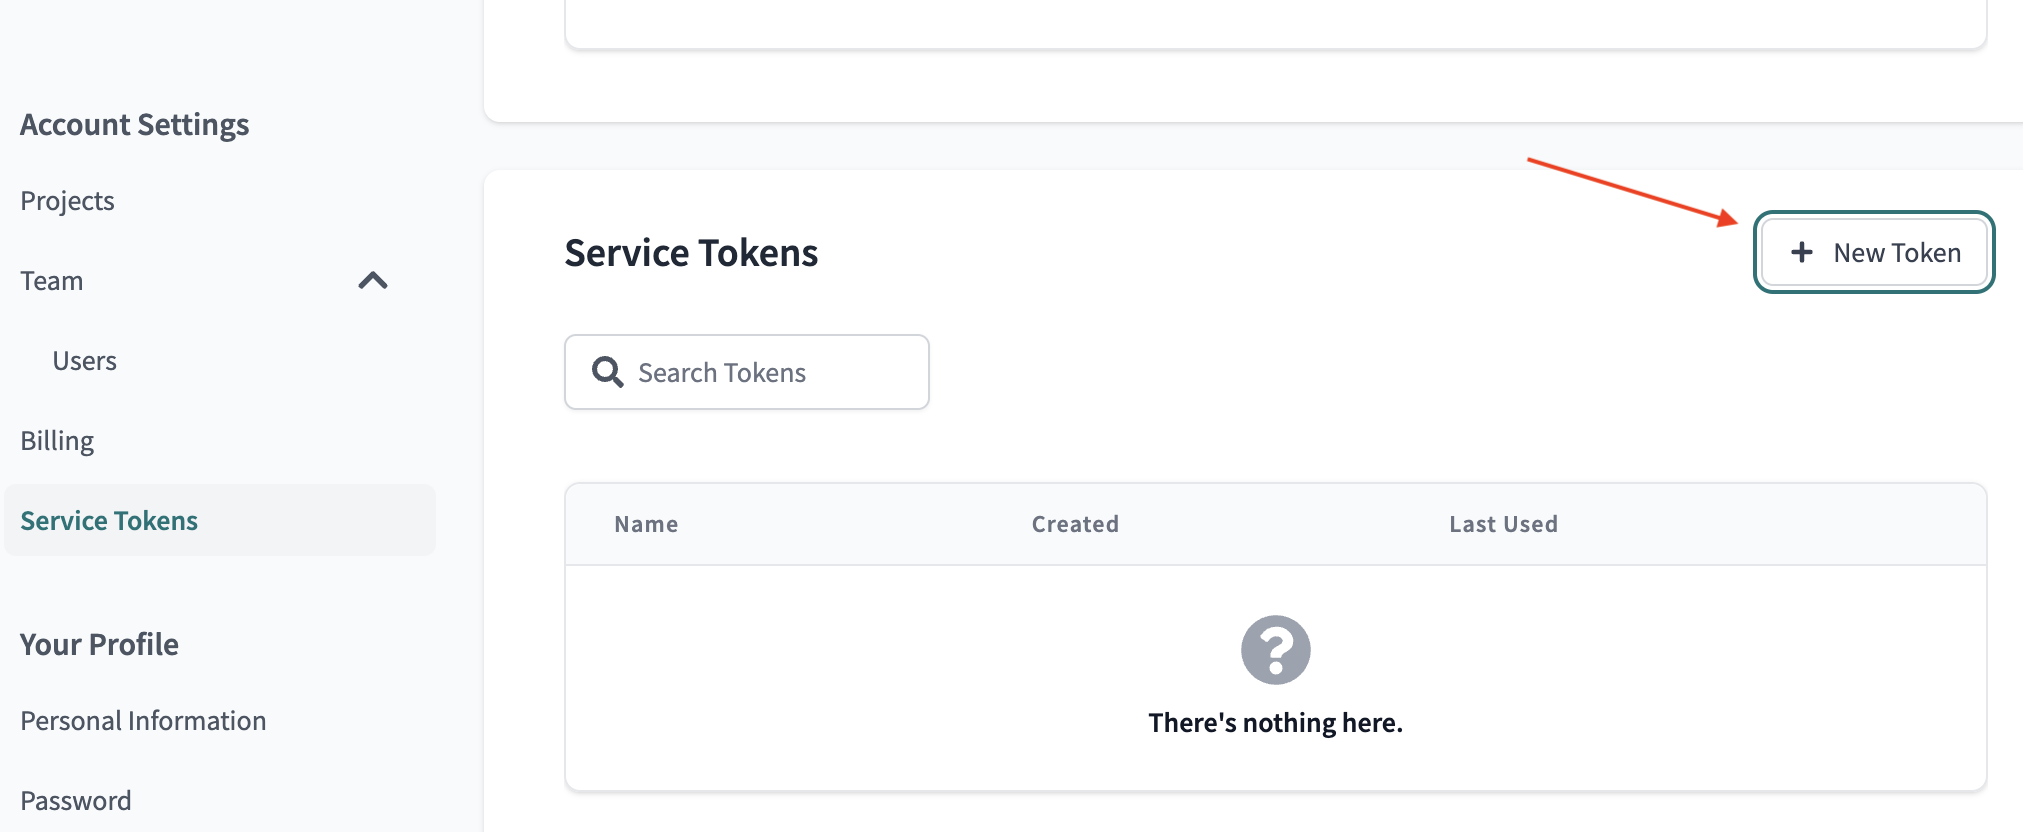
1. Navigate to **Account Settings → Service Tokens → + New Token**.
If you are interested in continuous deployment, you can use a Merge Trigger Production Job instead of the Artifacts Job listed above.
### dbt Cloud Access URL
You will need your [access url](https://docs.getdbt.com/docs/cloud/about-cloud/regions-ip-addresses) to connect Datafold to your dbt Cloud account.
### Add dbt Cloud Service Account Token
To connect Datafold to your dbt Cloud account, you will need to use a [Service Token](https://docs.getdbt.com/docs/dbt-cloud-apis/service-tokens).
info
Please note that the use of User API Keys for this purpose is no longer recommended due to a [recent security update](https://docs.getdbt.com/docs/dbt-cloud-apis/service-tokens) in dbt Cloud. [Learn more below](/integrations/orchestrators/dbt-cloud#deprecating-user-tokens)
1. Navigate to **Account Settings → Service Tokens → + New Token**.
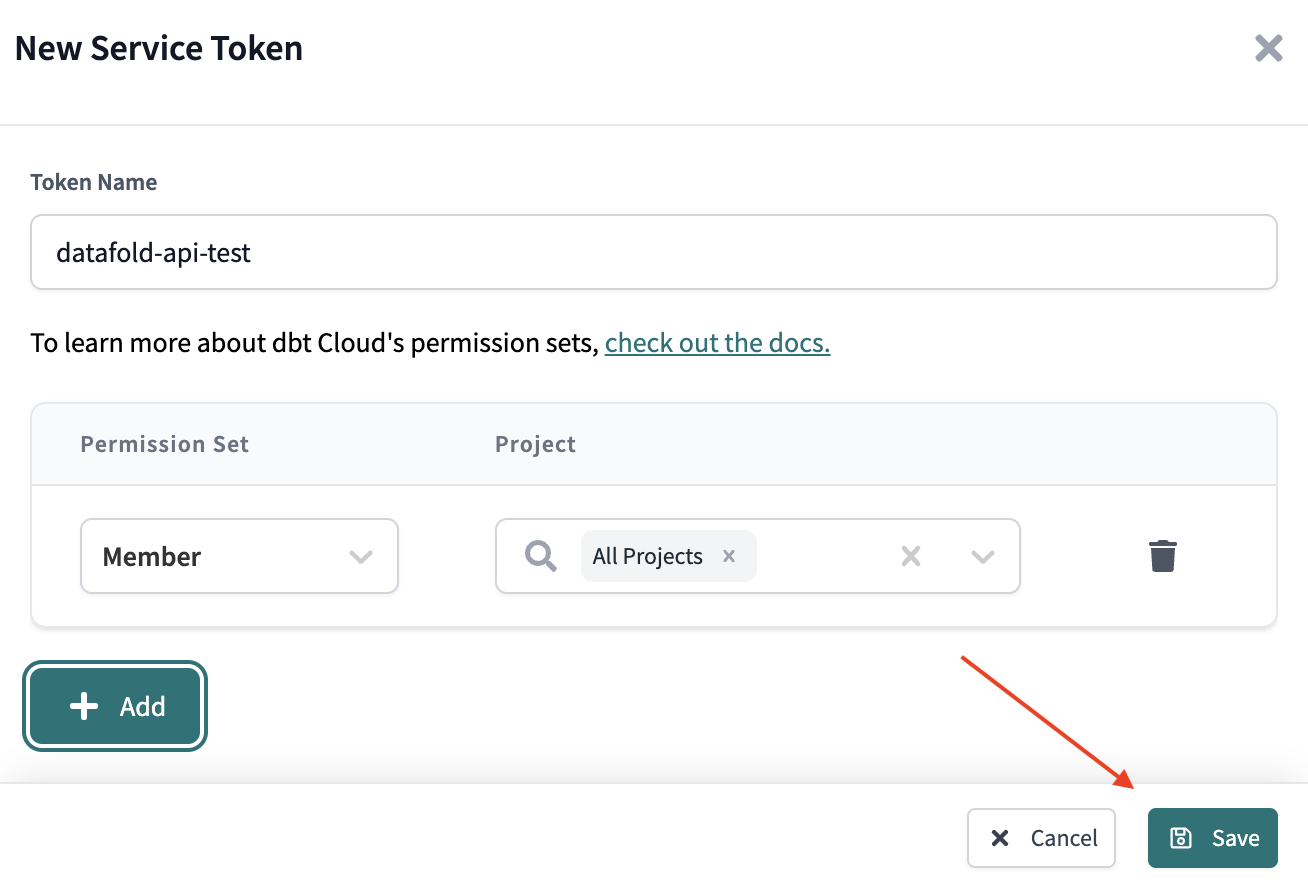
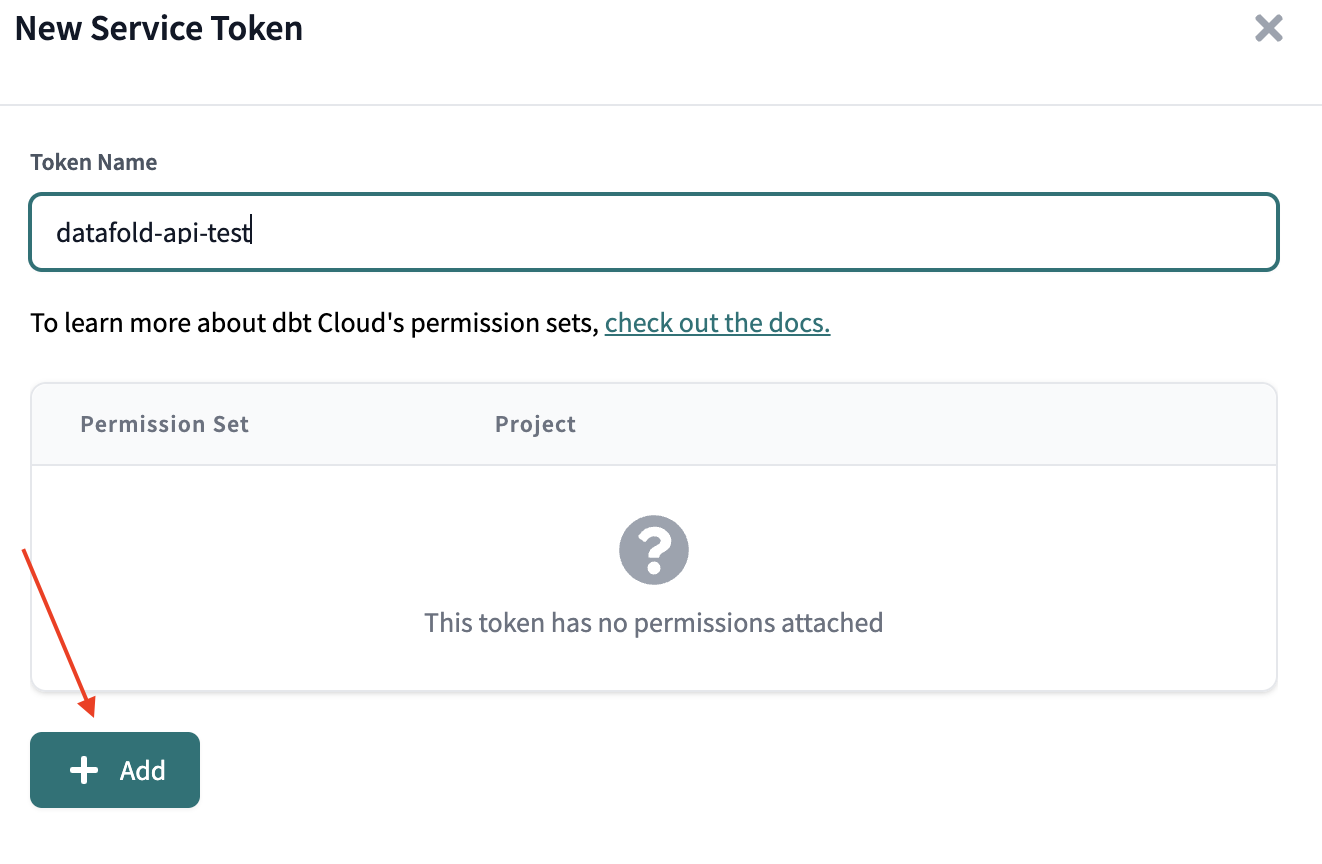 1. Add a Permission Set and select `Member` or `Developer`.
2. Select `All Projects`, or check only the projects you intend to use with Datafold.
3. Save your changes.
1. Add a Permission Set and select `Member` or `Developer`.
2. Select `All Projects`, or check only the projects you intend to use with Datafold.
3. Save your changes.
 1. Navigate to **Your Profile → API Access** and copy the token.
#### Deprecating User Tokens
dbt Cloud is transitioning away from the use of User API Keys for authentication. The User API Key will be replaced by account-scoped Personal Access Tokens (PATs).
This update will affect the functionality of certain API endpoints. Specifically, `/v2/accounts`, `/v3/accounts`, and `/whoami` (undocumented API) will no longer return information about all the accounts tied to a user. Instead, the response will be filtered to include only the context of the specific account in the request.
dbt Cloud users have until April 30, 2024, to implement this change. After this date, all user API keys will be scoped to an account. New customers are required to use the new account-scoped PATs.
For more information, please refer to the [dbt Cloud API Documentation](https://docs.getdbt.com/docs/dbt-cloud-apis/service-tokens).
If you have any questions or require further assistance, please don't hesitate to contact our support team.
## Create a dbt Cloud Integration in the Datafold app
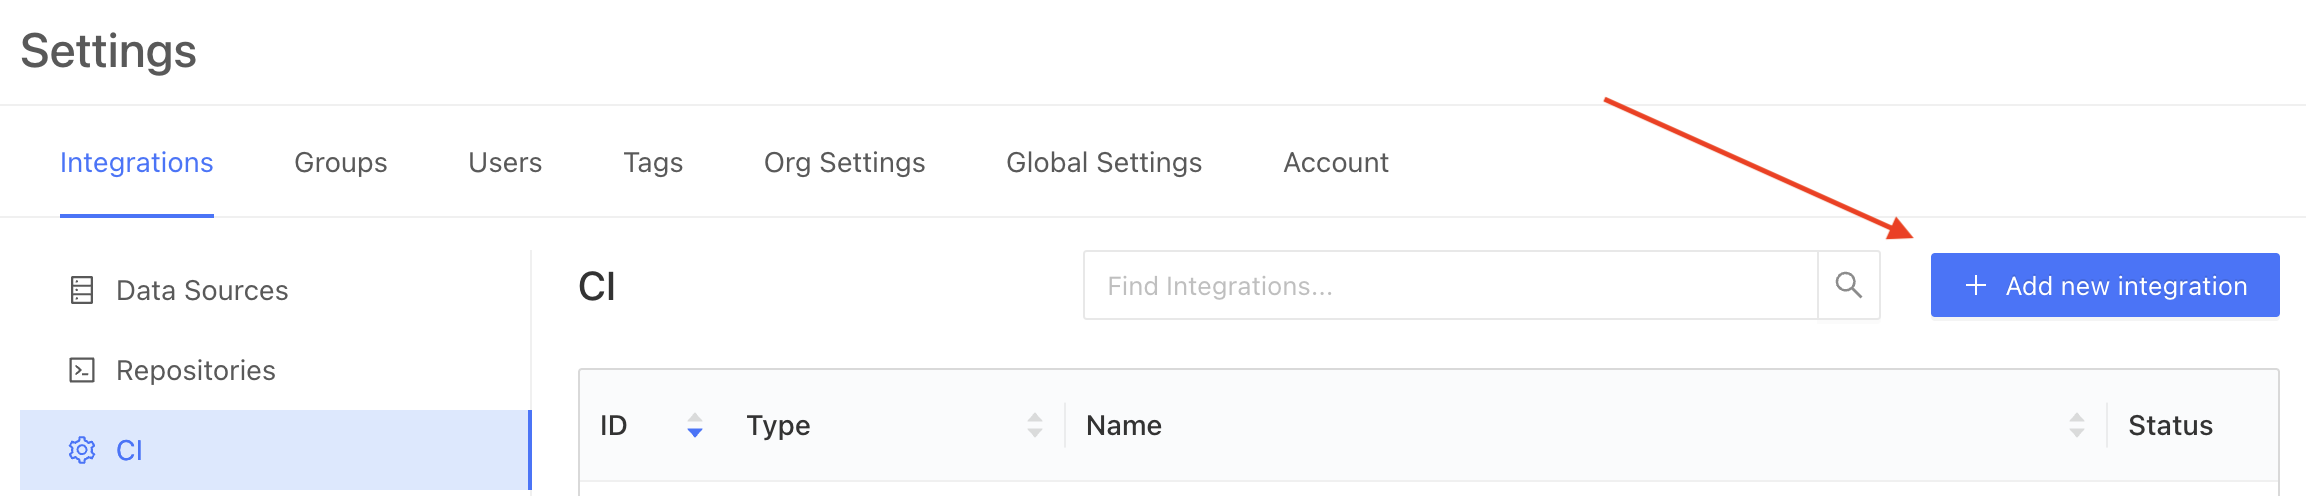
* Navigate to Settings > Integrations > CI and create a new dbt Cloud integration.
1. Navigate to **Your Profile → API Access** and copy the token.
#### Deprecating User Tokens
dbt Cloud is transitioning away from the use of User API Keys for authentication. The User API Key will be replaced by account-scoped Personal Access Tokens (PATs).
This update will affect the functionality of certain API endpoints. Specifically, `/v2/accounts`, `/v3/accounts`, and `/whoami` (undocumented API) will no longer return information about all the accounts tied to a user. Instead, the response will be filtered to include only the context of the specific account in the request.
dbt Cloud users have until April 30, 2024, to implement this change. After this date, all user API keys will be scoped to an account. New customers are required to use the new account-scoped PATs.
For more information, please refer to the [dbt Cloud API Documentation](https://docs.getdbt.com/docs/dbt-cloud-apis/service-tokens).
If you have any questions or require further assistance, please don't hesitate to contact our support team.
## Create a dbt Cloud Integration in the Datafold app
* Navigate to Settings > Integrations > CI and create a new dbt Cloud integration.
 ## Configuration
### Basic Settings
## Configuration
### Basic Settings
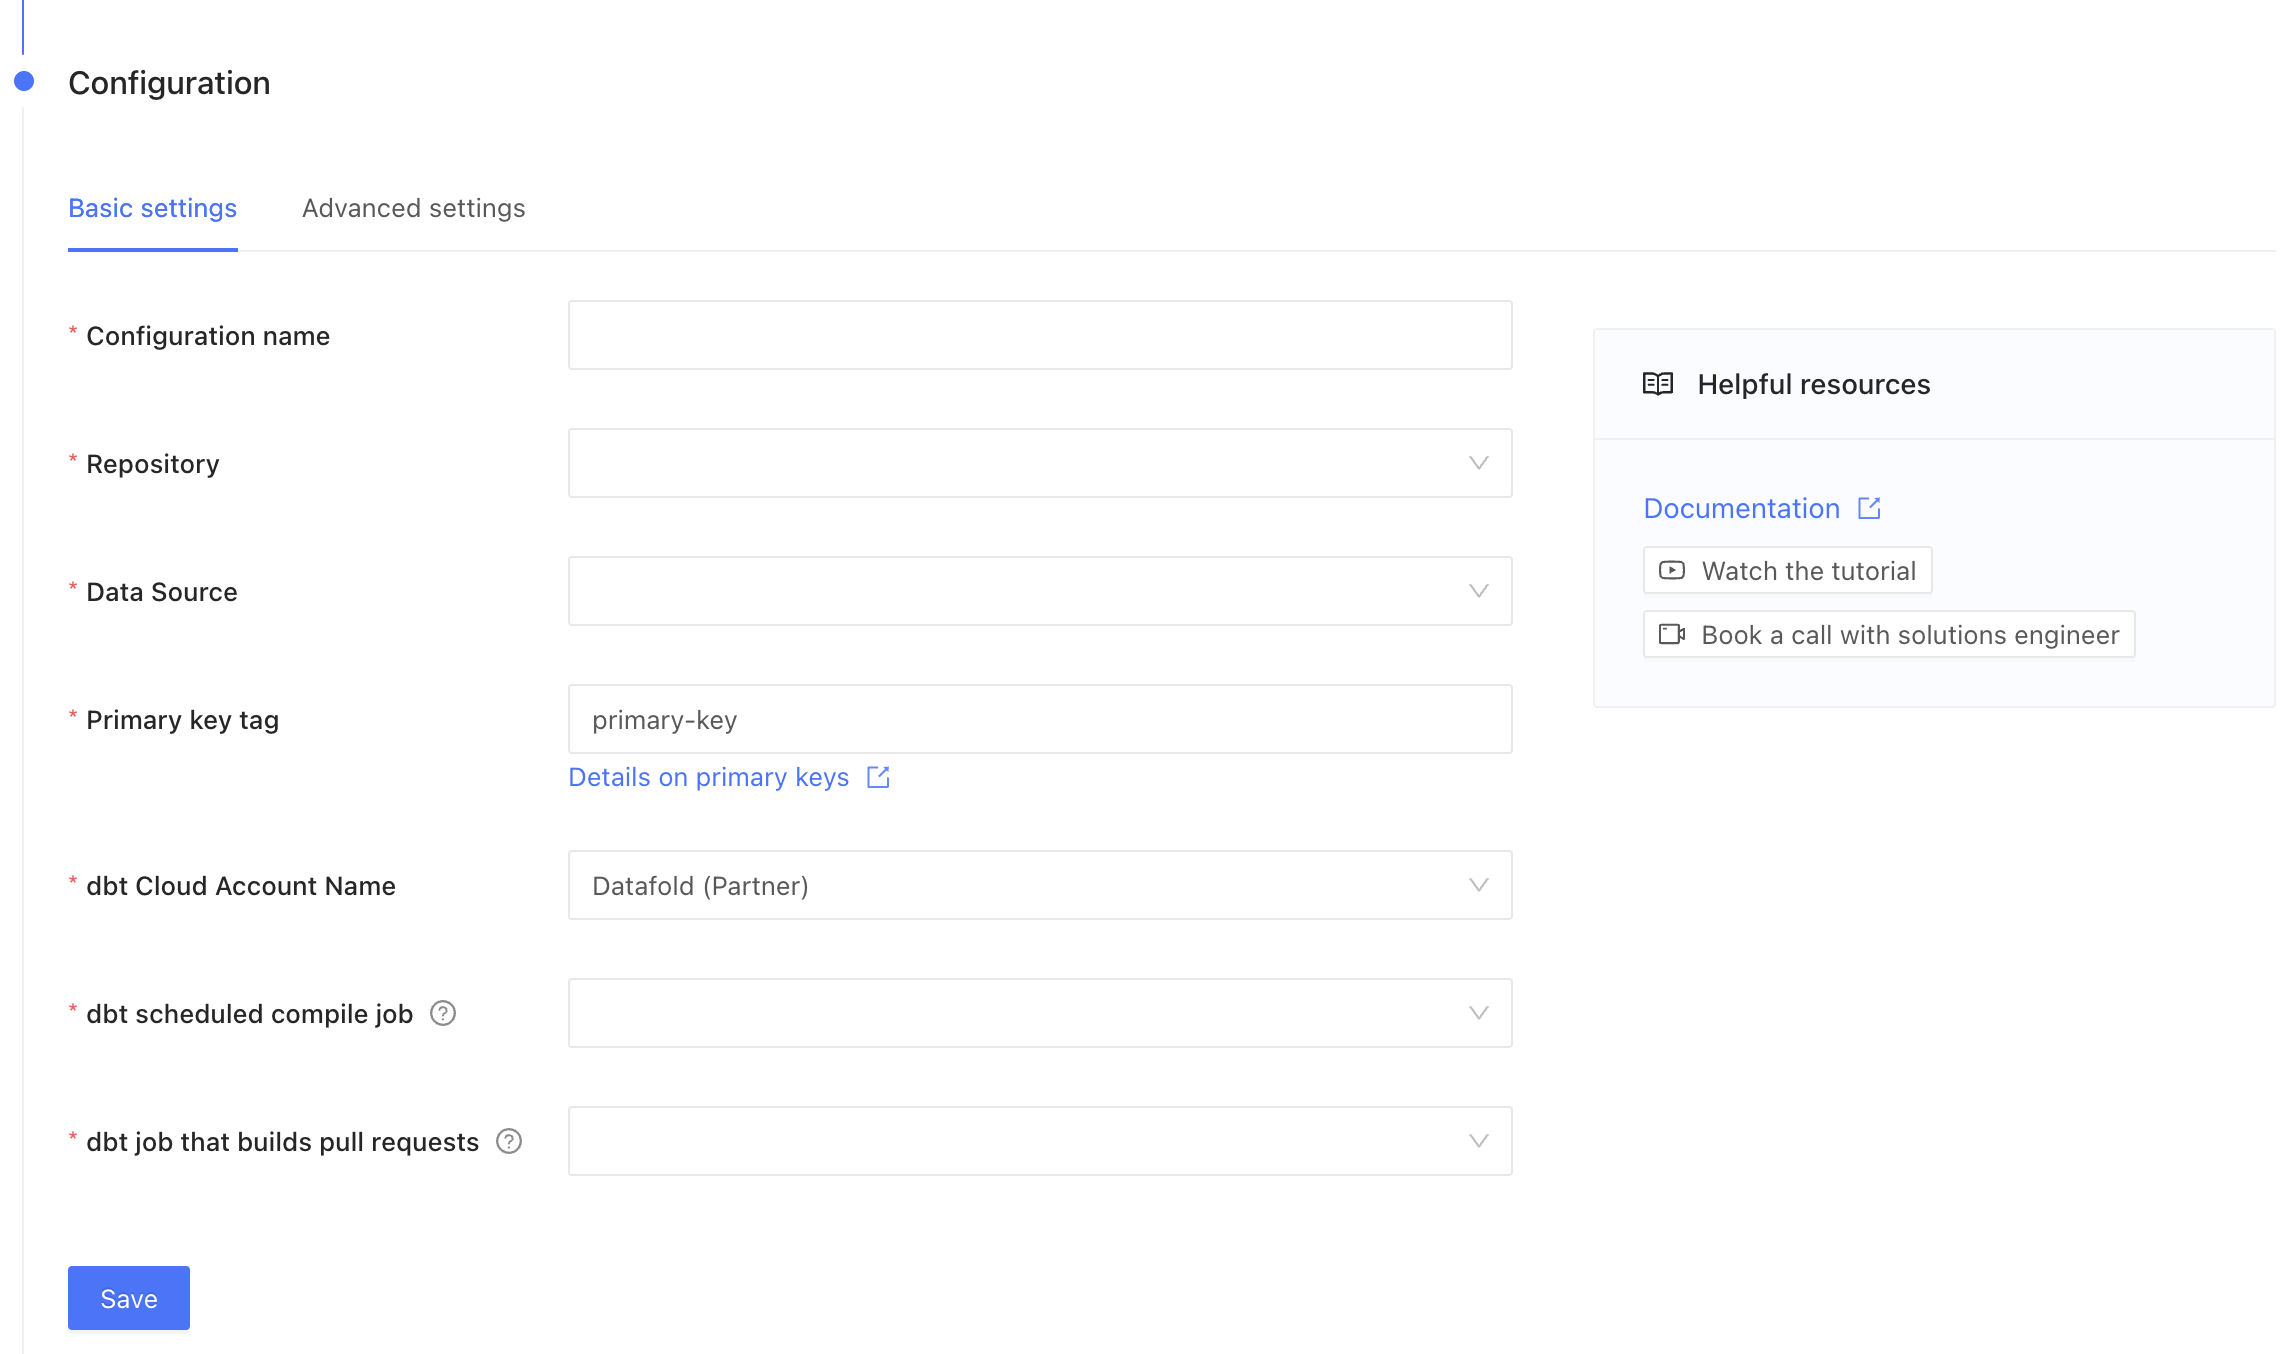 * **Repository**: Select a repository that you set up in [the Code Repositories setup step](/integrations/code-repositories).
* **Data Connection**: Select a connection that you set up in [the Data Connections setup step](/integrations/databases).
* **Name**: This can be anything!
* **Primary key tag**: This is a text string that you may use to tag primary keys in your dbt project yaml. Note that to avoid the need for tagging, [primary keys can be inferred from dbt uniqueness tests](/deployment-testing/configuration/primary-key).
* **Account name**: This will be autofilled using your dbt API key.
* **Job that creates dbt artifacts**: This will be [the Artifacts Job that you created](#create-an-artifacts-job-in-dbt-cloud). Or, if you have a dbt production job that runs on each merge to main, select that job.
* **Job that builds pull requests**: This is the dbt CI job that is triggered when you open a Pull Request or Merge Request.
### Advanced Settings
* **Repository**: Select a repository that you set up in [the Code Repositories setup step](/integrations/code-repositories).
* **Data Connection**: Select a connection that you set up in [the Data Connections setup step](/integrations/databases).
* **Name**: This can be anything!
* **Primary key tag**: This is a text string that you may use to tag primary keys in your dbt project yaml. Note that to avoid the need for tagging, [primary keys can be inferred from dbt uniqueness tests](/deployment-testing/configuration/primary-key).
* **Account name**: This will be autofilled using your dbt API key.
* **Job that creates dbt artifacts**: This will be [the Artifacts Job that you created](#create-an-artifacts-job-in-dbt-cloud). Or, if you have a dbt production job that runs on each merge to main, select that job.
* **Job that builds pull requests**: This is the dbt CI job that is triggered when you open a Pull Request or Merge Request.
### Advanced Settings
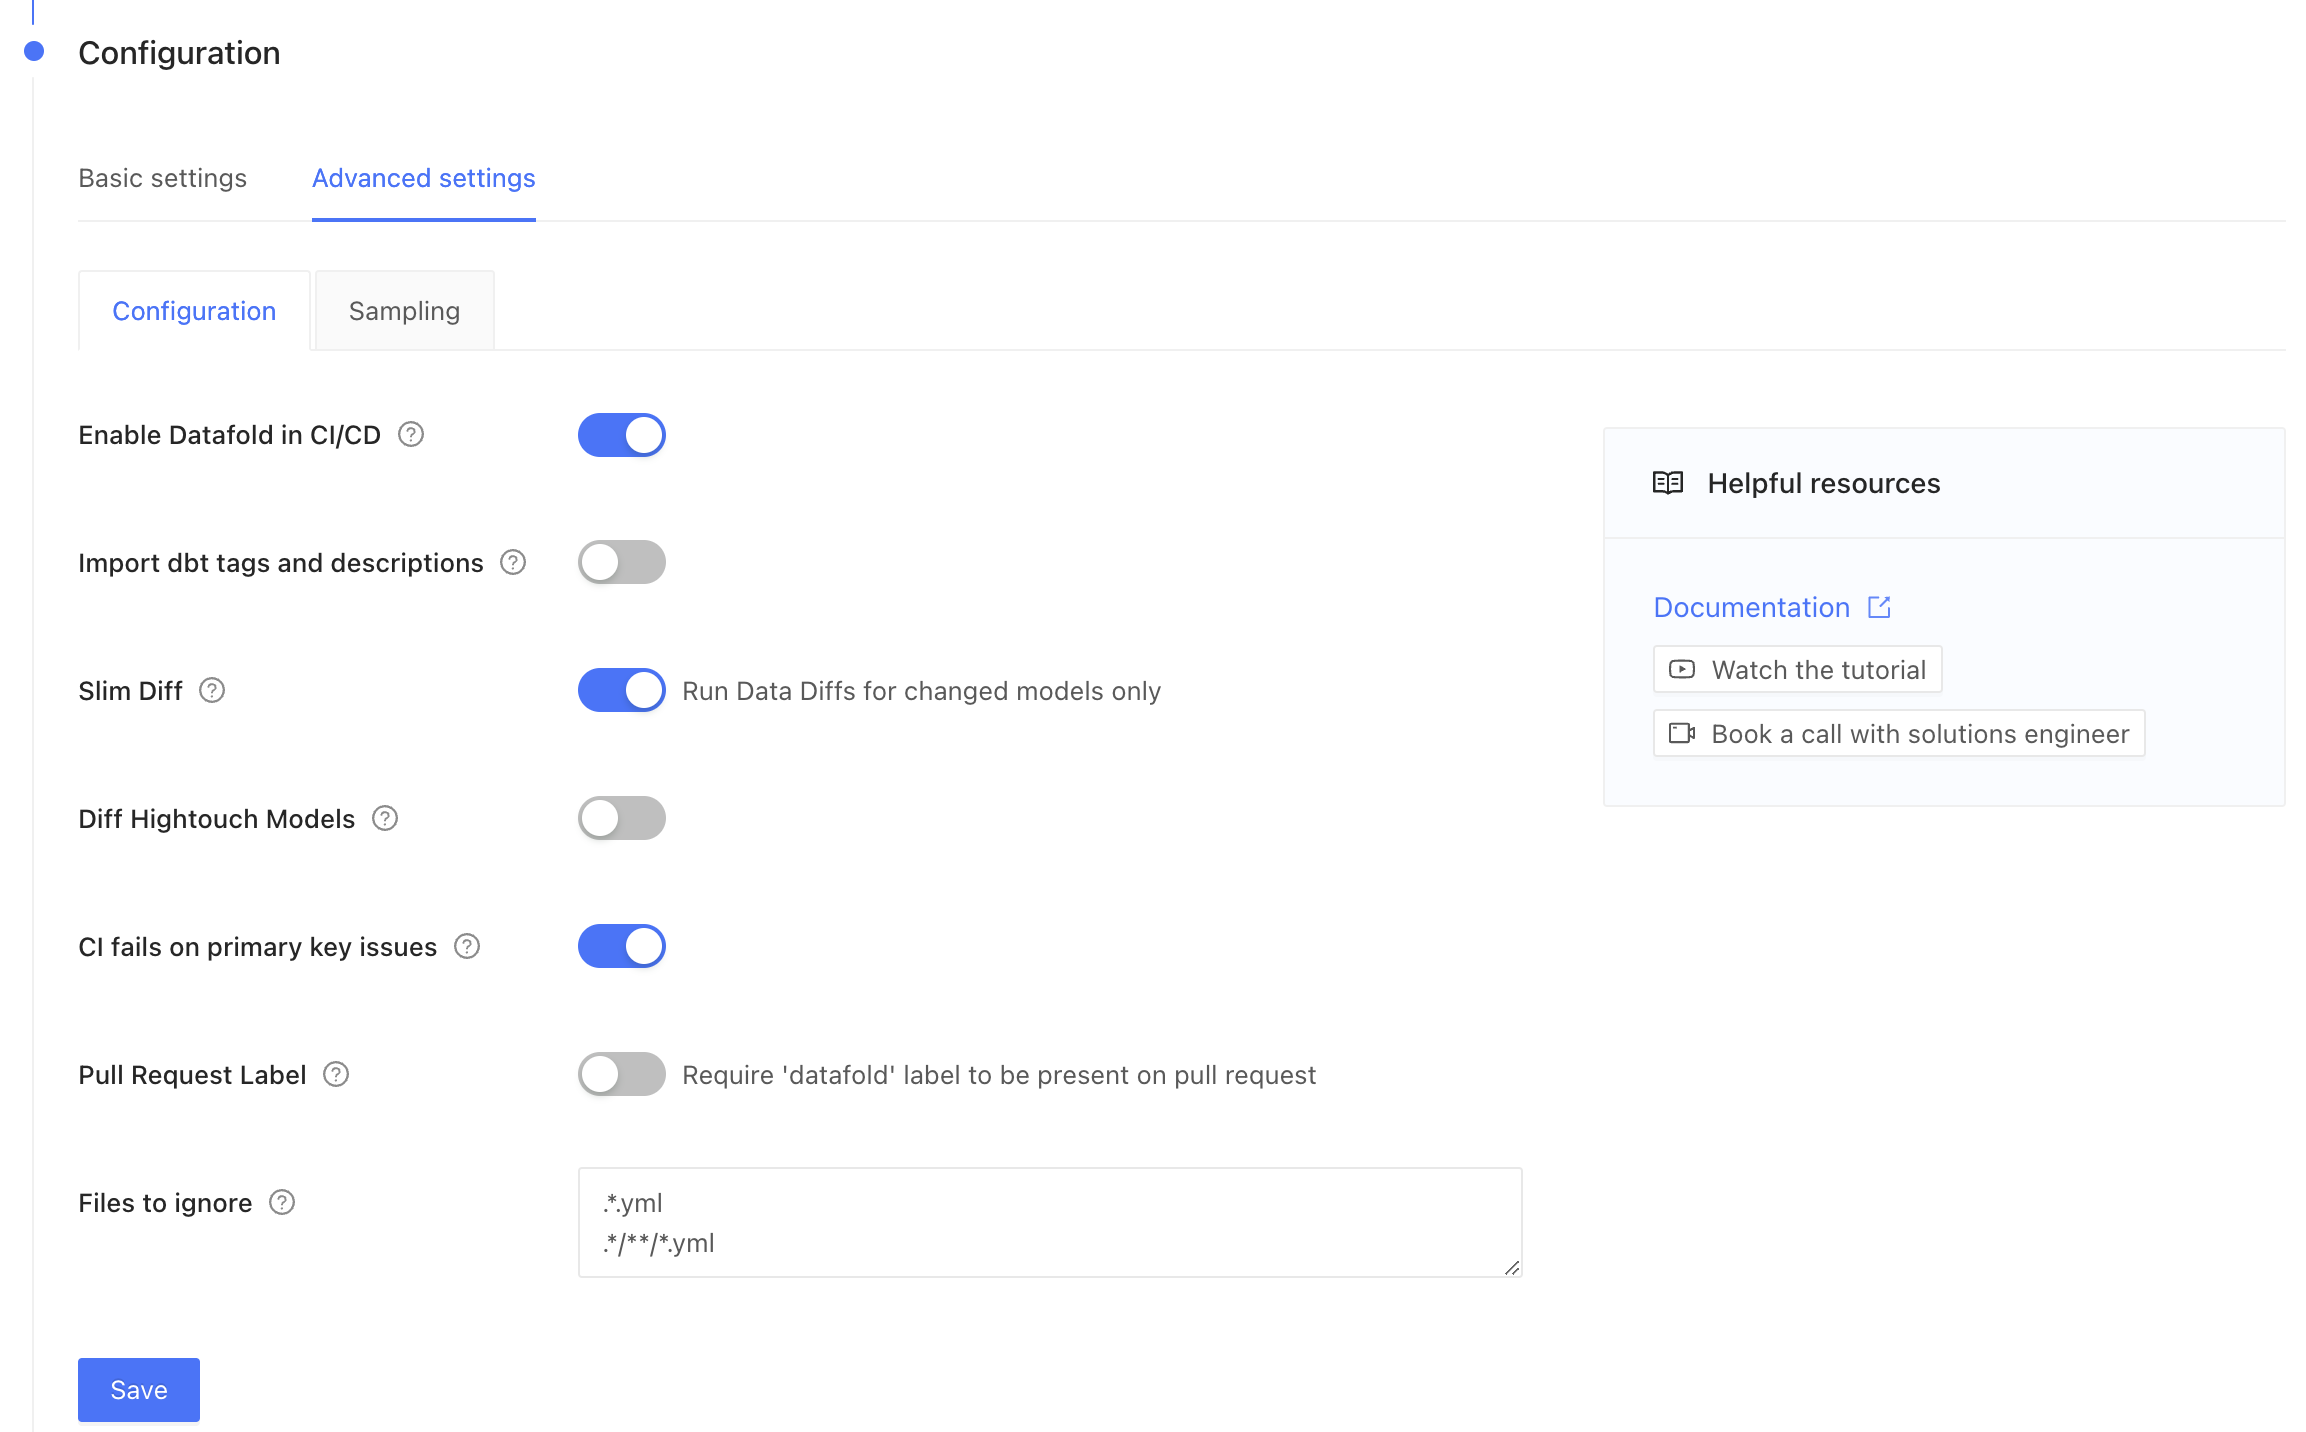 * **Enable Datafold in CI/CD**: High-level switch to turn Datafold off or on in CI (but we hope you'll leave it on!).
* **Import dbt tags and descriptions**: Populate our Lineage tool with dbt metadata. ⚠️ This feature is in development. ⚠️
* **Slim Diff**: Only diff modified models in CI, instead of all models. [Please read more about Slim Diff](/deployment-testing/best-practices/slim-diff), which is highly configurable using dbt yaml, and each organization will need to set a strategy based on their data environment.
* Downstream Hightouch models will be diffed even when Slim Diff is turned on.
* **Diff Hightouch Models**: Hightouch customers can see diffs of downstream Hightouch assets in Pull Requests.
* **CI fails on primary key issues**: The existence of null or duplicate primary keys causes the Datafold CI check to fail.
* **Pull Request Label**: For when you want Datafold to *only* run in CI when a label is manually applied in GitHub/GitLab.
* **CI Diff Threshold**: For when you want Datafold to *only* run automatically if the number of diffs doesn't exceed this threshold for a given CI run.
* **Files to ignore**: If at least one modified file doesn’t match the ignore pattern, Datafold CI diffs all changed models in the PR. If all modified files should be ignored, Datafold CI does not run in the PR. ([Additional details.](/deployment-testing/configuration/datafold-ci/on-demand))
* **Custom base branch**: For when you want Datafold to **only** run in CI when a PR is opened against a specific base branch. You might need this if you have multiple environments built from different branches. See [Custom branch](https://docs.getdbt.com/faqs/Environments/custom-branch-settings) in dbt Cloud docs.
Click save, and that's it!
Now that you've set up a dbt Cloud integration, Datafold will diff your impacted tables whenever you push commits to a PR. A summary of the diff will appear in GitHub, and detailed results will appear in the Datafold app.
* **Enable Datafold in CI/CD**: High-level switch to turn Datafold off or on in CI (but we hope you'll leave it on!).
* **Import dbt tags and descriptions**: Populate our Lineage tool with dbt metadata. ⚠️ This feature is in development. ⚠️
* **Slim Diff**: Only diff modified models in CI, instead of all models. [Please read more about Slim Diff](/deployment-testing/best-practices/slim-diff), which is highly configurable using dbt yaml, and each organization will need to set a strategy based on their data environment.
* Downstream Hightouch models will be diffed even when Slim Diff is turned on.
* **Diff Hightouch Models**: Hightouch customers can see diffs of downstream Hightouch assets in Pull Requests.
* **CI fails on primary key issues**: The existence of null or duplicate primary keys causes the Datafold CI check to fail.
* **Pull Request Label**: For when you want Datafold to *only* run in CI when a label is manually applied in GitHub/GitLab.
* **CI Diff Threshold**: For when you want Datafold to *only* run automatically if the number of diffs doesn't exceed this threshold for a given CI run.
* **Files to ignore**: If at least one modified file doesn’t match the ignore pattern, Datafold CI diffs all changed models in the PR. If all modified files should be ignored, Datafold CI does not run in the PR. ([Additional details.](/deployment-testing/configuration/datafold-ci/on-demand))
* **Custom base branch**: For when you want Datafold to **only** run in CI when a PR is opened against a specific base branch. You might need this if you have multiple environments built from different branches. See [Custom branch](https://docs.getdbt.com/faqs/Environments/custom-branch-settings) in dbt Cloud docs.
Click save, and that's it!
Now that you've set up a dbt Cloud integration, Datafold will diff your impacted tables whenever you push commits to a PR. A summary of the diff will appear in GitHub, and detailed results will appear in the Datafold app.