> ## Documentation Index
> Fetch the complete documentation index at: https://docs.datafold.com/llms.txt
> Use this file to discover all available pages before exploring further.
# OAuth Support
> Set up OAuth App Connections in your supported data warehouses to securely execute data diffs on behalf of your users.
This feature is currently supported for Databricks, Snowflake, Redshift, and BigQuery.
OAuth support empowers users to run data diffs based on their individual permissions and roles configured within the data warehouses. This ensures that data access is governed by existing security policies and protocols.
## Overview
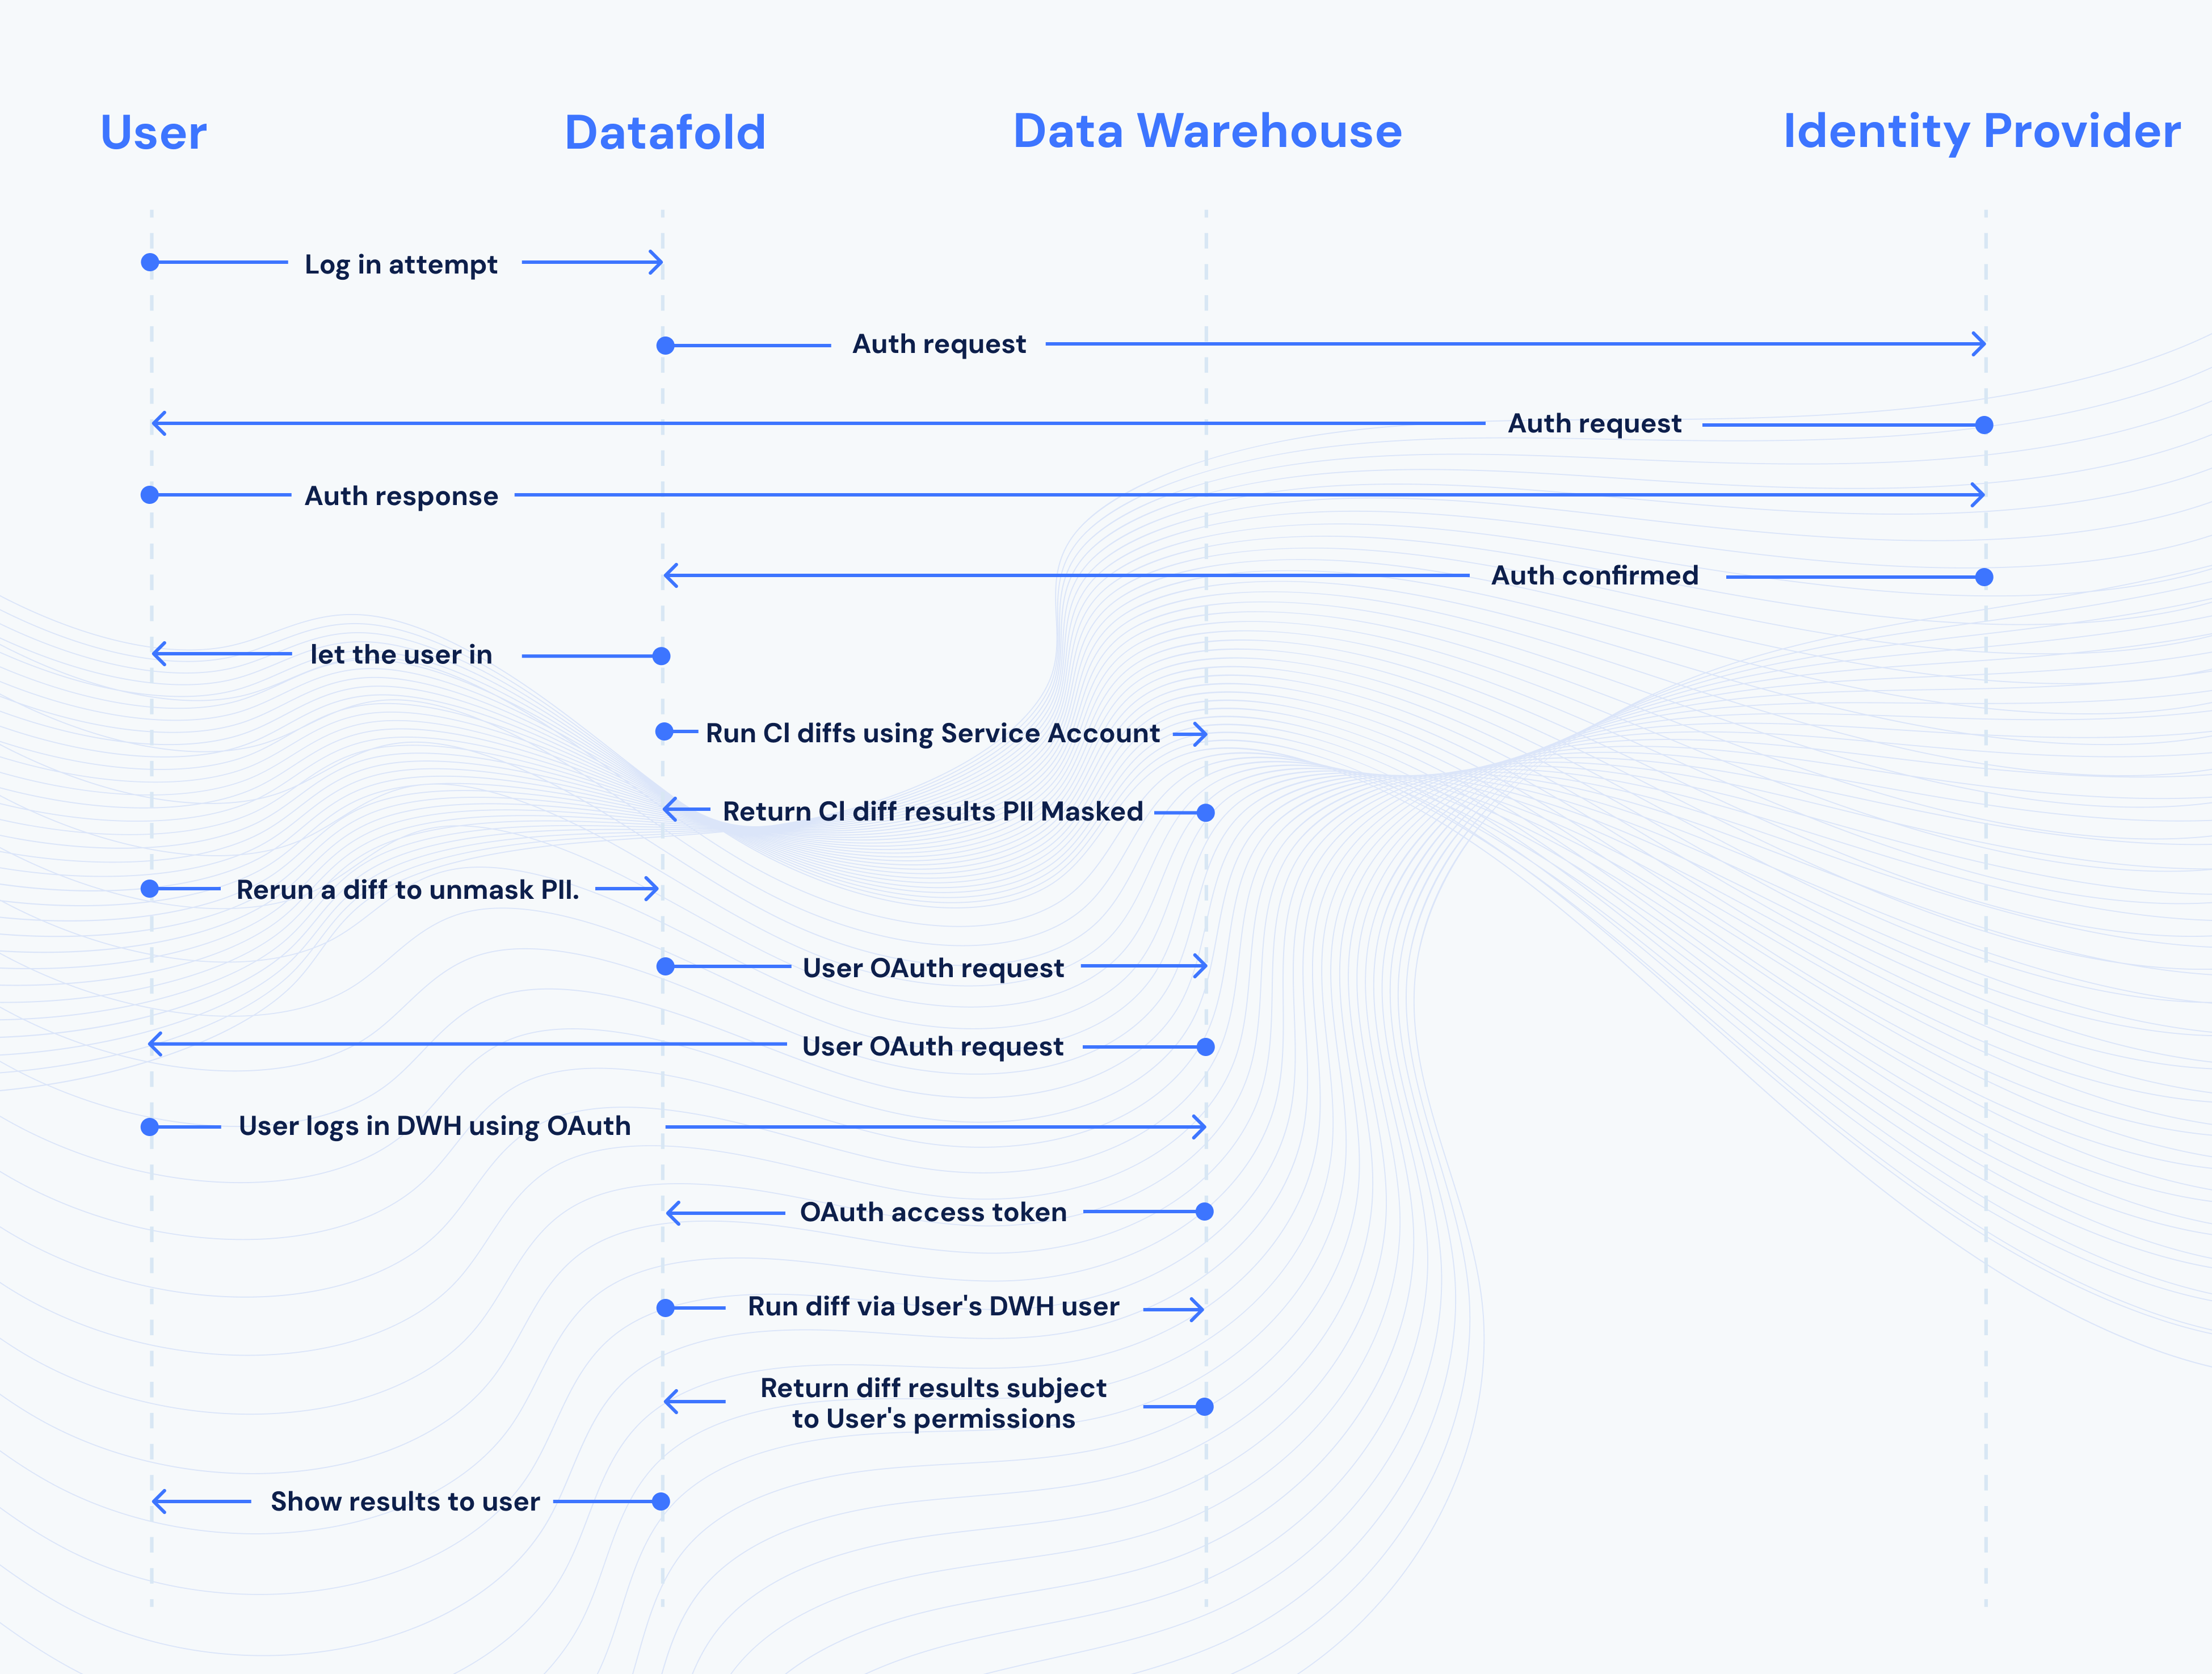
The diagram below illustrates how the authentication flow proceeds:
1. Users authenticate using the configured OAuth provider.
2. Users can then create diffs between data sets that their user can access using OAuth database permissions.
3. During Continuous Integration (CI), Datafold executes diffs using a Service Account with the least privileges, thus masking sensitive/PII data.
4. If a user needs to see sensitive/PII data from a CI diff, and they have permission via OAuth to do so, they can rerun the diff, and then Datafold will authenticate the user using OAuth database permissions. Then, the user will have access to the data based on these permissions.
This structure ensures that diffs are executed with the user's database credentials with their configured roles and permissions. Data access permissions are thus fully managed by the database, and Datafold only passes through queries.
 ## How it works
### 1. Create a Data Diff
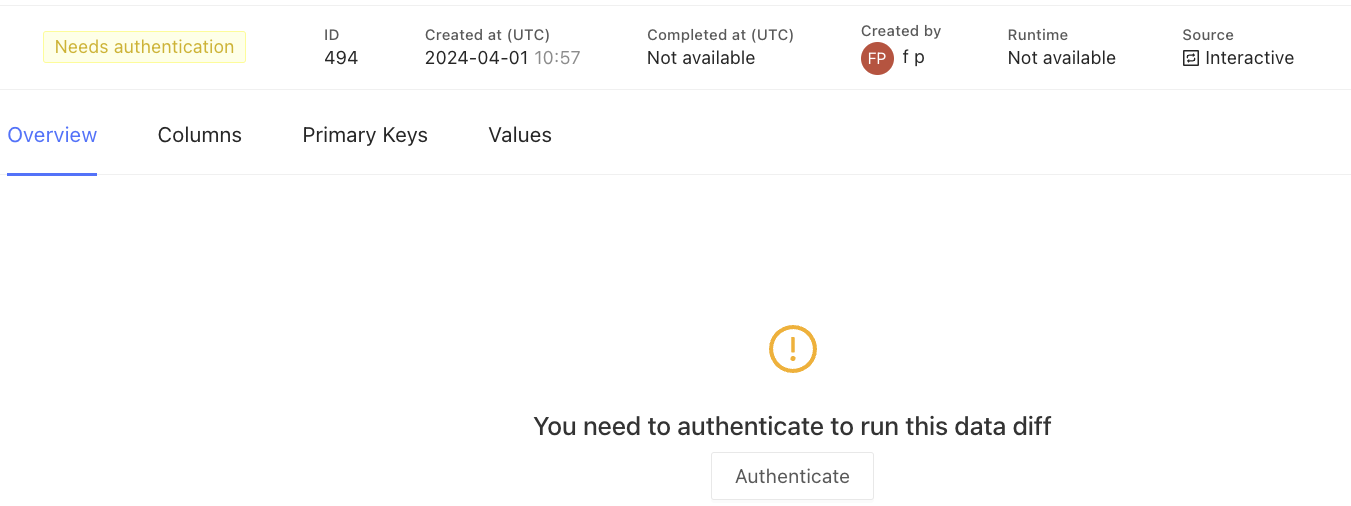
When you attempt to run a data diff, you will notice that it won't run without authentication:
## How it works
### 1. Create a Data Diff
When you attempt to run a data diff, you will notice that it won't run without authentication:
 ### 2. Authorize the Data Diff
Authorize the data diff by clicking the **Authenticate** button. This will redirect you to the data warehouse for authentication:
### 2. Authorize the Data Diff
Authorize the data diff by clicking the **Authenticate** button. This will redirect you to the data warehouse for authentication:
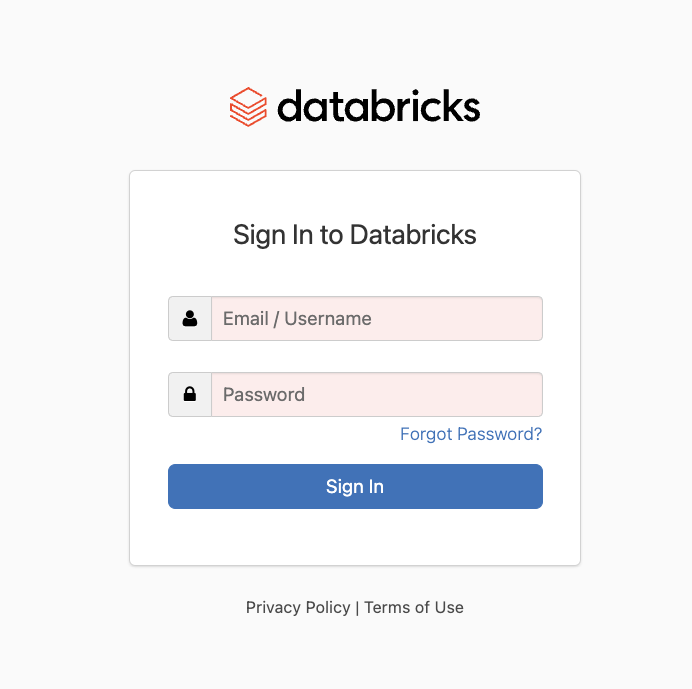 Upon successful authentication, you will be redirected back.
### 3. The Data Diff is now running
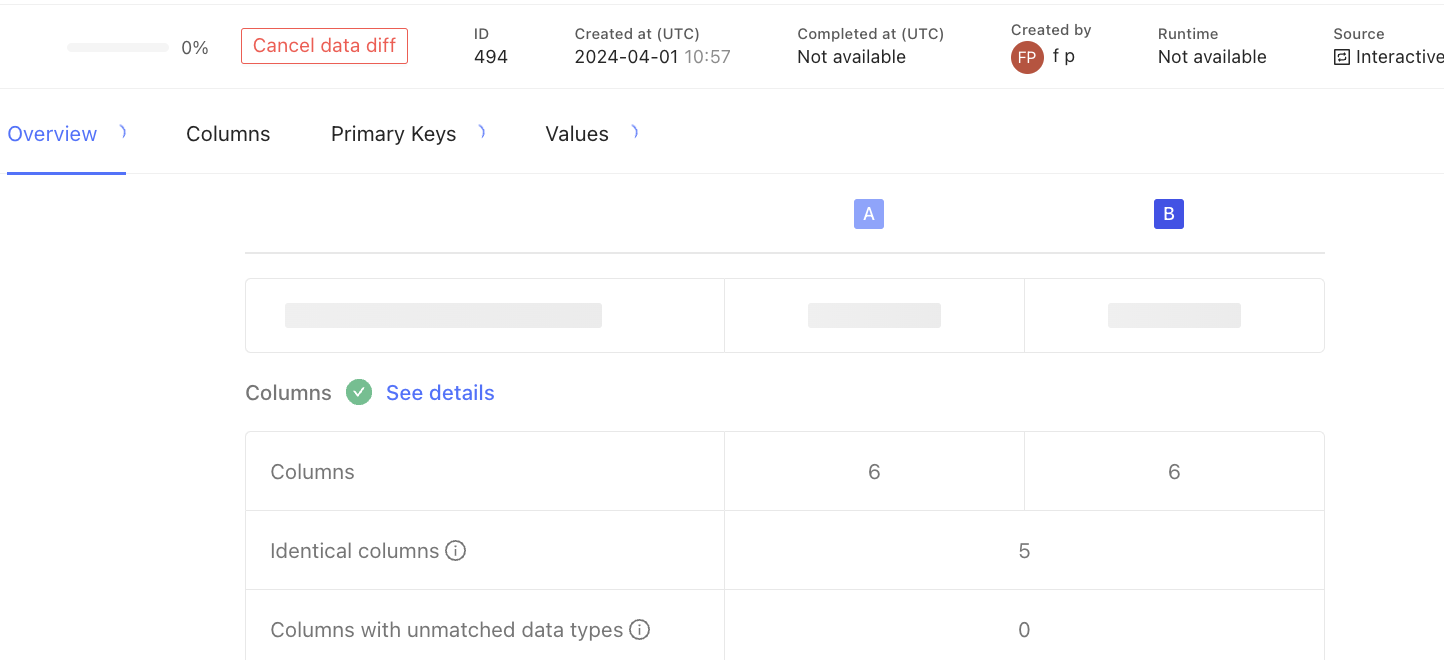
Upon successful authentication, you will be redirected back.
### 3. The Data Diff is now running
 ### 4. View the Data Diff results
The results reflect your permissions within the data warehouse:
### 4. View the Data Diff results
The results reflect your permissions within the data warehouse:
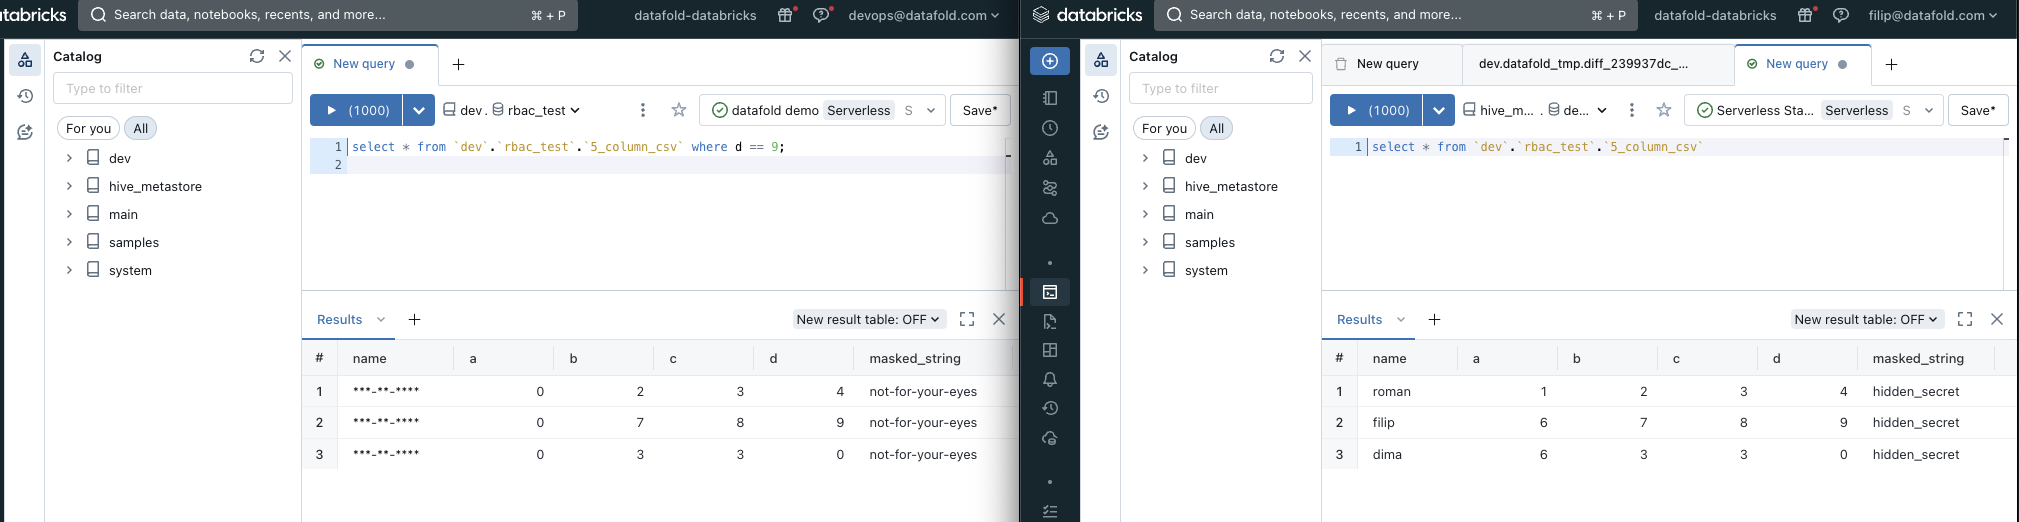
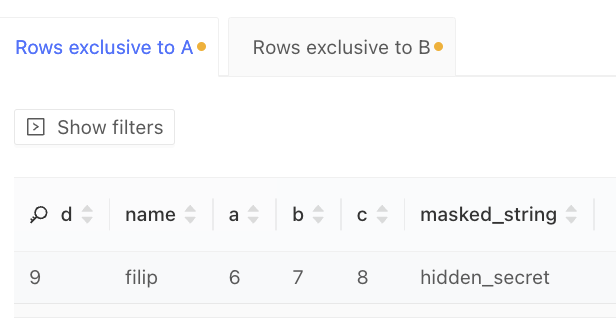 Note that running the same data diff, as a different user, renders different results:
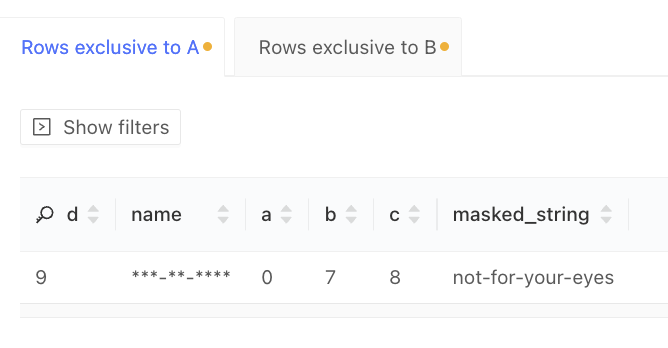 The masked values represent the data retrieved from the data warehouse. We do not conduct any post-processing:
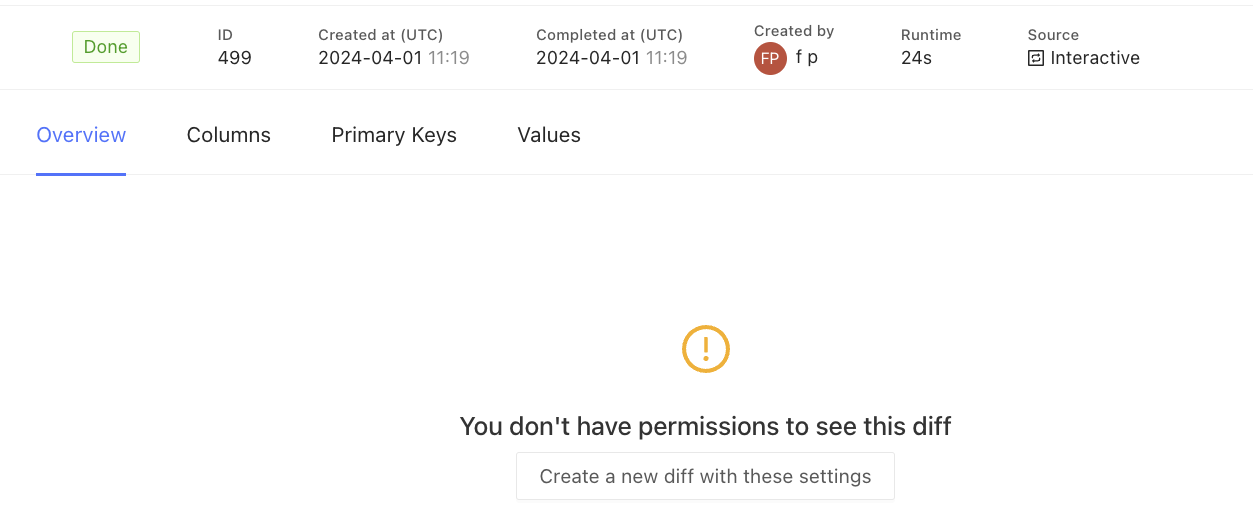
 By default, results are only visible to their authors. Users can still clone data diffs, but the results may differ depending on their data warehouse access levels.
For example, another user would not be able to access the data diff results from the previous example:
By default, results are only visible to their authors. Users can still clone data diffs, but the results may differ depending on their data warehouse access levels.
For example, another user would not be able to access the data diff results from the previous example:
 ### 5. Sharing Data Diffs
Data diff sharing is a feature that enables you to share data diffs with other users. This is useful in scenarios such as compliance verification, where auditors can access specific data diffs without first requiring permissions to be set up in the data warehouse.
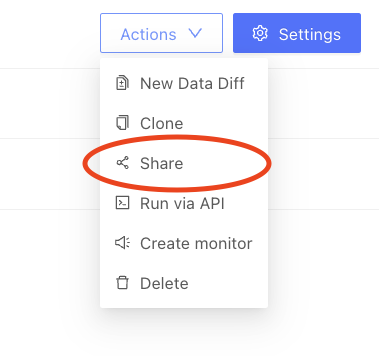
Sharing can be accessed via the **Actions** dropdown on the data diff page:
### 5. Sharing Data Diffs
Data diff sharing is a feature that enables you to share data diffs with other users. This is useful in scenarios such as compliance verification, where auditors can access specific data diffs without first requiring permissions to be set up in the data warehouse.
Sharing can be accessed via the **Actions** dropdown on the data diff page:
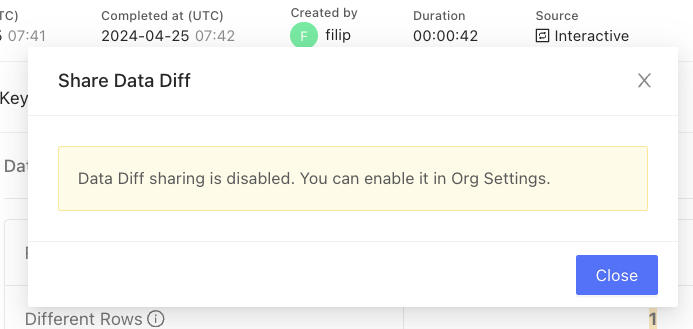
 Note that data diff sharing is disabled by default:
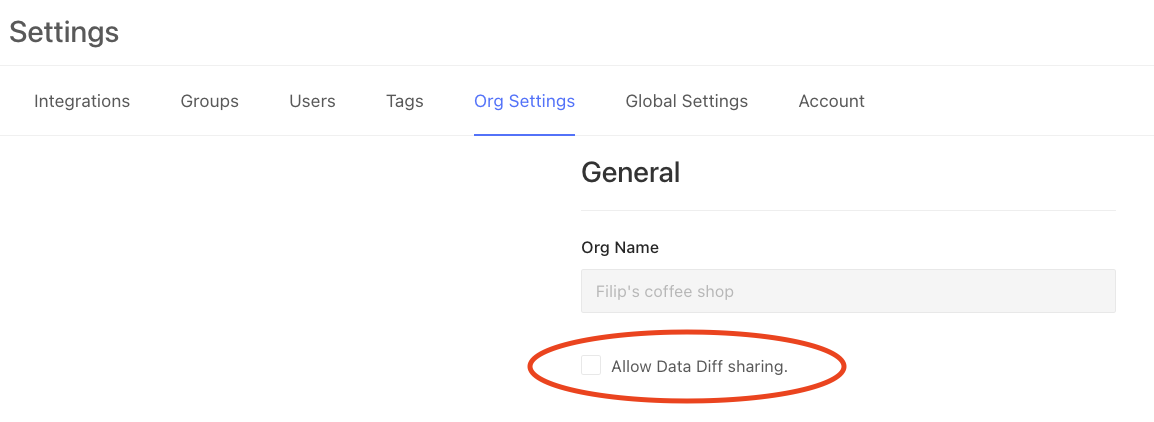
 It can be enabled under **Org Settings** by clicking on **Allow Data Diff sharing**:
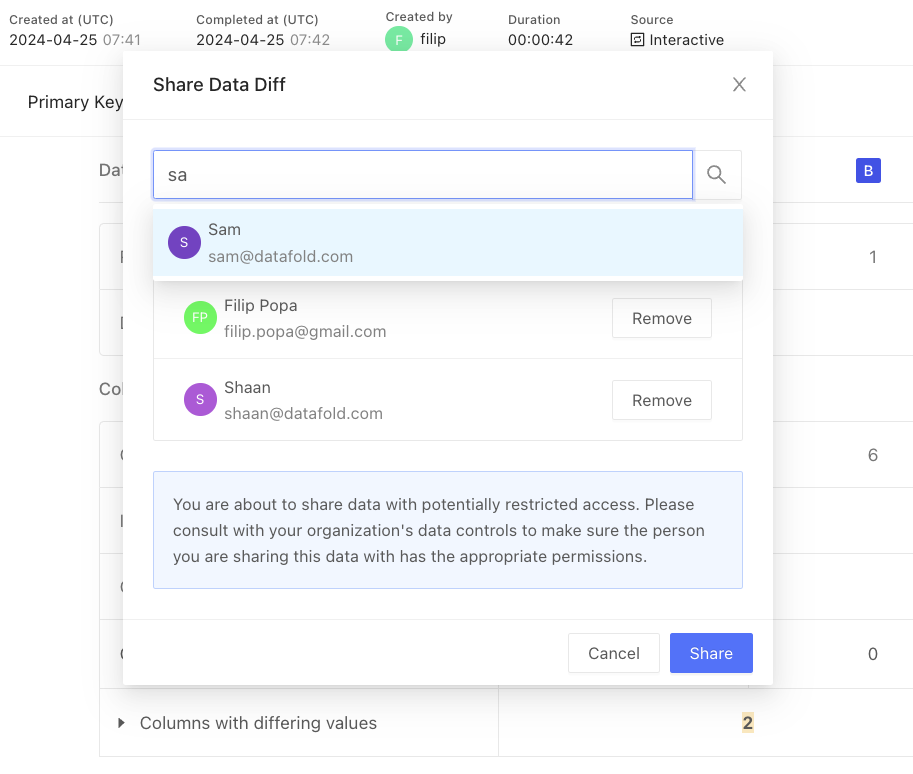
 Once enabled, you can share data diffs with other users:
 ## Configuring OAuth
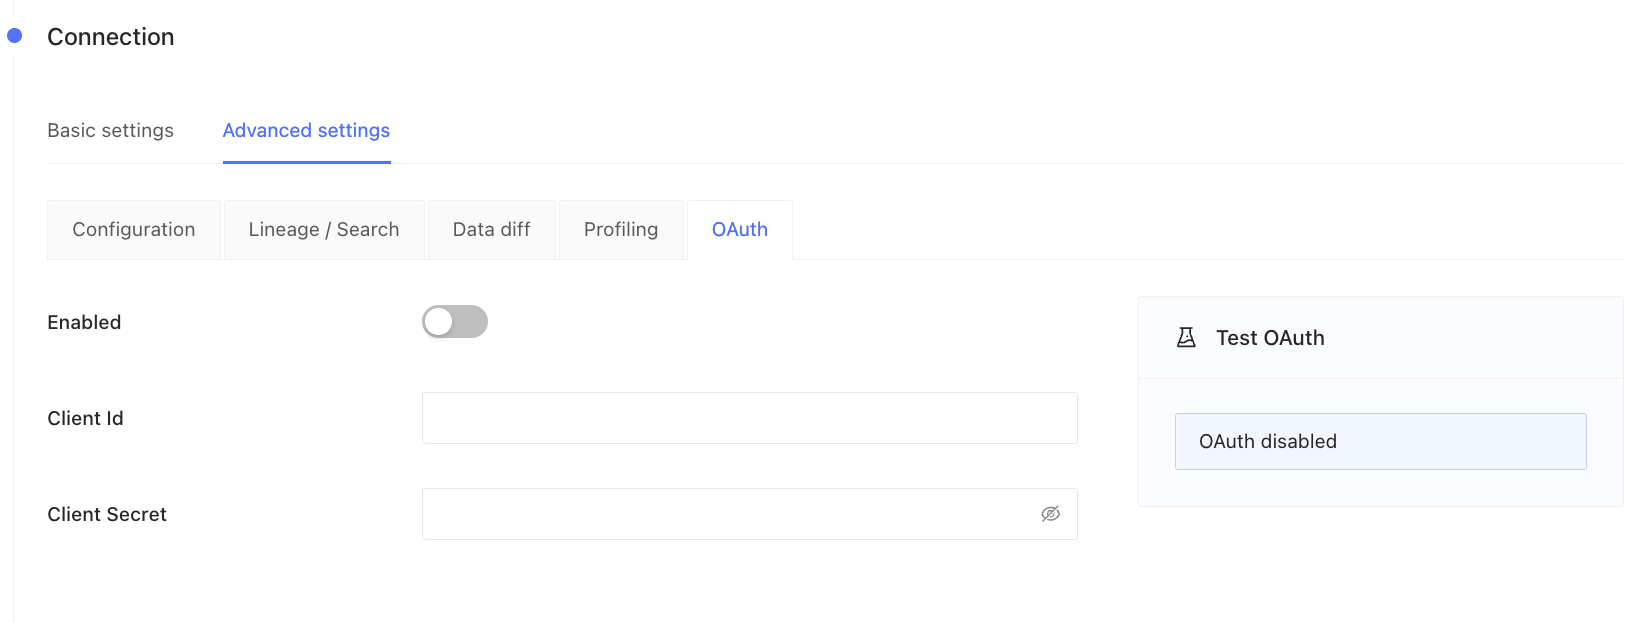
Navigate to **Settings** and click on your data connection. Then, click on **Advanced settings** and under **OAuth**, set the **Client Id** and **Client Secret** fields:
## Configuring OAuth
Navigate to **Settings** and click on your data connection. Then, click on **Advanced settings** and under **OAuth**, set the **Client Id** and **Client Secret** fields:
 ## Example: Databricks
To create a new Databricks app connection:
1. Go to **Settings** and **App connections**.
2. Click **Add connection** in the top right of the screen.
## Example: Databricks
To create a new Databricks app connection:
1. Go to **Settings** and **App connections**.
2. Click **Add connection** in the top right of the screen.
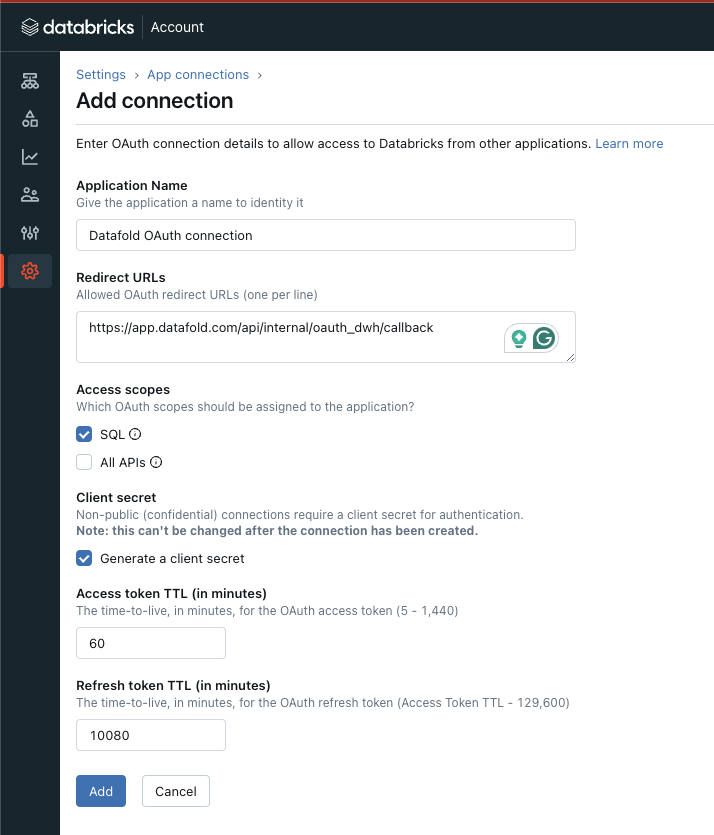 3. Fill in the required fields:
Application Name:
```
Datafold OAuth connection
```
Redirect URLs:
```
https://app.datafold.com/api/internal/oauth_dwh/callback
```
Datafold caches **access tokens** and uses **refresh tokens** to fetch new valid tokens in order to complete the diffs and reduce the number of times users need to authenticate against the data warehouses.
One hour is sufficient for the access token.
The refresh token will determine the frequency of user reauthentication, whether it's daily, weekly, or monthly.
4. Click **Add** to obtain the **Client ID** and **Client Secret**.
3. Fill in the required fields:
Application Name:
```
Datafold OAuth connection
```
Redirect URLs:
```
https://app.datafold.com/api/internal/oauth_dwh/callback
```
Datafold caches **access tokens** and uses **refresh tokens** to fetch new valid tokens in order to complete the diffs and reduce the number of times users need to authenticate against the data warehouses.
One hour is sufficient for the access token.
The refresh token will determine the frequency of user reauthentication, whether it's daily, weekly, or monthly.
4. Click **Add** to obtain the **Client ID** and **Client Secret**.
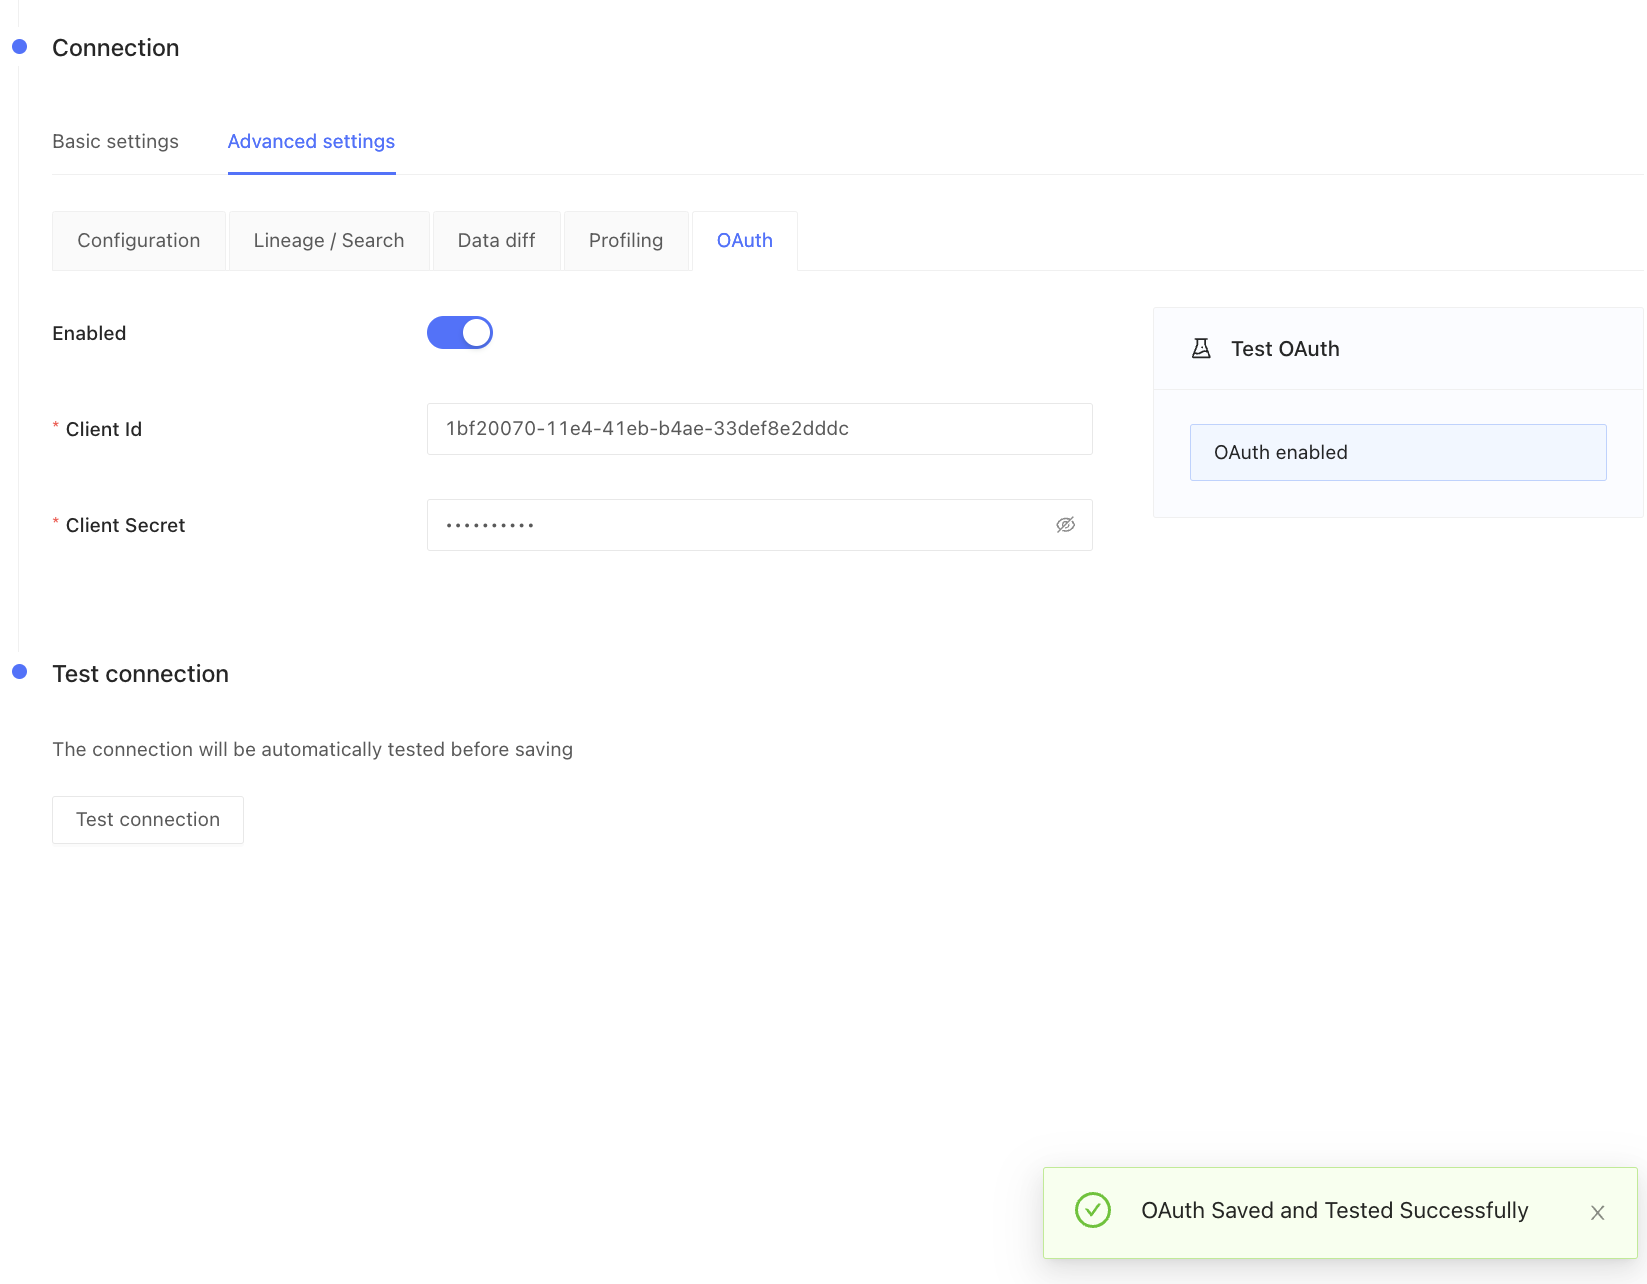
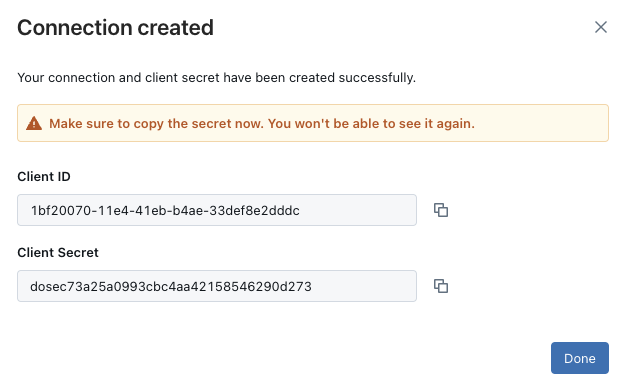 5. Fill in the **Client ID** and **Client Secret** fields in Datafold's Data Connection advanced settings:
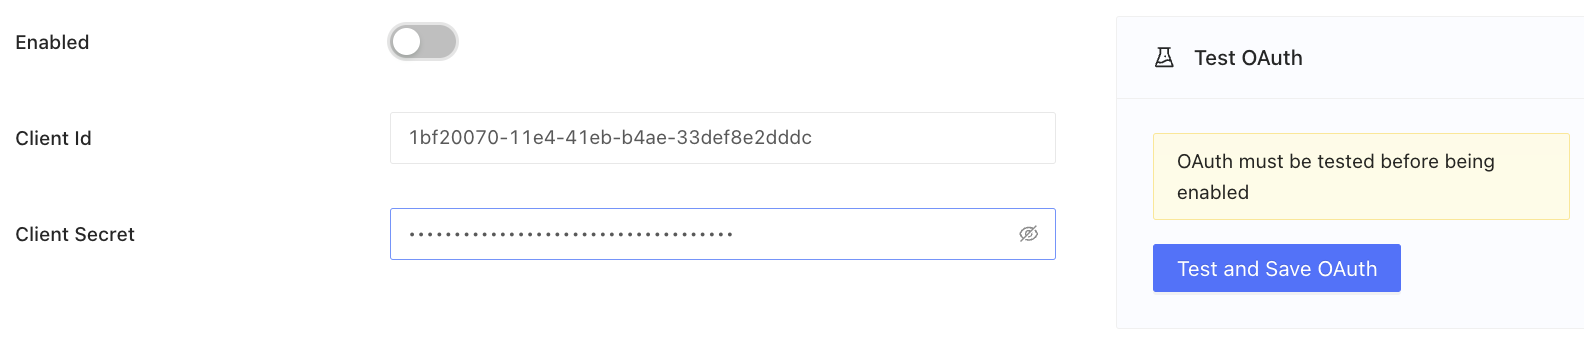 6. Click **Test and save OAuth**. You will be redirected to Databricks to complete authentication. If you are already authenticated, you will be redirected back. This notification signals a successful OAuth configuration:
 ### Additional steps for Databricks
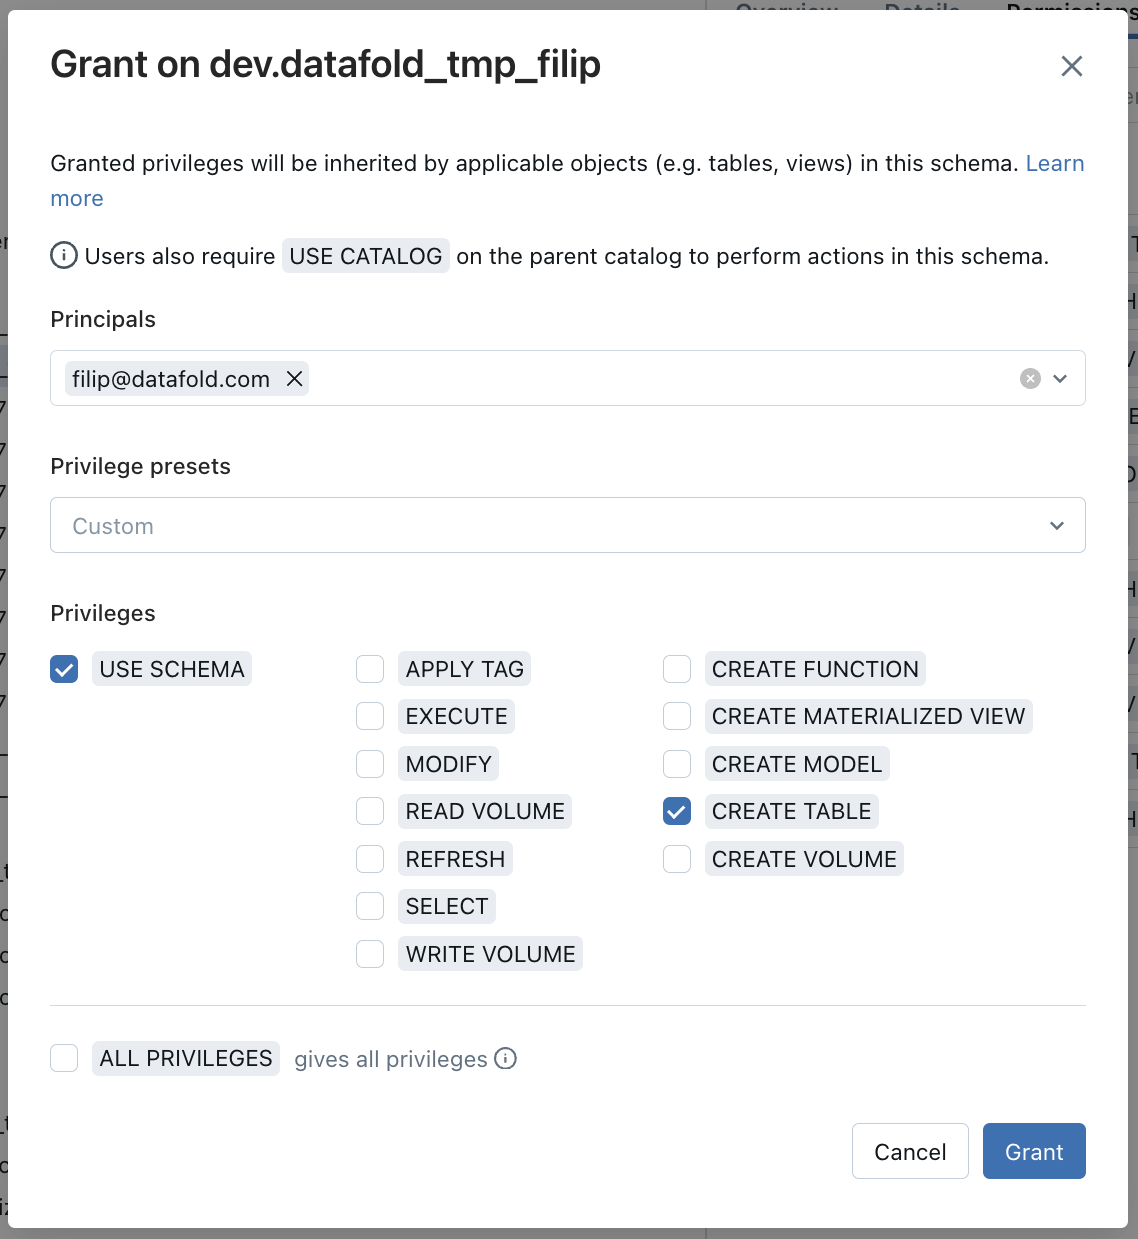
To ensure that users have correct access rights to temporary tables (stored in **Dataset for temporary tables** provided in the **Basic settings** for the Databricks connection), follow these steps:
1. Update the permissions for the **Dataset for temporary tables** in Databricks.
2. Grant these permissions to Datafold users: **USE SCHEMA** and **CREATE TABLE**.
This will ensure that materialization results from data diffs are only readable by their authors.
### Additional steps for Databricks
To ensure that users have correct access rights to temporary tables (stored in **Dataset for temporary tables** provided in the **Basic settings** for the Databricks connection), follow these steps:
1. Update the permissions for the **Dataset for temporary tables** in Databricks.
2. Grant these permissions to Datafold users: **USE SCHEMA** and **CREATE TABLE**.
This will ensure that materialization results from data diffs are only readable by their authors.
 ## Example: Snowflake
To create a new Snowflake app connection:
1. Go to Snowflake and run this SQL:
```sql theme={null}
CREATE SECURITY INTEGRATION DATAFOLD_OAUTH
TYPE = OAUTH
ENABLED = TRUE
OAUTH_CLIENT = CUSTOM
OAUTH_CLIENT_TYPE = 'CONFIDENTIAL'
OAUTH_REDIRECT_URI = 'https://app.datafold.com/api/internal/oauth_dwh/callback'
PRE_AUTHORIZED_ROLES_LIST=(, , ...)
OAUTH_ISSUE_REFRESH_TOKENS = TRUE
OAUTH_REFRESH_TOKEN_VALIDITY = 604800
OAUTH_ENFORCE_PKCE=TRUE;
```
**CAUTION**
* `PRE_AUTHORIZED_ROLES_LIST` must include all roles allowed to use the current security integration.
* By default, `ACCOUNTADMIN`, `SECURITYADMIN`, and `ORGADMIN` are not allowed to be included in `PRE_AUTHORIZED_ROLES_LIST`.
Datafold caches **access tokens** and uses **refresh tokens** to fetch new valid tokens in order to complete the diffs and reduce the number of times users need to authenticate against the data warehouses.
`OAUTH_REFRESH_TOKEN_VALIDITY` can be in the range of 3600 (1 hour) to 7776000 (90 days).
2. To retrieve `OAUTH_CLIENT_ID` and `OAUTH_CLIENT_SECRET`, run the following SQL:
```sql theme={null}
select system$show_oauth_client_secrets('DATAFOLD_OAUTH');
```
Example result:
## Example: Snowflake
To create a new Snowflake app connection:
1. Go to Snowflake and run this SQL:
```sql theme={null}
CREATE SECURITY INTEGRATION DATAFOLD_OAUTH
TYPE = OAUTH
ENABLED = TRUE
OAUTH_CLIENT = CUSTOM
OAUTH_CLIENT_TYPE = 'CONFIDENTIAL'
OAUTH_REDIRECT_URI = 'https://app.datafold.com/api/internal/oauth_dwh/callback'
PRE_AUTHORIZED_ROLES_LIST=(, , ...)
OAUTH_ISSUE_REFRESH_TOKENS = TRUE
OAUTH_REFRESH_TOKEN_VALIDITY = 604800
OAUTH_ENFORCE_PKCE=TRUE;
```
**CAUTION**
* `PRE_AUTHORIZED_ROLES_LIST` must include all roles allowed to use the current security integration.
* By default, `ACCOUNTADMIN`, `SECURITYADMIN`, and `ORGADMIN` are not allowed to be included in `PRE_AUTHORIZED_ROLES_LIST`.
Datafold caches **access tokens** and uses **refresh tokens** to fetch new valid tokens in order to complete the diffs and reduce the number of times users need to authenticate against the data warehouses.
`OAUTH_REFRESH_TOKEN_VALIDITY` can be in the range of 3600 (1 hour) to 7776000 (90 days).
2. To retrieve `OAUTH_CLIENT_ID` and `OAUTH_CLIENT_SECRET`, run the following SQL:
```sql theme={null}
select system$show_oauth_client_secrets('DATAFOLD_OAUTH');
```
Example result:
 3. Fill in the **Client ID** and **Client Secret** fields in Datafold's Data Connection advanced settings:
4. Click **Test and save OAuth**. You will be redirected to Snowflake to complete authentication.
Your default Snowflake role will be used for the generated **access token**.
This notification signals a successful OAuth configuration:
### Additional steps for Snowflake
To guarantee correct access rights to temporary tables (stored in **Schema for temporary tables** provided in the **Basic settings** for Snowflake connection):
* Grant the required privileges on the database and `TEMP` schema for all roles that will be using the OAuth flow.
```sql theme={null}
GRANT USAGE ON WAREHOUSE TO ROLE ;
GRANT USAGE ON DATABASE TO ROLE ;
GRANT USAGE ON ALL SCHEMAS IN DATABASE TO ROLE ;
GRANT USAGE ON FUTURE SCHEMAS IN DATABASE TO ROLE ;
GRANT ALL ON SCHEMA . TO ROLE ;
```
* Revoke `SELECT` privileges for tables in the `TEMP` schema for all roles that will be using the OAuth flow (except for the `DATAFOLDROLE` role), if they were provided. This action must be performed for all roles utilizing the OAuth flow.
```sql theme={null}
-- Revoke SELECT privileges for the TEMP SCHEMA
revoke SELECT ON ALL TABLES IN SCHEMA . FROM ROLE ;
revoke SELECT ON FUTURE TABLES IN SCHEMA . FROM ROLE ;
revoke SELECT ON ALL VIEWS IN SCHEMA . FROM ROLE ;
revoke SELECT ON FUTURE VIEWS IN SCHEMA . FROM ROLE ;
revoke SELECT ON ALL MATERIALIZED VIEWS IN SCHEMA . FROM ROLE ;
revoke SELECT ON FUTURE MATERIALIZED VIEWS IN SCHEMA . FROM ROLE ;
-- Revoke SELECT privileges for a Database
revoke SELECT ON ALL TABLES IN DATABASE FROM ROLE ;
revoke SELECT ON FUTURE TABLES IN DATABASE FROM ROLE ;
revoke SELECT ON ALL VIEWS IN DATABASE FROM ROLE ;
revoke SELECT ON FUTURE VIEWS IN DATABASE FROM ROLE ;
revoke SELECT ON ALL MATERIALIZED VIEWS IN DATABASE FROM ROLE ;
revoke SELECT ON FUTURE MATERIALIZED VIEWS IN DATABASE FROM ROLE ;
```
**CAUTION**
If one of the roles has `FUTURE GRANTS` at the database level, this role will also have `FUTURE GRANTS` on the `TEMP` schema.
## Example: Redshift
Redshift does not support OAuth2. To execute data diffs on behalf of a specific user, that user needs to provide their own credentials to Redshift.
1. Configure permissions on the Redshift side. Grant the necessary access rights to temporary tables (stored in the **Schema for temporary tables** provided in the **Basic settings** for Redshift connection):
```sql theme={null}
GRANT USAGE on SCHEMA to ;
GRANT CREATE on SCHEMA to ;
```
2. As an Administrator, select the **Enabled** toggle in Datafold's Redshift Data Connection **Advanced settings**:
3. Fill in the **Client ID** and **Client Secret** fields in Datafold's Data Connection advanced settings:
4. Click **Test and save OAuth**. You will be redirected to Snowflake to complete authentication.
Your default Snowflake role will be used for the generated **access token**.
This notification signals a successful OAuth configuration:
### Additional steps for Snowflake
To guarantee correct access rights to temporary tables (stored in **Schema for temporary tables** provided in the **Basic settings** for Snowflake connection):
* Grant the required privileges on the database and `TEMP` schema for all roles that will be using the OAuth flow.
```sql theme={null}
GRANT USAGE ON WAREHOUSE TO ROLE ;
GRANT USAGE ON DATABASE TO ROLE ;
GRANT USAGE ON ALL SCHEMAS IN DATABASE TO ROLE ;
GRANT USAGE ON FUTURE SCHEMAS IN DATABASE TO ROLE ;
GRANT ALL ON SCHEMA . TO ROLE ;
```
* Revoke `SELECT` privileges for tables in the `TEMP` schema for all roles that will be using the OAuth flow (except for the `DATAFOLDROLE` role), if they were provided. This action must be performed for all roles utilizing the OAuth flow.
```sql theme={null}
-- Revoke SELECT privileges for the TEMP SCHEMA
revoke SELECT ON ALL TABLES IN SCHEMA . FROM ROLE ;
revoke SELECT ON FUTURE TABLES IN SCHEMA . FROM ROLE ;
revoke SELECT ON ALL VIEWS IN SCHEMA . FROM ROLE ;
revoke SELECT ON FUTURE VIEWS IN SCHEMA . FROM ROLE ;
revoke SELECT ON ALL MATERIALIZED VIEWS IN SCHEMA . FROM ROLE ;
revoke SELECT ON FUTURE MATERIALIZED VIEWS IN SCHEMA . FROM ROLE ;
-- Revoke SELECT privileges for a Database
revoke SELECT ON ALL TABLES IN DATABASE FROM ROLE ;
revoke SELECT ON FUTURE TABLES IN DATABASE FROM ROLE ;
revoke SELECT ON ALL VIEWS IN DATABASE FROM ROLE ;
revoke SELECT ON FUTURE VIEWS IN DATABASE FROM ROLE ;
revoke SELECT ON ALL MATERIALIZED VIEWS IN DATABASE FROM ROLE ;
revoke SELECT ON FUTURE MATERIALIZED VIEWS IN DATABASE FROM ROLE ;
```
**CAUTION**
If one of the roles has `FUTURE GRANTS` at the database level, this role will also have `FUTURE GRANTS` on the `TEMP` schema.
## Example: Redshift
Redshift does not support OAuth2. To execute data diffs on behalf of a specific user, that user needs to provide their own credentials to Redshift.
1. Configure permissions on the Redshift side. Grant the necessary access rights to temporary tables (stored in the **Schema for temporary tables** provided in the **Basic settings** for Redshift connection):
```sql theme={null}
GRANT USAGE on SCHEMA to ;
GRANT CREATE on SCHEMA to ;
```
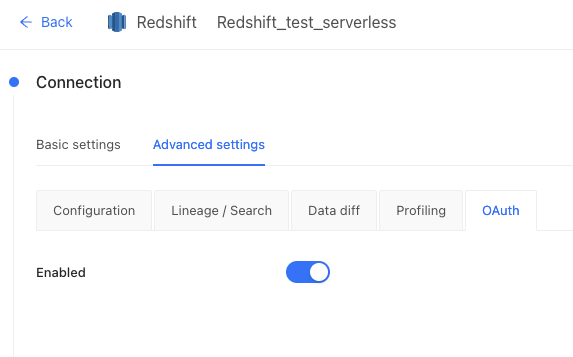
2. As an Administrator, select the **Enabled** toggle in Datafold's Redshift Data Connection **Advanced settings**:
 Then, click the **Test and Save** button.
3. As a User, add your Redshift credentials into Datafold. Click on your Datafold username to **Edit Profile**:
Then, click the **Test and Save** button.
3. As a User, add your Redshift credentials into Datafold. Click on your Datafold username to **Edit Profile**:
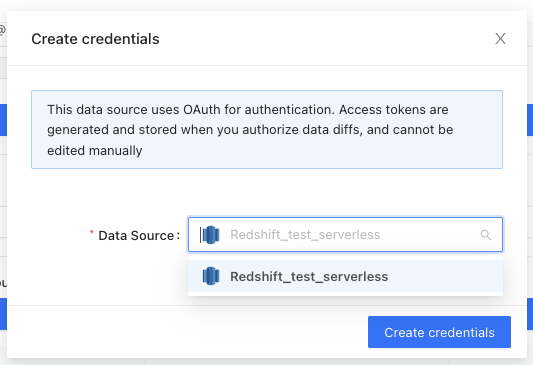
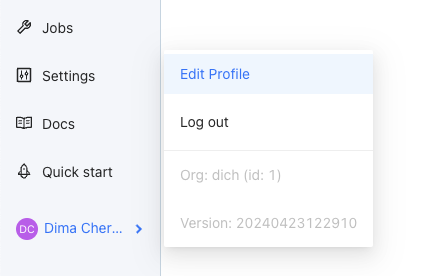 Then, click **Add credentials** and select the required Redshift data connection from the **Data Connections** list:
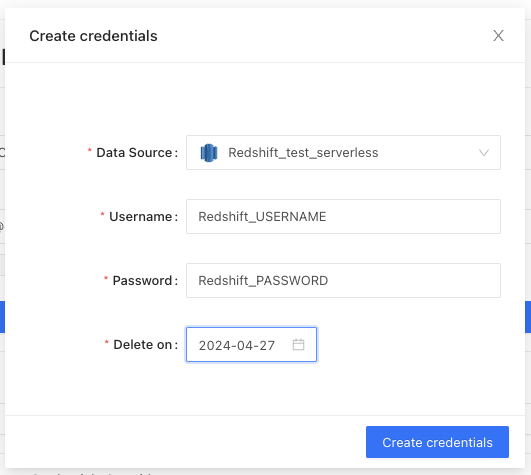
 Finally, provide your Redshift username and password, and configure the **Delete on** field (after this date, your credentials will be removed from Datafold):
 Click **Create credentials**.
## Example: BigQuery
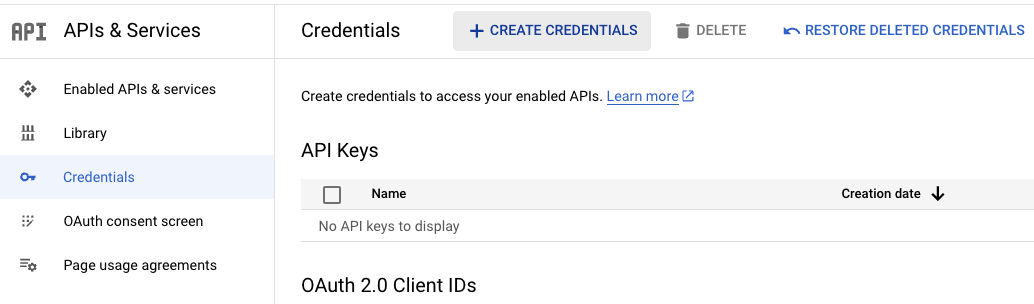
1. Create a new Google Cloud OAuth 2.0 Client ID. Go to the Google Cloud console, navigate to **APIs & Services**, then **Credentials**, and click **+ CREATE CREDENTIALS**:
Click **Create credentials**.
## Example: BigQuery
1. Create a new Google Cloud OAuth 2.0 Client ID. Go to the Google Cloud console, navigate to **APIs & Services**, then **Credentials**, and click **+ CREATE CREDENTIALS**:
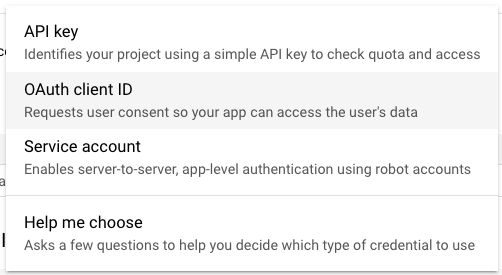
 Select **OAuth client ID**:
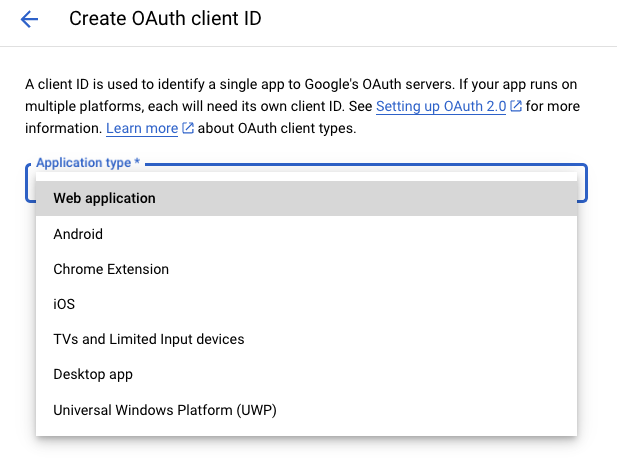
 From the list of **Application type**, select **Web application**:
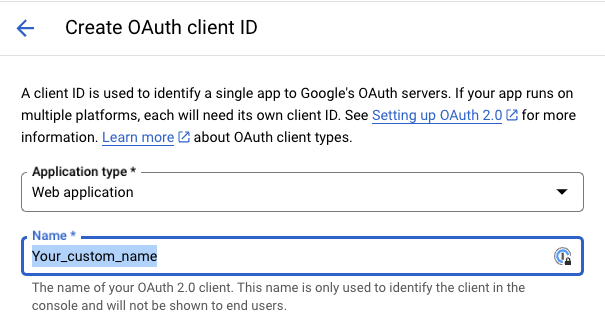
 Provide a name in the **Name** field:
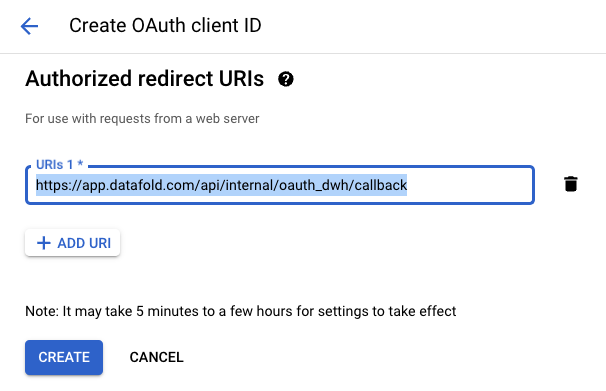
 In **Authorized redirect URIs**, provide `https://app.datafold.com/api/internal/oauth_dwh/callback`:
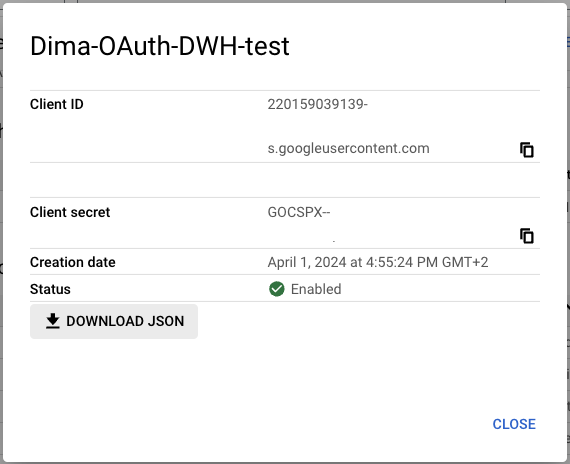
 Click **CREATE**. Then, download the OAuth Client credentials as a JSON file:

 2. Activate BigQuery OAuth in Datafold by uploading the JSON OAuth credentials in the **JSON OAuth keys file** section, in Datafold's BigQuery Data Connection **Advanced settings**:
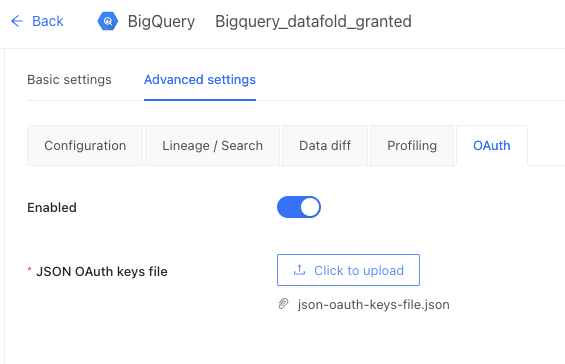 Click **Test and Save**.
### Additional steps for BigQuery
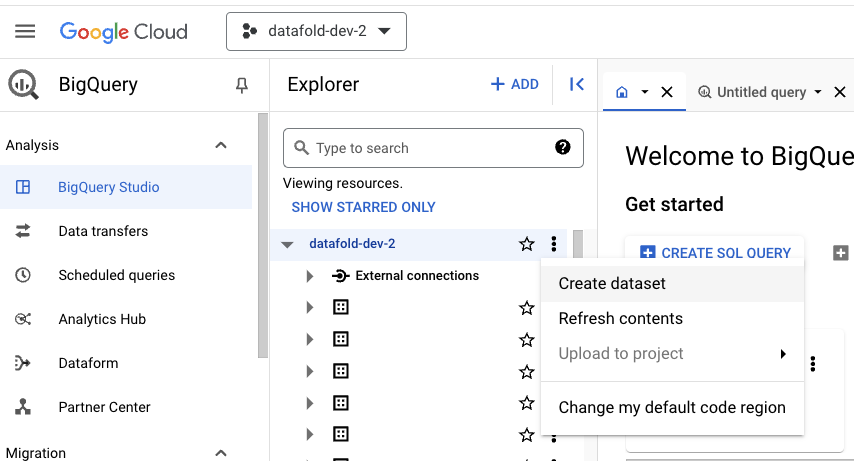
1. Create a new temporary schema (dataset) for each OAuth user.
Go to Google Cloud console, navigate to BigQuery, select your project in BigQuery, and click on **Create dataset**:
Click **Test and Save**.
### Additional steps for BigQuery
1. Create a new temporary schema (dataset) for each OAuth user.
Go to Google Cloud console, navigate to BigQuery, select your project in BigQuery, and click on **Create dataset**:
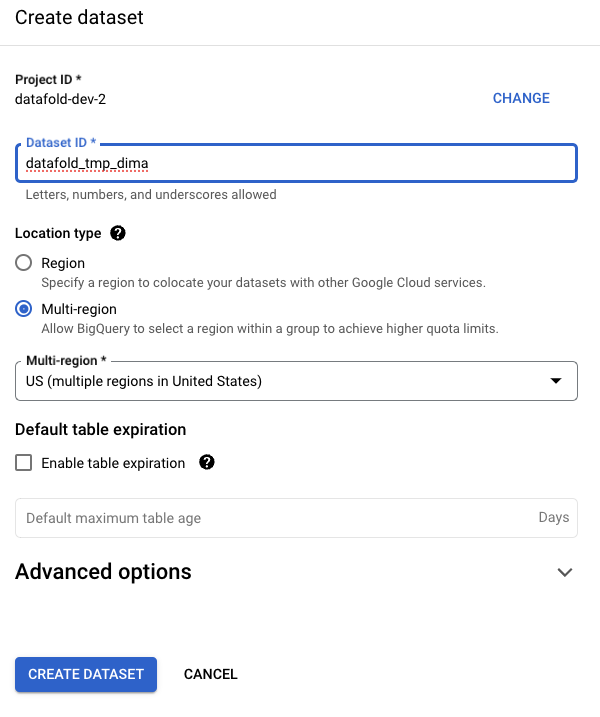
 Provide `datafold_tmp_` as the **Dataset ID** and set the same region as configured for other datasets. Click **CREATE DATASET**:
 2. Configure permissions for `datafold_tmp_`.
Grant read/write/create/delete permissions to the user for their `datafold_tmp_` schema. This can be done by granting roles like **BigQuery Data Editor** or **BigQuery Data Owner** or any custom roles with the required permissions.
Go to Google Cloud console, navigate to BigQuery, select `datafold_tmp_` dataset, and click **Manage Permissions**:
2. Configure permissions for `datafold_tmp_`.
Grant read/write/create/delete permissions to the user for their `datafold_tmp_` schema. This can be done by granting roles like **BigQuery Data Editor** or **BigQuery Data Owner** or any custom roles with the required permissions.
Go to Google Cloud console, navigate to BigQuery, select `datafold_tmp_` dataset, and click **Manage Permissions**:
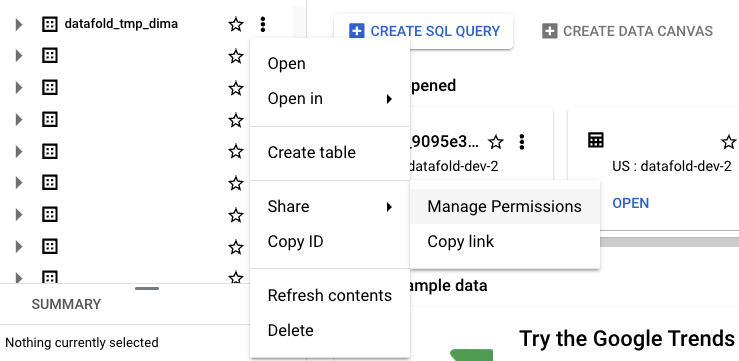 Click **+ ADD PRINCIPAL**, specify the user and role, then click **SAVE**:
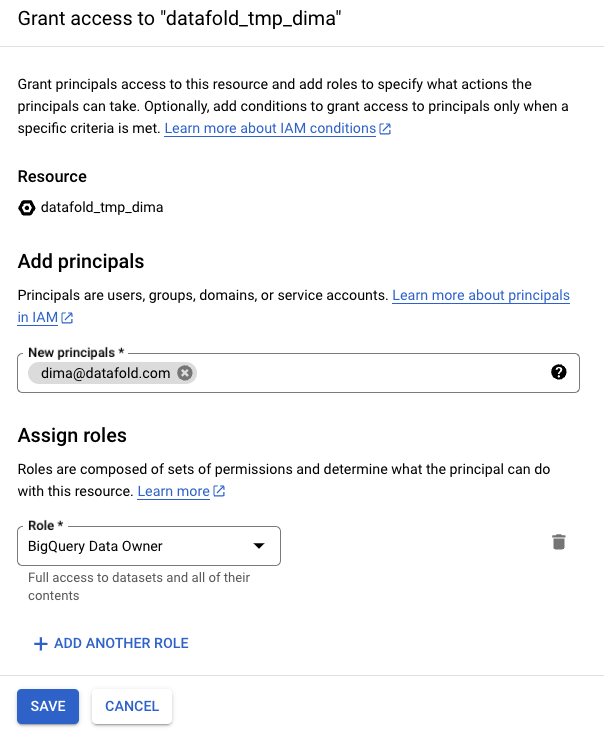 Ensure that only the specified user (excluding admins) has read/write/create/delete permissions on `datafold_tmp_`.
3. Configure temporary schema in Datafold.
As a user, navigate to `https://app.datafold.com/users/me`. If the user lacks credentials for BigQuery, click on **+ Add credentials**, select BigQuery datasource from the list, and click **Create credentials**:
Ensure that only the specified user (excluding admins) has read/write/create/delete permissions on `datafold_tmp_`.
3. Configure temporary schema in Datafold.
As a user, navigate to `https://app.datafold.com/users/me`. If the user lacks credentials for BigQuery, click on **+ Add credentials**, select BigQuery datasource from the list, and click **Create credentials**:
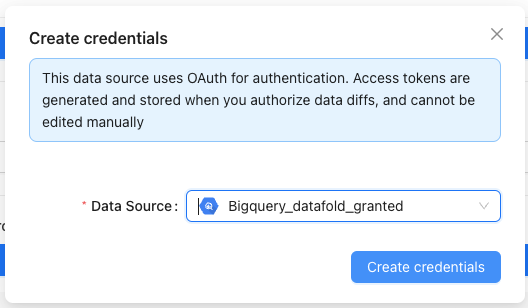 The user will be redirected to `accounts.google.com` and then returned to the previous page:
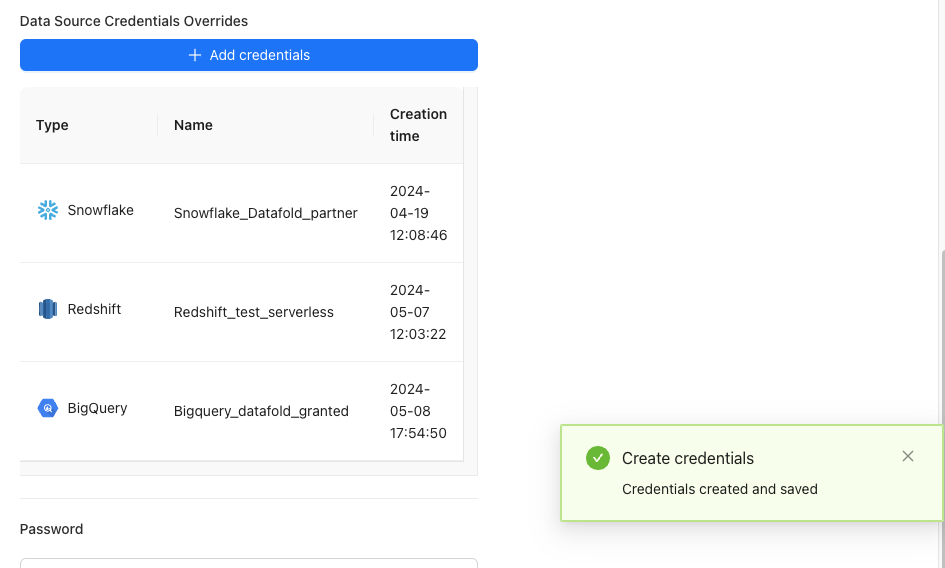 Select BigQuery credentials from the list, input the **Temporary Schema** field in the format `.>`, and click **Update**:
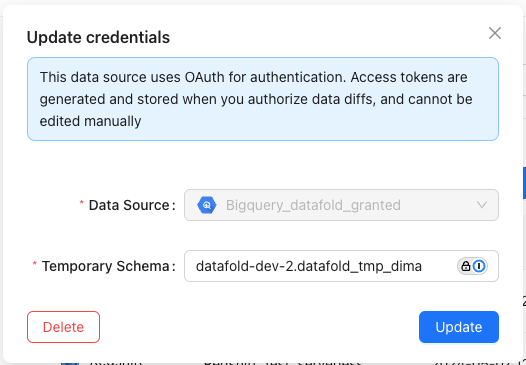 Users can update BigQuery credentials only if they have the correct permissions for ``.